Technics SHMX 1200 Service Manual
This is the 33 pages manual for Technics SHMX 1200 Service Manual.
Read or download the pdf for free. If you want to contribute, please upload pdfs to audioservicemanuals.wetransfer.com.
Extracted text from Technics SHMX 1200 Service Manual (Ocr-read)
Page 1
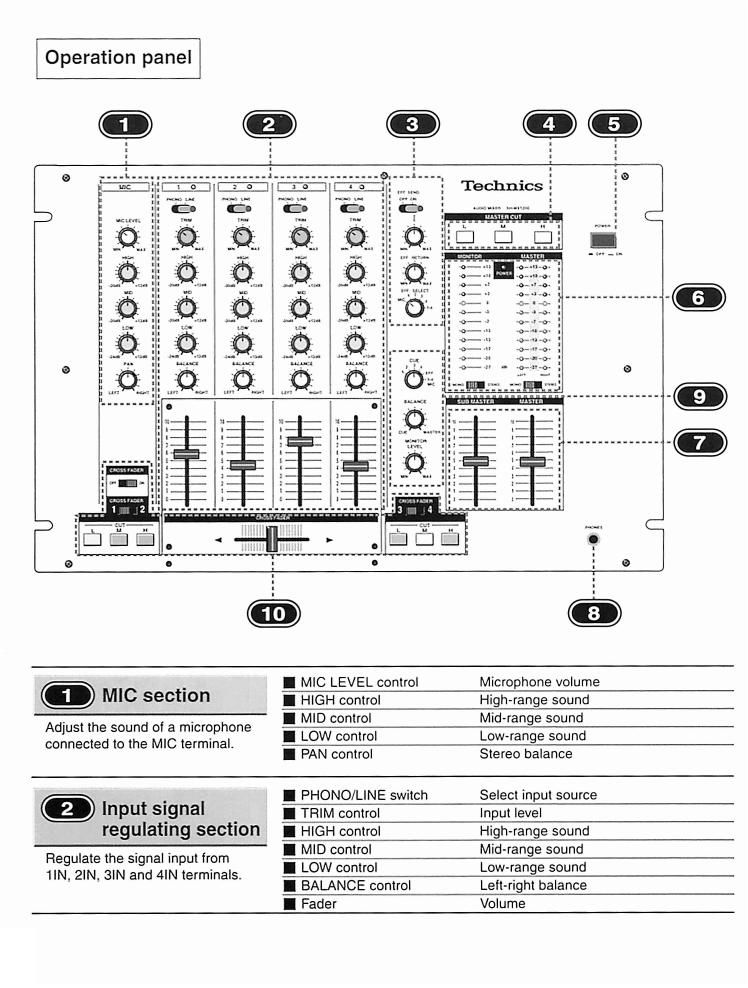
hi Operation panel
Adjust the sound of a microphone
connected to the MIC terminal.
I MIC LEVEL control
Microphone volume
I HIGH control High-range sound
I MID control Mid-range sound
I LOW control Low-range sound
I PAN control Stereo balance
Input signal
regulating section
Regulate the signal input from
1lN, 2|N, SIN and 4|N terminals.
I PHONO/LINE switch
Select input source
I TRIM control
Input level
I HIGH control
High-range sound
I MID control
Mid-range sound
I LOW control
Low-range sound
I BALANCE control
Left-right balance
I Fader
Volume
Page 2
External effector
I EFF SEND Effector output on/oli switch and output
level control
section I EFF RETURN Eltector input level control
Adjust the input/output 0 an I EFF SELECT Eltect source selector
external effector.
I H (high) High-range cut
MASTER CUT I M (mid) Mid
While the button is depressed. the
specified sound range of the
master output is cut.
- The sub-master output is also cut.
@ POWER button
Turns the audio mixer on and oil.
- The POWER indicator lights when the audio mixer is on.
@ MONITOR/MASTER
output level meter
Display of each output level
- With the MONO/STEREO switch, the output mode of each can be
selected.
MASTER]
- SUB MASTER
volume fader
Adjustment at each output level
PHONES jack
Connection jack lor monitoring headphones
Monitor section
For monitoring adjustments
I CUE Monitor source selector
- When 1, 2, 3 or 4 is selected, the corresponding indicator in the input
signal adjustment section lights.
I BALANCE control Adjustment of the volume balance
between the MASTER source and the
source selected by CUE
l MONITOR LEVEL control Headphones volume
CROSS FADER
section
Used to adjust the level balance of
the 2 input signals for the FADER.
The level balance between input signal 1 or 2 and input signal 3 0r 4 can
be adjusted with the sliding lader control.
I OFF/ON switch Fader on/oll
I 1/2 and 3/4 switches Source selection
I CUT button The specilied sound range is cut with the
respective CUT buttons beneath the 1/2
and 3/4 switches.
' Specily H to cut the high range, M lor the middle range, and L for the low
range. Once a button is pressed (the button lights), the sound is out until
the same button is pressed again (the button goes out).