Sony ws fv 10 c owners manual
This is the 2 pages manual for sony ws fv 10 c owners manual.
Read or download the pdf for free. If you want to contribute, please upload pdfs to audioservicemanuals.wetransfer.com.
Extracted text from sony ws fv 10 c owners manual (Ocr-read)
Page 1
SONXo
4-239-622-02(1)
Speaker Stand
323%?!ng
Operating Instructions
Mode d'emploi
Manual de instructiones
Manual de instrugoes
Bedienungsanleitung
Gebruiksaanwijzing
WS-FV10C
Sony Corporation © 2002 Printed in C
NEE:
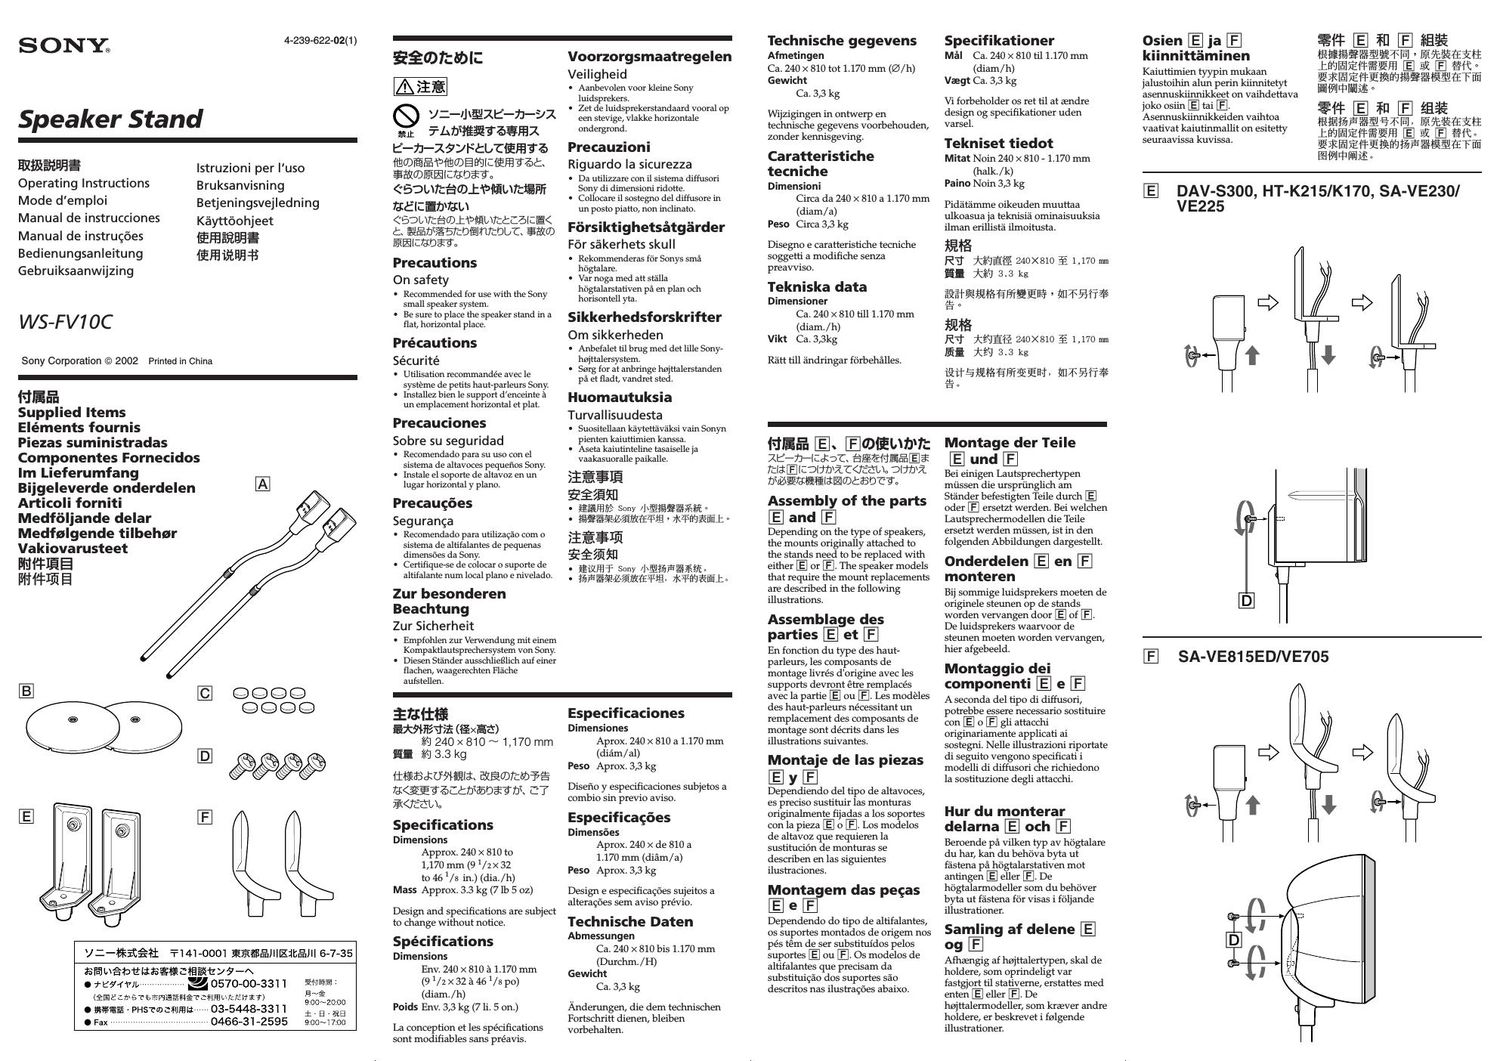
Supplied Items
Eléments fournis
Piezas suministradas
Istruzioni per luso
Bruksanvisning
Betjeningsvejledni
Kayttoohjeet
EFBEREEE
lififiiitEH-l?
hina
Componentes Fornecidos
lm Lieferumfang
Bijgeleverde onderdelen
Articoli forniti
Medfoljande delar
Medfolgende tilbehor
Vakiovarusteet
Milt-FEE
Mllilflfi E
ng
JZ-Hiiifiii $141000] ifififlfillllZillfilfilll 6-7-35
o realm/l. »
O §%$
~ PHSTflaflfifi'
fart-fimfibfiliiagfitlfigfiitya-A
:2 0570-00331 1
(fifiltlnl5Tefiwifi$flfiTtiUfiaukriwifl
- - 03-5448-331 1
0466-31-2595
amoral
fi~fi
SOONZDDD
i ' El ~ RE
800~l700
520mm:
J:-Il\§21l:°-7J-~DX
em i-Ltbilfiaéa'ofififiz
E-n-xayfitbtfizfiwa
{moneelmwanlclemaaa
$M®ifi¥llzfim§3a
("Bomrcfimitbltfimfcgfifi
HEEEDTJM
<53urceaaimawoccalce<
C fifibfiitblfllflicbbtt $310)
Elilllflbgfla
Precautions
On safety
- Recommended for use wlth the Sony
small speaker system.
- Be sure to place the speaker stand in a
flat, horizontal place.
Préca utions
S écu r i té
' Utilisation recommandée avec 1:2
systeme de petits haut-parleurs Sony
. lnstallez blen le support denceinte a
un emplacement horizontal et plat.
Precauciones
Sobre su seguridad
- Recomendado para su uso con el
slstema ole altavoces peqnenos Sony.
. lnstale el soporle ole altavoz en un
lugar horizontal y plano.
Precaucoes
Seg u ra nga
. Recomendado para utilizacao com o
slstema ole altltalantes ole pequenas
dlrnensoes da Sony.
. Certifique-se ole colocar o suporte de
altitalante num local plano e nivclado.
Zur besonderen
Beachtung
Zur Sicherheit
. Empfnhlcn Zur Verwendung nut elnem
Kompaktlautsprechersystem yon Sony
- Dlesen Stander ausschlieBlich aut elner
flachen, waagerechtcn Flache
autstellen.
Voorzorgsmaatregelen
Ve i l i g h ei d
- Aanbevolen voor klelne Sony
luldsprekers.
- Zel de luldsprekerslandaard vooral op
een stevige, vlakke horizontale
ondergrond.
Precauzioni
Rigua rdo Ia sicurezza
- Da atlhzzare con ll slstema diftusnri
Sony dl dimensioni ridotte.
- Collocarc il sostegnn del allttnsore in
un posto piatto, non inclinato.
Forsiktighetsatgarder
For sakerhets skull
- Rekomrnenderas tor Sonys sma
hogtalare.
- Var noga med att stalla
hogtalarstahyen pa en plan och
horlsontell yta.
Sikkerhedsforskrifter
Om sikkerheden
- Anhetalet til brug mea dct lille Sony-
hnittalersystem.
- Sorg for at anbringe hzjttalerstanden
pa et fladt, vandret steal.
Huomautuksia
Turvallisuudesta
- Suosltellaan kaytettavaksl vain Sonyn
pienten kaiuttimien kanssa.
- Aseta kalutlnlellne tasalselle ja
vaakasuoralle palkalle.
ease
535%]
3%]??? Sony /l\fll%§%§7fiitfc
- l§§§§§§dllfiflfflti45ifi militifliétfiflz
E§$1fi
§égfifll
' @1115! l: Sony /l\fl?%§5%§7rxffia
- §%F%§§91Z3flfil(£§iifi» Manson
Inlfli
fiififiifii (EXEZY)
lftil 240x 810 ~1,170 mm
EE FJ 3.3 kg
{rearranges ESZEODTCUJFVE
H
Specifications
Dimensions
Approx. 240 X 810 to
1,170 mm (9 1/z>< 32
to 46 1/8 in.) (dia./h)
Mass Approx. 3.3 kg (7 lb 5 oz)
Design and specifications are subject
to change without notice.
Specifications
Dimensions
Env. 240 X 810 a 1.170 mm
(91/2 x 32 a 46 1/3 po)
(diam. /h)
Poids Env. 3,3 kg (7 Ii. 5 on.)
La conception et les specifications
sont modifiables sans préavis.
Especificaciones
Dimensiones
Aprox. 240 X 810 a 1.170 mm
(diam/al)
Peso Aprox. 3,3 kg
Disefio y especificacinnes subjettys a
combio sin previo aviso.
Especificacées
Dimensfies
Aprox. 240 X de 810 a
1.170 mm (diam/a)
Peso Aprox. 3,3 kg
Design e especiticagfies sujeitos a
alteragfies sem avist) prévio.
Technische Daten
Abmessungen
Ca. 240 X 810 bis 1.170 mm
(Durchm./H)
Gewicht
Ca. 3,3 kg
Anderungen, die dem technischen
Fortschritt dienen, bleiben
vorbehalten.
Technische gegevens
Afmetingen
Ca. 240 X 810 tot 1.170 mm (z/h)
Gewicht
Ca. 3,3 kg
Wijzigingen in ontwerp en
technische gegevens voorbehouden,
zonder kennisgeving.
Caratteristiche
tecniche
Dimensioni
Circa da 240 X 810 a 1.170 mm
(diam/a)
Peso Circa 3,3 kg
Disegno e caratteristiche tecniche
soggetti a modifiche senza
preavviso.
Tekniska data
Dimensioner
Ca. 240 X 810 till 1.170 mm
(diam. /h)
Vikt Ca. 3,3kg
Ratt till andringar forbehalles.
Specifi kationer
Mal Ca. 240 X 810 til 1.170 mm
(diam/h)
Vegt Ca. 3,3 kg
Vi forbeholder os ret til at aendre
design 0g specifikatinner uden
varsel.
Tekniset tiedot
Mitat Noin 240 X 810 71.170 mm
(halk. /k)
Paino Noin 3,3 kg
Fidatarrune (likeuden muuttaa
ulkoasua ja teknisia' Ominaisuuksia
ilman erillista' ilrnoitusta.
RU MJlfifié 240x810 £1,170 m
g; 7%] 3.3 kg
igétfiéfilfififififiEflvr W$%tf%
u
ffllfi
RTJ' téflfiié 240><810 55 l,170 mm
Iii kéq 3.3 kg
EiriifllfifififiQEHi flfl$%/?$
NEE: Eh IOlEUTJTt
xe-n-lzrtatt erranlarrafia
l:3ljbi€
Assembly of the parts
IE and
Depending on the type of speakers,
the mounts originally attached to
the stands need to be replaced with
either El or I. The speaker models
that require the mount replacements
are described in the following
illustrations.
Assemblage des
parties [El et
En function du type des hautr
parleurs, les composants de
montage livrés d'origine avec les
supports devront etre remplacés
avec la partie Les modeles
des hautrparleurs nécessltant un
remplacement des composants de
montage sont decrits dans les
illustrations suivantes.
Mont je de Ias piezas
Ev
Dependiendo del tipo de altavoces,
es precise sustituir las monturas
originalmente fijadas a los soportes
con la pieza [E] o I. Los modelos
de altavoz que requieren la
sustitucir'ln de monturas se
describen en las siguientes
ilustraciones.
Montagem das pecas
Eel
Dependendo do tipo de altitalantes,
os suportes montadus de origem nos
pés tém de ser stituidos pelos
suportes IE] nu Os modelos de
altitalantes que precisam da
substituigao dos suportes sat)
descritos nas ilustragfies abaixo.
Montage der Teile
IE und
Bei einigen Lautsprechertypen
mussen die ursprunglich am
stander betestigten Teile durch El
nder ersetzt werden. Bei welchen
Lautsprechermudellen die Teile
ersetzt werden mussen, ist in den
folgenden Abbildungen dargestellt.
Onderdelen [El en
monteren
Bij sommige luidsprekers moeten de
originele steunen op de stands
Worden vervangen door E of I.
De luidsprekers waarvoor de
steunen moeten Worden vervangen,
hier afgebeeld.
Montaggio dei
componenti IEI e
A seconda del tipo di diffusori,
potrebbe essere necessario sostituire
cnn gli attacchi
originariamente applicati ai
sostegni. Nelle illustrazioni riportate
di seguito vengono specificati i
modelli di dittusori che richiedono
la sostituzinne degli attacchi.
Hur du monterar
delarna IE och
Beroende pa vilken typ av hogtalare
du har, kan du behova byta ut
fastena pa hogtalarstativen mot
antingen IE eller .
hiigtalarmodeller som du behover
byta ut fastena for visas i foljande
illustrationer.
Samling af delene E]
09
Aflwaengig at hnjttalertypen, skal de
holdere, som oprindeligt var
fastgiort til stativerne, erstattes med
enten lEl eller I. De
hnjttalermodeller, som kraever andre
holdere, er beskrevet i tolgende
illustrationer.
Osien IE] ja
kiinnittia'minen
Kaiuttimien tyypin mukaan
jalustoihin alun perin kiinnitetyt
asennuskiinnikkeet on vaihdettava
joko tysiin [E tai .
Asennuskiinnikkeiden vaihtoa
vaativat kaiutinrnallit on esitetty
seuraavissa kuvissa.
Eli? E *1] tfiifi
laeeeaenm , nearest:
mael'raarfi E 212 any:
amenameeaeea Mai
annexe
31¢ [E in 23%
mamaaeann a sea
maenaan El 2 Etta
aiaanaemaaaeearn
lifilWlfiEfi»
E DAV-S300, HT-K215IK170, SA-VE230/
VE225
SA-VE815EDNE705
Page 2
flair
(D 7w|~ (I) Es-1 (I) (DIEICFJED. 157JFI \"47
(I) Es-XOJNCIEILA Eiiwfibi'flobb
tAn'CQEau.
® XSVFIW?®EEE§EEE?6 (720 mm ~
1,080 mm)u
© XE-t-ZI-FE N-XOJ'FDBEEUJRfGE
3'.
(D *9" (IEI) EXE-t-Efifiilcmfieitbobbt
Elia?»
twig
Xliijjilléivct SEEHEEEdeEIICDUDiC<
ream.
Assembly
(D Attach the foot pads (I) to the bottom of the
base (I), then screw the pipe stand fully (I) into the
hole in the base.
® Adjust the pipe stand to a height of 720 mm (28 3la in.)
to 1,080 mm (42 5/3 in.).
© Pass the speaker cord into the hole under the base and
out from the hole in the mount.
(9 Tightly secure the speaker to the mount with the screw
(@L
Note
Depending on the type of speakers, the mounts originall
attached to the stands need to be replaced with either Elyor
Montage
(D Fixez les tampons (I) sous la base (I), puis vissez
entiérement le tube socle (I) dans le trou de la base.
® Ajustez le tube socle a une hauteur de 720 mm
(28 3la po) a 1.080 mm (42 5/8 pa).
© Faites passer le cordon denceinte dans le trou sous la
base at ressortir par le trou de la monture.
® Fixez solidement l'enceinte a la monture avec la vis
(@L
Remarque
En function du type des hautiparleurs, les composants de
montage livrés d'origine avec les supports devront etre
remplacés avec la partie E ou
Armado
(D Coloque las almohadillas (I) en la parte inferior de la
base (I) y, a continuacién ajuste firmemente el tubo
de soporte (I) en el orificio de la base.
® Ajuste el tubo de soporte a una altura de 720 mm a
1.080 mm.
© Pase el cable de altavoz por el orificio por debajo de la
base y saque por el orificio en la montura.
(D Fije firmemente el altavoz a la montura con el tornillo
(@L
Nata
Dependiendo del tipo de altavoces, es preciso sustituir las
monturas originalmente fijadas a las soportes con la pieza (E
o I.
Montagem
(D Coloque os apoios (I) na parte inferior da base (I).
e depois aparafuse bem o tubo de suporte (I) no
orificio da base.
® Ajuste o tubo de suporte a uma altura entre 720 mm e
1.080 mm.
© Passe o cabo do altifalante por dentro do buraco sob a
base, fazendo-o sair pelo buraco do suporte.
® Fixe bem o altifalante a base com o parafuso (IE1).
Nata
Dependendo do tipty de altifalantes, suportes montadtys de
origem nos pés tém de ser substituidos pelos suportes E ou
I.
Zusammenbauen
6) Die Fquolster (I) an der Unterseite des FuBes (I)
anbringen, dann den Rohrstander ganz (I) in die
Bohrung im FuB hineinschrauben.
® Den Rohrstéinder auf eine Hohe zwischen 720 und
1.080 mm einstellen.
© Das Lautsprecherkabel von unten durch den FuB
fiihren, so daB es oben aus dem Rohrstander wieder
austritt.
® Den Lautsprecher mit der Schraube (E1) test an die
Montageplatte anschrauben.
Hinweis
Bei einigen Lautsprechertypen mussen die ursprunglich am
Stander befestigten Teile durch E oder Iersetzt werden.
Monteren
G) Bevestig de voetkussentjes (I) onderaan de sokkel
(I) en schroef vervolgens de stang (I) volledig in
het gat in de sokkel.
© Verstel de staander op de gewenste hoogte, van
720 mm tot 1.080 mm.
C3) Leid het luidsprekersnoer door de opening onderin de
grondplaat, door de staander heen de luidsprekersteun
uit.
(D Bevestig de luidspreker goed op de steun met behulp
van de schroef (El).
0pmerking
Bij sommige luidsprekers mtyeten de ori inele steunen op de
stands Worden vervangen door E] of
Complesso
(DApplicare i piedini antiscivolo (I) nella parte inferiore
della base (I), quindi awitare completamente i|
supporto tubolare (I) nel foro della base.
® Regolare il supporto tubolare ad unaltezza da 720 mm
a 1.080 mm.
© Far passare il cavo del diflusore nel foro sotto la base e
fuori dal foro nella base di supporto.
® Fissare saldamente il diffusore al supporto mediante la
vita (@L
Nota
A seconda del ti 0 di 'ffusori, potrebbe essere necessario
sostituire con EDD li attacchi originariamente applicati ai
sostegni.
Montering
(D Fast fotdynorna (I) p5 bottenplattans undersida (I)
och skruva sedan ned roret ( i halet i bottenplattan
sé att det sitter fast ordentligt.
C2) Stall in rorstativets hiijd pa mellan 720 och 1.080 mm.
© Dra hogtalarkabeln genom halet under bottenplattan
och ut genom halet i monteringsfastet.
® Skruva fast hogtalaren ordentligt i monteringsplattan
(IE)-
OBS!
Beroende p51 vilken typ av hiigtalare du har, kan du behova
byta ut tastena pa htigtalarstativen mot antingen (El eller I.
Montering
6) Sat beskyttelsespuderne (I) pa undersiden at basen
(I), 09 skru derefter standerroret (I) helt ind i
hullet i basen.
C2) lndstil standermret til en hnjde af 720 mm til
1.080 mm.
C3) Stik hnjttalerkablet ind i hullet under basen og ud
gennem hullet pa undersiden.
® Fastgor hojttaleren til beslaget ved hjaelp at skruen
(IE)-
Bemaark
Afhaengig af hnjttalertypen, skal de holdere, som oprindeligt
var fastgjort t'il stativerne, erstattes med enten [E] eller I.
Kokoaminen
G) Kiinnita pehmustetyynyt (I) jalustan pohjaan (I) ja
kierra jalustaputki sitten taydellisesti (I) jalustassa
olevaan reikaan.
® Sééida putkituen korkeudeksi 720 mm - 1.080 mm.
@ Kuljeta kaiutinjohto alustan alla olevan reiéin lapi ja
ulos asennustelineen reiasta.
® Kiinnita kaiutin pitava'sti jalustaan ruuvilla (E1).
Huomautus
Kaiuttimien tyypin mukaan jalustoihin alun perin kiinnitetyt
asennuskiinnikkeet on vaihdettava joko osiin E tai I.
(BE
@ifirlfilfl (I) EEEEE (I) Efififififiéfiéfl (I)
fififiAEEJZHMLPSI °
®fi§§llfi§¥§lfl§|l 720 nm 5 1,080 nrn WEE 0
©figgifigfigifi23'lzfifl'fihfi'fiEEEEV-FJZEMLER
Hg, 0
@Ffifiifit (El) fig§$$fiflflfilfifilfil¢t °
tfiflfitgfififlififlfi fifififiifitflfilfiilét¥§ffi El 2J2
éfi .
23%
@lfiflfllfi ( ) flfiEEEE ( ) Ffi'fiflfififilfiéfi
( ) Siél?)\§P£J:EJ¥LW .
@lfififiiéfiifliiu 720 nm 5 1,080 nrn WEE.
© lfilfifi€§§§£§fl§¥Tfifiq¥LfifiEfiééfitfilflfl
if, a
@lfiflgfi ( IE ) fitfifiéEEEfllElET-Elfifii»
tawzaseem) fi%%f£i&ififllfililt%§fifi El 32
Etta
EEEitQJEEE§
§§§5E3§nt 9971 713%. )éfiUUEb \5?L)%>%ll197l<78
E<fi3fl3§t WICEQ. Qaiflfiblfiéitblafibifl'a
Note on placement
Use caution when placing the stand on a specially treated
(waxed, oiled, polished, etc.) floor, as staining 0r discoloration
may result.
Remarque sur l'installation
lrenez les precautions ne'cessaires lors de l'installation du
support sur un plancher traité (cire, huile', verni, etc.) pour
éviter l'apparition de taches ou la décnloration du sol.
Nota acerca de la ubicacién
Tenga cuidado si coloca el soporte en suelos t'ratados de
manera especial (encerados, barnizados con aceites, pulidos,
etc.), ya que es posible que aparezcan manchas o se
descoloren.
Nota sobre a colocagéo
Tenha cuidado ao colocar o suporte numa superficie com
tratamento especial (encerada, oleada, polida, etc.) porque
pode manchaila nu descoloraila.
Hinweis zur Aufstellung
Seien Sie vorsichtig, wenn Sie den stander auf einen
besonders behandelten FuBboden (gewachst, geiilt, poliert
usw.) stellen, da es zu Flecken oder Verfarbungen kommen
kann.
0pmerking over plaatsen
Ga voorzichtig te werk wanneer u de staander op een speciaal
behandelde vlner (met was of olie behandeld, gepolijst,
enzovoort) plaatst, anders kunnen vlekken of Verkleuringen
optreden.
Nota sulla collocazione
Se il sostegno viene collocato su un pavimento trattato con
prodntti speciali, quali cera, olio o lucidanti, prestare
attenzione onde evitare macchie o perdita di colore.
Placeri ng
Var forsiktig nar du placerar hogtalarstativet pa ett
ytbehandlat golv (vaxat, oljat, polerat eller liknande) ettersom
htigtalarstativet kan orsaka fl5ckar eller missfa'rgningar.
Bemarkning om placering
Vzer torsigtig, nar stativet anbringes pa et specialbehandlet
gulv (vokset, olieret, poleret t)sv.), da det kan medftare pletter
eller mistarvning.
Jalustan sijoittamista koskeva
huomautus
Ole varovainen, jos sijoitat jalustan erikoiskéisitellylle
(esimerkiksi vahatulle, kiillntetulle tai ('Sljytylle) lattialle, koska
talléiin voi syntya tahroja tai varjaytymia.
WEE§$E
eeieoae>eoee<flaxee\e%e>oeute
oeeeameaeevameea»
MEE§$W
efiaemaeoeeoe
aeeeaeeaee,ameeaw