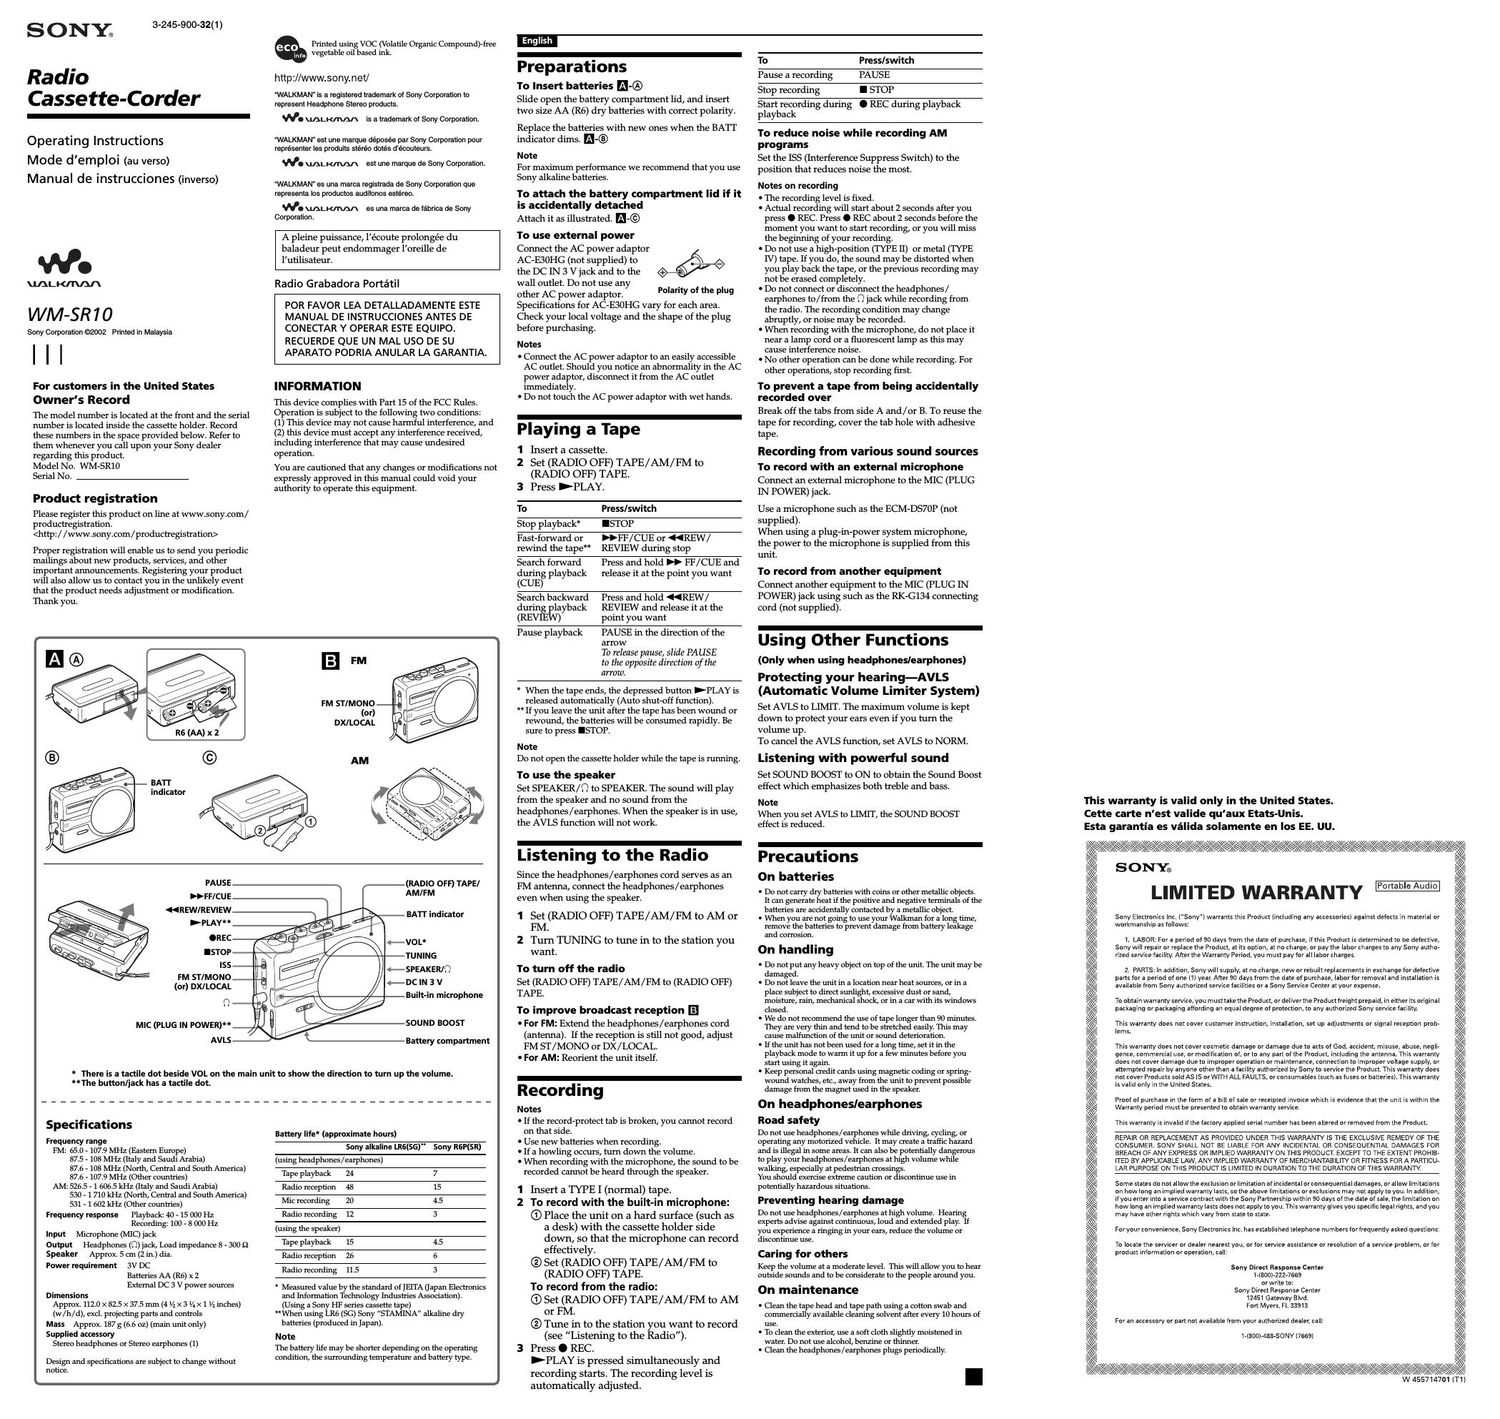
Sony wm sr 10 owners manual
This is the 2 pages manual for sony wm sr 10 owners manual.
Read or download the pdf for free. If you want to contribute, please upload pdfs to audioservicemanuals.wetransfer.com.
Extracted text from sony wm sr 10 owners manual (Ocr-read)
Page 1
3-245-900-32(1)
SONE
Radio
Cassette-Carder
Operating Instructions
Mode demploi (au verso)
Manual de instrucciones (inverso)
W
/3me
WM-SR10
Sony Corporation @2002 Printed in Malaysia
For customers in the United States
Owner's Record
The model number is located at the front and the serial
number is located inside the cassette holder. Record
these numbers in the space provided below. Refer to
them whenever you call upon your Sony dealer
regarding this product.
Model No. WM-SRI 0
Serial No.
Product registration
Please register this product on line at www.sony.com/
productregistration.
Proper registration will enable us to send you periodic
mailings about new products, services, and other
important announcements. Registering your product
will also allow us to contact you in the unlikely event
that the product needs adjustment or modification.
Thank you.
Printed using voc (Volatile Organic Compoundfl'ree
vegetable oil based ink.
http://www.sony.net/
WALKMAN" is a registered trademark or Sony Corporation to
represent Headphone Stereo products.
W \IALKIMA is a trademark of Sony Corporation.
WALKMAN est une marque deposée par Sony Corporation pour
representer les produits stereo dotés d'écouteurs.
W \IALWA est une marque de Sony Corporation.
WALKMAN es una marca registrada de Sony Corporation que
representa los productos audifonos este'reo.
W \mLK/An es una marca de fabrtca de Sony
Corporation.
A pleine puissance, lécoute prolongée du
baladeur peut endommager I'oreille de
I'utilisateur.
Radio Grabadora Portatil
POR FAVOR LEA DETALLADAMENTE ESTE
MANUAL DE INSTRUCCIONES ANTES DE
CONECTAR Y OPERAR ESTE EQUIPO.
RECUERDE QUE UN MAL USO DE SU
APARATO PODRIA ANULAR LA GARANTIAi
INFORMATION
This device complies with Part 15 of the FCC Rules.
Operation is subject to the following two conditions:
(1) This device may not cause harmful interference, and
(2) this device must accept any interference received,
including interference that may cause undesired
operation.
You are cautioned that any changes or modifications not
expressly approved in this manual could void your
authority to operate this equipment.
R6 (AA)x 2
BA'I'I'
indicator
EFM
FM STIMONO
(or)
DX/LOCAL
PAUSE
»FF/CUE
«REWIREVIEW
>PLAY
ISS
FM STIMONO
(or) DXILOCAL
MIC (PLUG IN POWER)
AVLS
The button/jack has a tactile dot.
Specifications
Frequency range
FM: 65.0 a 107.9 MHZ (Eastern Europe)
87.5 a 108 MHz (Italy and Saudi Arabia)
87.6 a 108 MHz (North, Central and South America)
87.6 . 107.9 MHz (Other countries)
AM: 526.5 a 1 606 5 kHz (Italy and Saudi Arabia)
530 a I 710 kHz (North, Central and South America)
531 . 1 602 kHz (Other countries)
Frequency response Playback: 40 a 15 000 Hz
Recording: 100 a 8 000 Hz
Input Microphone (MIC) jack
Output Headphones (n) jack, Load impedance ti . 300 9
Speaker Approx. 5 cm (2 in.) dia
Power requirement 3V DC
Batteries AA (R6) x 2
External DC 3 V power sources
Dimensions
Approx. 1120 X 82.5 X 37.5 mm (4 V: X 3 Vi X 1 V2 inches)
(w/h/d), excl. prolecting parts and controls
Mass Approx. 187 g (5.6 oz) (main unit only)
Supplied accessory
Stereo headphones or Stereo earphones (1)
Design and specifications are subject to change without
notice.
(RADIO OFF) TAPE]
AMIFM
BATT indicator
4-SPEAKER/Q
1-DC IN 3 V
Built-in microphone
SOUND BOOST
/Battery compartment
* There is a tactile dot beside VOL on the main unit to show the direction to turn up the volume.
Battery life (approximate hours)
Sony alka e LR6(SG) Sony R6P(SR)
(using headphones /earphones)
Tape playback 24 7
Radio reception 48 15
Mic recording 20 4.5
Radio recording 12 3
(using the speaker)
Tape playback 15 4.5
Radio reception 26 6
Radio recording 11.5 3
r Measured value by the standard of IEITA (Japan Electronics
and Information Technology industries Association).
(Using a Sony l-lF series cassette tape)
** When using LR6 (5G) Sony STAMJNA alkaline dry
batteries (produced in Japan).
Note
The battery lite may be shorter depending on the operating
condition, the surrounding temperature and battery type.
Preparations
To Insert batteries --®
Slide open the battery compartment lid, and insert
two size AA (R6) dry batteries with correct polarity.
Replace the batteries with new ones when the BATT
indicator dims.
Note
For maximum performance we recommend that you use
Sony alkaline batteries.
To attach the battery compartment lid if it
is accidentally detached
Attach it as illustrated. l©
To use external power
Connect the AC power adaptor
AC7E30HG (not su lied) to o
the DC IN 3 v jackii'id to the M
wall outlet. Do not use any
other AC power adaptor.
Specifications for ACAESOHG vary for each area.
Check your local voltage and the shape of the plug
before purchasing.
Polarity of the plug
Notes
I Connect the AC power adaptor to an easily accessible
AC outlet. Should you notice an abnormality in the AC
power adaptor, disconnect it from the AC outlet
immediately.
I Do not touch the AC power adaptor with wet hands.
Playing a Tape
1 Insertacassette.
2 Set (RADIO OFF) TAPE/AM/FM to
(RADIO OFF) TAPE.
3 Press FPLAY.
To Press/switch
Stop playback" ISTOP
Fastcforward or »FF / CUE or «REW /
rewind the tape REVIEW during stop
Search forward Press and hold » FF / CUE and
during playback release it at the point you want
(C UE)
Search backward Press and hold «REW/
during playback REVIEW and release it at the
(REVIEW) point you want
Pause playback PAUSE in the direction of the
arrow
To release pause, slide PAUSE
to the opposite direction ofthe
arrow.
* When the tape ends, the depressed button >PLAY is
released automatically (Auto shut-off function).
** If you leave the unit after the tape has been wound or
rewound, the batteries will be consumed rapidly. Be
sure to press ISTOI.
Note
Do not open the cassette holder while the tape is running.
To use the speaker
Set SPEAKER/O to SPEAKER. The sound will play
from the speaker and no sound from the
headphones/ earphones. When the speaker is in use,
the AVLS function will not work.
Listening to the Radio
Since the headphones/ earphones cord serves as an
FM antenna, connect the headphones/ earphones
even when using the speaker.
1 Set (RADIO OFF) TAPE/AM/FM to AM or
FM.
2 Turn TUNING to ttlne in to the Station you
want
To turn off the radio
Set (RADIO OFF) TAPE/AM/FM to (RADIO OFF)
TAPE.
To improve broadcast reception E]
I For FM: Extend the headphones/ earphones cord
(antenna). If the reception is still not good, adjust
FM ST/MONO or DX/LOCAL.
I For AM: Reorient the unit itself.
Recording
Notes
I If the record-protect tab is broken, you cannot record
on that side.
I Use new batteries when recording.
I If a howling occurs, tum down the volume.
I When recording with the microphone, the sound to be
recorded cannot be heard through the speaker.
1 Insert a TYPE I (normal) tape.
2 To record with the built-in microphone:
(D Place the unit on a hard surface (such as
a desk) with the cassette holder side
down, so that the microphone can record
effectively
(9 Set (RADIO OFF) TAPE / AM /FM to
(RADIO OFF) TAPE.
To record from the radio:
6) Set (RADIO OFF) TAPE / AM/ FM to AM
or FMI
© Time in to the station you want to record
(see "Listening to the Radio).
3 Press O REC.
FPLAY is pressed simultaneously and
recording starts The recording level is
automatically adjusted.
To Press/switch
Pause a recording PAUSE
I STOP
Start recording during . REC during playback
playback
Stop recording
To reduce noise while recording AM
programs
Set the ISS (interference Suppress Switch) to the
position that reduces noise the most.
Notes on recording
I The recording level is fixed.
I Actual recording will start about 2 seconds after you
press 0 REC. Press 0 REC about 2 seconds before the
moment you want to start recording, or you will miss
the beginning of your recording.
I Do not use a high-position (TYPE 11) or metal (TYPE
IV) tape. If you do, the sound may be distorted when
you play back the tape, or the previous recording may
not be erased completely.
I Do not connect or disconnect the headphones/
earphones to/ from the 0 jack while recording from
the radio. The recording condition may change
abruptly, or noise may be recorded.
I When recording with the microphone, do not place it
near a lamp cord or a fluorescent lamp as this may
cause interference noise.
I No other operation can be done while recording. For
other operations, stop recording first.
To prevent a tape from being accidentally
recorded over
Break off the tabs from side A and/ or B. To reuse the
tape for recording, cover the tab hole with adhesive
tape.
Recording from various sound sources
To record with an external microphone
Connect an external microphone to the MIC (PLUG
IN POWER) jack.
Use a microphone such as the ECMaDS7OP (not
Supplied).
When using a plugsinapower System microphone,
the power to the microphone is supplied from this
unit.
To record from another equipment
Connect another equipment to the MIC (PLUG IN
POWER) jack using such as the RKaGISII connecting
cord (not supplied).
Using Other Functions
(Only when using headphoneslearphones)
Protecting your hearing-AVLS
(Automatic Volume Limiter System)
Set AVLS to LIMIT. The maximum volume is kept
down to protect your ears even if you turn the
volume up.
To cancel the AVLS function, set AVLS to NORM.
Listening with powerful sound
Set SOUND BOOST to ON to obtain the Sound Boost
effect which emphasizes both treble and bass.
Note
When you set AVLS to LIMIT, the SOUND BOOST
effect is reduced.
-
Precautions
On batteries
- Do not carry dry batteries with coins or other metallic objects.
It can generate heat it the positive and negative terminals of the
batteries are accidentally contacted by a metallic object.
- When you are not going to use your Walkman for a long time,
remove the batteries to prevent damage trom battery leakage
and corrosion
On handling
- Do not put any heavy object on top or the unit. The unit may be
damaged.
- Do not leave the unit in a location near heat Sources, or in a
place subject to duect sunlight, excessive dust or sand,
moisture, rain, mechanical shock, or in a car with its Windows
closed.
- We do not recommend the use of tape longer than 90 minutes.
They are very thin and tend to be stretched easily. This may
cause maltimction ot the unit or sound deterioration.
- It the unit has not been used tor a long time, set it in the
playback mode to warm it up for a few minutes before you
start using it again.
- Keep personal credit cards using magnetic coding or spring
wound watches, etc., away trom the unit to prevent possible
damage trom the magnet used in the speaker.
On headphones/earphones
Road safety
Do not use headphones /earphones while driving, cycling, or
operating any motorized vehicle. It may create a traffic hazard
and is illegal in some areas. It can also be potentially dangerous
to play your headphones/earphones at high volume while
wauong, especially at pedestrian crossings.
You should exercise extreme caution or discontinue use in
potentially hazardous situations.
Preventing hearing damage
Do not use headphones /earphones at high volume. l-Iearing
experts advise against continuous, loud and extended play. It
you experience a ringing in your ears, reduce the volume or
discontinue use.
Caring for others
Keep the volume at a moderate level. This will auow you to hear
outside sounds and to be considerate to the people around you.
On maintenance
- Clean the tape head and tape path using a cotton swab and
commerciauy available cleaning solvent atter every 10 hours of
use.
- To clean the exterior, use a soft cloth slightly moistened in
water. Do not use alcohol, benzine or thinner.
- Clean the headphones /earphones plugs periodically.
This warranty is va id only in the United States.
Cette carte n'est val de qu'aux Etats-Unis.
Esta garantia es va
5? #3..
5a
- c
a solamente en los EE. UU.
LIMITED WARRANTY
Portable Audio
Sony Elsctronrcs lnc. ("Sony) warrants this Product (including any accessones) against detects in matenal or
workmanship as rollows
1. LABOR: For a period of 90 days from the date of purchase, if this Product is determined to be defective,
Sony will repalr or replace the Product, at its opilon, at no charge, or pay the labor charges to any Sony anther
r'lzed service facility Aflerthe Warranty Period, you must pay for all labol charges
2. PARTS: in addrtron. Sony will supply, at no charge, new or rehurlt replacements In exchange ror dereotrve
parts tor a period orone ill year. Arter so days irom the date or purchase, laborfor removal and lnstallatlon is
available from Sony authorized scrvrce lacrlitles or a Sony Servlce Center at your expense.
To obtain warranty service, you rnusitake the Product, ordellverthe Produottrelght prepald, ln elther rts orlgrnal
packaglng or packaglng attordrng an equal degree or protection, to any authorlzed Sony servlce racllrty.
This warranty does not cover customer instruction, installation, set up adjustments or Signal reception prob
lems.
This warranty does not cover cosmetic damage or damage due to acts or God, accident, misuse, abuse, neglr:
gence, commercial use, or modification or, arm any part or the Product including the antenna. This warranty
does not coverdamage due to improperoperatlon or maintenance, connection to improper voltage supply, or
attempted repair by anyone other than a faclllry allthorlzed by Sony to service the Product This warranty does
not cover Products sold As is or WITH ALL FAULTS, or Consumables (such as iuses or banerresl. Thls warranty
is valid only in the United States
Prooi or purchase ln the term at a blll or sale or receipred invoice which ls eyldence that the unlt ls Wlthin the
Warranty period must be presented to obtaln warranty servlce.
This warranty is invalid lithe factory applied serlal number has been altered or removed from the Product.
REPAIR OR REPLACEMENT AS PROVlDED UNDER THlS WARRANTV IS THE EXCLUSlVE REMEDY OF THE
CONSUMER SONY SHALL NOT BE LIABLE FOR ANY lNCIDENTAL OR CONSEQUENTIAL DAMAGES FOR
BREACH OF ANY EXPRESS OR IMPLIED WARRANTV ON THIS PRODUCT EXCEPT TO THE EXTENT PROHlBe
ITED BY APPLICABLE LAW, ANV lMPLlED WARRANTV OF MERCHANTABlLlTv OR FITNESS FOR A PARTICUV
LAR PURPOSE ON THIS PRODUCT Is LlMlTED IN DURATlON TO THE DURATION OF THIS WARRANTV
Some states do notallowthe exclusion or llmltatron olincldental or consequential damages, or allow limitations
on how long an implied warranty lasts, so the above llmltatluns or exclusions may not apply to you ln additlon,
Ifyou enter lnto a servlce contractwrth the Sony Partnership wrthrn on days orthe date orsale, the llmltatlon on
how long an implied warranty lasts does not apply to you. Thlswarranty glves you speorrlc legal nghts, and you
may have other rights which vary from state to state.
Pot your convenience, Sony Electronlcs Inc. has established telephone numbers tor frequently asked questions:
To locate the servicer ordeslsr nearest you, orror service assistance or resolution or a servrce problem, or tor
product intormation or operation. call.
Sony Direct Response Center
iisoorzzzeissa
or write to:
Sony Direct Response Center
lust Gateway Blvd.
Fort Myers, FL 33913
For an accessory or part not available from your authorized dealer, call
ielsourAserONv (7669)
Page 2
R6 (AA) x2
Voyant
BA'l'l'
lndicador
BA'l'l'
FM
FM STIMONO
(oulo)
DX/ LOCAL
PAUSE
»FFICUE
«REW/REVIEW
>PLAY
.REC
ISTOP
ISS
FM STIMONO
(ou/o) DXILOCAL
MIC (PLUG IN POWER **
AVLS
(RADIO OFF) TAPE]
AMIFM
Voyant BATI'
/ lndirador BAIT
VOL"
TUNING
SPEAKER/Q
DC IN 3 V
Microphone intég ré
Micréfono incorporado
IITIT
SOUND BOOST
Logement de la pile
Compartimento para pilas
* Un point tactile a cote de VOL sur I'appareil principal indique le sens de rotation du bouton de volume.
' Le bouton/la prise comporte un point en relief.
* En la unidad principal existe un punto tactil junto a VOL que muestra la direccion para subir el volumen.
' El baton/Ia toma tiene un punto tactil.
Specifications
Plage de trequences
FM: 65,0 a 107,9 MHZ (Europe de lest)
87,5 a 108 MHz (Italie et Arabie saoudjte)
87,6 a 108 MHz (Amérique du nold, centrale et du
sud)
87, o a 107, 9 MHz (Autres pays)
AM: 526,5 a 1 505,5 kHz (Italie et Arabie saoudite)
530 a 1 710 kHz (Amérique du nerd, cent-tale et du
sud)
531 a 1 602 kHz (Autres pays)
Reponse en frequence Lecture: 40 , 15 000 Hz
Eni'egistrement: 100 a 8 000 Hz
Entree Prise d'entrée de microphone (MIC)
Sortie Prise découteurs (n)
Impedance de charge de 8 . 300 o
Haut-parleur Diametre de 5 cm environ
Alimentation 3V CC
Piles du format AA (R5) x 2
Sources dalimentation 3 V CC extemes
Dimensions (llh/p)
Env 112,0 X 82,5 x 37,5 mm (4 V1 x 3 A X 1 V2 pouces)
(l/h/p), parties saillantes et commandes non comprises
Poids Env. 137 g (6,6 onces) (appareil principal
uniquement)
Accessoire tourn
Ecouteurs ou casque stereo (1)
Pour les utilisateurs en France
En cas de reinplacement du casque/ecouteurs, refereztvous
au modele de casques/ecouteurs adaptes a votre appareil
indiqué cirdessous.
MDR<027LP
La conception et les specifications peuvent etre modifiees
sans preavis.
Autonomie de la pile (Approx. en heures)
Pile alcaline Sony Sony R6P(SR)
LR6(SG)"
(utilisation du casque/des écouteurs)
Lecture de cassette 24 7
Reception radio 48 15
Enregistrernentpar 20 4,5
microphone
Emegistrement de 12 3
la radio
(utilisation du hautrparleur)
Lecture de cassette 15 4,5
Reception radio 26
Enregistrement de 11,5 3
la radio
r Valeur mesuree contormement aux normes ]'EITA (Japan
Electronics and Lrifonnat-ion Technology Industries
Association). (Avec une cassette Sony modele HF)
H En cas dunlisatjon du piles seches alcalines LR6 (so)
Sony STAMINA (piodulte au IapOn),
Remarque
Lautonorme de la pile peut etre legereinent plus courte en
fonction des conditions dut-iljsation, de la temperature
exterieure et du type de pile utilise.
ca
Preparations
Insertion des piles I-®
Faites glisser le couvercle du logement desa piles
pour louvrir et insérez deux piles seches du format
AA (R6) en respectant la polarite.
Remplacez les piles par des piles neuves lorsque le
voyant BAIT baisse en intensi e. I-.
Remarque
Il est conseille dutiliser piles alcalines Sony pour one
performance optimale.
Pour fixer Ie couvercle du logement de la
pile s'iI s'est détaché accdentellement
Fierale de la facon suivante. I-©
Courant domestique
Branchez ladaptateur secteur a la
prise DC IN 3V eta une prise de
courant murale. utilisez
ladaptateur secteur AC-E3UHG
(non fourni). N 'utilisez pas
dautre adaptateur secteur CA.
Les specifications pour lAC-EBOHG Varient suivant les
zones géographiques. Vérifiez avant l'achat votre
tension secteur locale et le modéle de la fiche.
--e
Polarite de la fiche
Remarques
I Branchez ladaptateur secteur sur une prise de courant
facile dacces. Si l/adaptateur secteur présente u.ne
anomalie, debranchez-le immédiatement de la prise de
courant.
I Ne touchez pas ladaptateur secteur avec des mains
humides.
Lecture d'une cassette
1 Insérez line cassette.
2 Réglez (RADIO OFF) TAPE / AM/ FM sur
(RADIO OFF) TAPE
3 Appuyez sur >PLAY.
Pour Appuyez surlfaites coulisser
I STOP
» FF/CUE ou « REW/
Arréter la lecture"
Avancer ou
rembobiner REVIEW a larrét
Faire défiler vers » FF / CUE sans le libérer
l'avant pendant la et libe'reZAIe a lendroit
lecture (CUE) souhaité
Faire de'filer vers
l'arriere durant
« REW/ REVIEW sans 1e
libérer et libe'rezAle a
la lecture lendroit souhaité
(REVIEW)
Interrompre PAUSE dans la direction
temporairement de la fleche
la lecture Pnur rrlfichcr la pause
denregistremen t, relfichez
PA USE.
A la {in de la cassette, le bouton >PLAY enfoncé est
relache automatiquement (Fonction Auto shut-off).
" Si vous nutilisez pas lappareil apres un bobinage ou
un rebobinage, la pile suse rapidement. Appuyez
toujours sur I STOP.
Remarque
Nouvrez pas le logement de la cassette pendant la
lecture d/une bande.
Pour utiliser le haut-parleur
Re'glez SPEAKER/Q sur SPEAKER. Le son est emis
du hauttparleur et non des écouteurs/du casque.
Lorsque le haut-parleur est en marche, la fonction
AVLS ne fonctionne pas.
Ecoute de la radio
Etant donné que le cordon des e'couteurs/du casque
sert d'antenne FM, connectez les écouteurs/le casque
meme lors de lutilisation du hauttparleur.
1 Reglez (RADIO OFF) TAPE / AM/ FM sur
AM on FM.
2 Activez TUNING pour régler la station
desirée.
Pour éteindre la radio
Re'glez (RADIO OFF) TAPE/AM/FM sur (RADIO
OFF) TAPE.
Pour améliorer la reception radio E]
I Pour FM: Déployez 1e cable (antenne) du casque/
des écouteurs. Si la qualite de la reception n'est
toujours pas satisfaisante, réglez FM ST/ MONO ou
DX/ LOCAL.
I Pour AM: Réorientez lappareil proprement ditr
Enregistrement
Remarques
0 Si la languette de protection en écriture est cassée,
vous ne pouvez pas enregistrer cette face.
I Utilisez de nouvelles piles pour l'enregist-rement.
I En cas de bruit strident, baissez le volume.
I Lors de lenregistrement avec le microphone, le son a
enregistrer nest pas audible a travers 1e haut-parleur.
1 Introduisez une cassette normale (TYPE I).
2 Pour enregistrer avec le microphone
intégré:
G) Posez lappareil sur une surface dure
(comme 1m bureau) en orientant le porte-
cassette vers le haut de sorte a optimiser
lenregistrement a laide du micro plat,
® Réglez (RADIO OFF) TAPE / AM / FM sur
(RADIO OFF) TAPE.
Pour enregistrer de la radio:
® Réglez (RADIO OFF) TAPE / AM / FM sur
AM 011 FMI
® Accordez la station que vous voulez
enregistrer (voir Ecoute de la radio)
3 Appuyez sur 0 RECI
>PLAY senfonce simultanement et
lenregistrement demarrel Le niveau
denregistrement est réglé
automatiquement.
Pour Appuyez surl
faites coulisser
Lnterrompre temporairement PAUSE
lenregistrement
Arreter l'enregistrement I STOP
Demarrer l'enregistrement . REC lors de la
lors de la lecture lecture
Pour réduire le bruit pendant
l'enregistrement d'émis ions AM
Re'glez le commutateur ISS (Interference Suppress
Switch) sur la position qui reduit au mieux le bruit.
Remarques sur lenregistrement
I Le niveau denregistrement est fixe.
I Lenregistrement proprernent dit commencera environ
2 secondes apres que . REC a été activé. Pour ne pas
manquer 1e début de lenregistrement, appuyez sur
. REC 2 secondes environ avant 1e moment ou
lenregistrernent doit commencer.
I Nutilisez pas de cassette de posit-ion haute (TYPE 11)
ni metal (TYPE IV). Sinon 1e son risque de présenter de
la distorsion a la lecture ou lenregistrement precedent
risque de ne pas etre entierement effacé.
I Ne branchez et ne debranchez pas les ecouteurs/le
casque de la prise Q pendant lenregistrement de la
radio. Les conditions denregistrement peuvent
changer rapidement ou du bruit risque détre
enregistre.
I Pour eviter les interferences, ne posez pas lappareil
pres dun cordon de lampe ou dune lampe
fluorescente lors de lenregistrernent avec le
microphone.
I Aucune autre fonction ne peut etre utilisée pendant
I'enregistrement. Arrétez dabord lenregistrement
pour utiliser une autre fonction.
Pour éviter un enregistrement accidentel
d'une cassette
Brisez les taquets de la face A et/ou B. Pour réutiliser
la cassette pour lenregistrement, recouvrez lorifice
par du ruban adhésif.
Enregistrement a partir de
différentes sources sonores
Enregistrement avec un microphone externe
Branchez un microphone sur la prise MIC (PLUG IN
POWER).
Utilisez un microphone, par exemple un ECMa
DS7UP (non fourni).
Si vous utilisez un microphone autoaalii'nente',
lalimentation du microphone est assurée par cet
appareil.
Enregistrement a partir d'un autre
appareil
Branchez un autre appareil sur la prise MIC (PLUG
IN POWER) a l'aide dun cordon de raccordement
RK-GI34 (non fourni).
Utilisation d autres functions
(Uniquement lors de I'utilisation du casquel
des écouteurs)
Protection de l'ou'i'e-Fonction AVLS
(limitation automatique du volume)
Réglez AVLS sur LIMIT. Le volume maximum est
maintenu a un niveau relativement faible afin de
protéger votre ouie.
Pour annuler la fonction AVLS, re'glez AVLS sur
NORM.
Optimisation du son
Réglez SOUND BOOST sur ON pour une
optimisation du son qui met en valeur les aigus et les
graves.
Remarque
Lorsque vous réglez la fonction AVLS sur LIMIT, leffet
SOUND BOOST est réduit.
-
Précautions
Piles
- Ne transportez pas des piles seches avec des pieces de monnaie
ou autres obiets metalliques. Les piles peuvent produire de la
chaleur si leurs homes positive et negative entrent
accidentellement en contact a cause dun ohjet metallique.
- Si vous ne comptez pas utiliser le Walkman pendant un certain
temps, enlevez las piles pour éviter tout dommage do a une
fuite délectrolyte et a la corrosion qui en resulte.
Manipulation
- Ne laissez pas tomber lappareil et ne le cognez pas car il
risquerait de ne plus fonctionner.
- Ne laissez pas lappaleil pres dune source de chaleur, dans un
endroit expose au soleil, a une poussieie intense, au sable, a
lhumidite, a la pluie, a des chocs mécaniques, ni dans une
voiture aux tenetres closes.
- Lutilisation de cassettes superieures a 90 minutes nest pas
recommndee. Elles sont tres tines et tendent a sétirer
facilement. Ceci risque de piovoquer un dysfonctionnernent de
l'appareil ou une deformation du son.
- Si l'appaieil n'a pas ete utilise pendant longtemps, metteztle en
mode de lecture pendant quelques nunutes pour le chauffer
avant de lutiliser de nouveau.
- Eloignez de lappareil les cartes de credit djsposant dune
bande magnetique ou les montres a ressort, car laimant du
hauteparleur de lappareil pourrait les endomrnager.
Ecouteurslcasque
Sécurité routiere
Ne vous servez pas des ecouteurs ou d'un casque pendant la
conduite dune voiture, dune more on de tout autre vehicule
motorisé, afin deviter tout accident de la circulation. En out-re, 11
est inteidit dans certains pays dut-iliser un casque ou des
écouteurs en conduisant,
I] peut etre egalement dangereux decouter a volume eleve tout
en marchant, specialement lorsque vous traversez une route.
Soyez touiours extremement prudent ou cessez dut-iliser cet
appareil dans les situations presentant des risques daccident.
Prévention des dommages auditifs
Evitez dut-iliser les ecouteurs ou le casque a volume eleve. Les
medecins deconseillent une ecoute prolongee a volume trop
eleve Si vous percevez un sifflement dans les oreilles, rnieux
vaut reduire le volume ou cesser decouter.
Ne génez pas les personnes qui vous
entourent
Maintenez un volume modere découte. Vous pourrez ainsi
entendie les sons exterieurs et etre attentiis aux gens qui vous
entourent.
Entretien
- Toutes les 10 heures dut-ilisation, nettoyez la tete et le passage
de bande de la cassette avec un cotonrtige et un solvant de
nettoyage disponible dans le commerce.
. Pour nettoyer 1e corriet, utilisez un chiffon doux légerement
humecte deau Ne pas utiliser dalcool, de benzine ni de
diluant.
- Nettoyez régulieiement les fiches du casque/des ecouteurs et
celle de la telecommande. -
Preparativos
Para insertar pilas l-®
Deslice y abra la tapa del compartimento para pilas e
inserte dos pilas secas de tamafio AA (R6) con la
polaridad correcta.
Sustituya las pilas por unas nuevas cuando se
debilite el indicador BATT. I-.
Nota
Para obtener el maximo rendimiento, se recomienda
utilizar pilas alcalinas Sony.
Para fijar la tapa del compartimento de la
pila cuando se haya desprendido
accidentalmente
Hagalo Como se ilustra a continuacion. I-©
Para utilizar alimentacién externa
Conecte e1 adaptador de
corriente alterna AC-E30HG ._e
(no suministrado) a la toma DC M
IN 3V a la toma de ared. No .
utilice Illingun otro adpaptador Polaridad de la
_ clavija
de corriente altema.
Las especificaciones para ACtESOI-IG varian
dependiendo de la ubicacion. Compruebe e1 voltaje
local y la forma del enchufe antes de adquirir el
adaptador.
Notas
I Conecte el adaptador de alimentacion de ca a una
toma de corriente de ca de facil acceso. Si detecta
alguna anomalia en el adaptador de alimentacién de
ca, desconéctelo inmediatamente de la toma de
corriente de ca.
I No toque el adaptador de alimentacion de ca con las
manos mojadas.
Reproduccion de la c nta
1 Inserte un casete.
2 Ajuste (RADIO OFF) TAPE / AM / FM en
(RADIO OFF) TAPE.
3 Pulse FPLAY.
Para Pulse/deslice
Detener la reproduccién I STOP
Hacer que la cinta avance » FF/CUE o
« REW / REVIEW
durante el modo de
parada
rapidamente o rebobinar
la cinta
Buscar hacia delante
durante la
reproduccién (CUE)
Pulse y mantenga
pulsado » FF/CUE,
y sueltelo en el punto
que desee
Buscar hacia atras
durante la reproduccit'm
(REVIEW)
Pulse y mantenga
pulsado « REW/
REVIEW, y sue'ltelo en
el punto que desee
PAUSE en el sentido de
la flecha
Para dcsaclivar I11
pausa, deslicc PAUSE
en sentido upurstu ill dz
luflecha.
Cuando finaliza la cinta, el boton >PLAY salta
automaticarnente (funcién de apagado automatico).
Si deja la unidad activada una vez bobinada o
rebobinada la cinta, las pilas se consumiran
rapidamente. Asegurese de pulsar ISTOP.
Realizar una pausa en la
reproduccién
Nota
No abra el compartimento del casete rnientras esta
corriendo la cinta.
Deslice el interruptor SPEAKER/O. a SPEAKER. El
sonido Se reproducira desde el altavoz y no Se oira
nada en los auriculares.
Cuando se estan utilizando el altavoz, la funcion
AVLS no se encuentra operativa.
Recepcion de la radio
Dado que el cable sirve como antena de FM, conecte
los auriculares con casco/auriculares incluso cuando
esté utilizando el altavoz.
1 Ajuste (RADIO OFF) TAPE / AM/ FM en
AM 0 FM,
2 Gire TUNING para sintonizar la emisora
deseada.
Para apagar la radio
Ajuste (RADIO OFF) TAPE /AM/FM en (RADIO
OFF) TAPE.
Para mejorar Ia recepcion de la emisién E]
' Para FM: Extienda el cable de los auriculares con
casco/auriculares (antena). Si la recepcion sigue
siendo deficiente, ajuste FM ST/ MONO o DX/
LOCAL.
I Para AM: Cambie la orientacion de la propia unidad.
Grabac'én
Notas
I Si la lengueta de proteccion contra grabacion esta rota,
no se puede grabar en esa cara.
I Utilice pilas nuevas cuando grabe.
I Si se produce un efecto de aullido, reduzca el volumen.
I Cuando se grabe con un microfono, e1 sonido que va a
grabarse no se oira a través de el altavoz.
1 Inserte una cinta normal (TYPE I).
2 Para grabar con el microfono
incorporado:
G) Coloque 1a unidad sobre una superficie
dura (como, por ejemplo, un escritorio)
con el compartimento del casete
mirando hacia abajo, de forma que el
micréfono pueda grabar con eficiencia.
® Ajuste (RADIO OFF) TAPE /AM/FM
en (RADIO OFF) TAPE.
Para grabar de la radio:
6) Ajuste (RADIO OFF) TAPE/AM/FM
en AM 0 FMl
@ Sintonice la emisora que desea grabar
(consulte Recepcion de la radio).
3 Pulse 0 REC.
Se pulsa F PLAY de forma simultanea y
comienza 1a grabacién. E1 nivel de
grabacién se ajusta automaticamente.
Para Pulse/deslice
Introducir una pausa PAUSE
en la grabacién
Detener la grabacién I STOP
Comenzar la grabacion . REC durante la
durante la reproduccion reproduccion
Para reducir el ruido cuando se graban
programas AM
Ajuste ISS (Interruptor de supresion de
interferencias) en la posicit'm en la que el ruido se
reduzca en mayor medida.
Notas sobre la grabacibn
I Los niveles de grabacion son fijos.
I La grabacion real comenzara transcurridos unos 2
segundos después de pulsar . REC. Pulse . REC
unos 2 segundos antes del momento en el que desea
iniciar la grabacion 0 se perdera el principio de la
misma.
I No utilice ninguna cinta de posicion alta (TYPE 11) ni
de metal (TYPE IV). Si lo hace, es posible que el sonido
se distorsione cuando vuelva a reproducir la cinta o
que la grabacién anterior no se elimine por completo.
I No conecte ni desconecte los auriculares con casco/
auriculares de la toma O mientras esté grabando de la
radio. La condicirm de grabacion podria cambiar
repentinamente o podrian grabarse ruidos.
I Cuando grabe con microfono, no lo coloque cerca del
cable de una lampara ni cerca de una lampara
fluorescente ya que podrian producirse ruidos de
interferencia.
I No puede realizarse ninguna ot-ra operation rnientras
se esta grabando. Para realizar otras operaciones,
detenga primero la grabacion.
Para evitar grabar encima de una cinta de
forma accidental
Retire las lenguetas de la cara A y / o B. Para volver a
utilizar la cinta para grabar, cubra e1 orificio de la
lengi'ieta con cinta adhesiva.
Grabacion de distintas fuentes de sonido
Grabacién con un microfono externo
Conecte un microfono a la toma MIC (PLUG IN
POWER).
Emplee un microfonot, como el ECMaDS70P (no
suministrado).
Si utiliza u.n microfono con sistema de alimentacion por
enchufe, esta unidad suministrara la alimentacion al
microfono.
Grabacién desde otro equipo
Conecte otro equipo a la toma MIC (PLUG lN
POWER) mediante el cable de conexit'm RK7G134
(no sumi'nistrado).
Uso de otras funciones
(Sélo cuando se utilizan los auriculares)
Para proteger sus oidos - AVLS (sistema
de limita ' 'n automa ' a del volumen)
Ajuste AVLS en LIMIT. Aunque lo aumente, e1
volumen maximo se mantendra en un nivel inferior
con el fin de proteger sus oidos.
Para cancelar la funcién AVLS, ajuste AVLS en
NORM.
Para potenciar el sonido
Ajuste SOUND BOOST en ON para obtener el efecto
potenciador de sonido que aumenta tanto los agudos
como los graves.
Nota
Cuando ajuste AVLS en LIMIT, el efecto SOUND
BOOST se reducira.
-
Precauciones
Pilas
- No rransporte pilas secas junto con monedas u otios objetos
metalicos. Puede generarse calentarruento Si los terminales
positivo y negative de laS pilas entran accidentalmente en
contacto mediante un obleto metalico.
- Cuando no vaya a utilizar el Walkman durante mucho tiempo,
extralga las pilas para evrtar los danos provocados por fugas y
la consecuente corrosion.
Manejo
- No deje caer 1a unidad ni la golpee, puesto que podria provocar
un mal funcionamjento.
- No deJe la unidad cerca de tuentes termicas, ni en un lugar
sometido a la luz solar directa, a polvo excesivo, a arena, a la
humedad, a la Lluvia, a golpes, ni en el interior de un automovil
con las ventanillas cerradas.
- No se recomienda la uulizaclon de cintas de mas de 90 minutos
de duracion. Dichas cintas son muy finas y suelen dilatarse con
tacilidad, lo que puede provocar errores de runcionarniento de
la unidad o un deterioro del sonido.
- Si no ha utiliL-ado la unidad durante mucho tiempo, pongala en
el modo de reproduction para que se caliente durante algunos
minutos antes de empezar a usarla de nuevo.
- Mantenga las tanetas de credito personales que utiliaan codigo
magnet-ice y los reloles por pulsaciones, etc. aleiados de la
unidad para evitar posibles danos provocados por el iman
utilizado en el altavoz.
Auriculares con cascolauriculares
Seguridad en la carretera
No utilice los auriculares con casco/aunculaies cuando
conduzca, vaya en bicicleta, o maneje cualqujer vehiculo
motorizadu. Esto podria suponer un peligro para el tratico, y es
ilegal en ciertas zonas. También puede iesultar potencialrnente
peligroso escuchar a traves de los auriculares con casco/
auriculares a gran volumen rnientras camina, especialmente en
pasos cebra. En situaciones potencialrnente peljgrosas, debera
tener mucho cuidado o dejar de utilizar los auriculares,
Cuidado de sus oidos
Evite utilizar los auriculares con casco/auriculares a gran
volumen. Los especialistas del sistema auditivo desaconsejan la
escucha prolongada a gran nivel. Si experimenta un silbido en
sus oidos, reduzca el volumen o dele de escuchar a través de Ios
auriculares.
Respeto a los demas
Mantenga el volumen a un nivel moderado. Esto le pemutira
escuchar Ios sonidos del exterior y iespetar a quienes se
encuentren a su alredeaor.
Mantenimiento
- Limpie el cabezal y la trayectoria de la cinta medlante un pano
de algodon y una solucion detergente normal transcurndas 10
horas de uso.
- Para ljmpiar la parte exterior, utilice un pano suave
ligeramente humedecido con agua. No utilice alcohol, benclna
ni disolventes.
- Limpie periodicainente las claviias del mando a distancia
y los auriculares con casco/auriculares. I