Sony sa ve 325 owners manual
This is the 2 pages manual for sony sa ve 325 owners manual.
Read or download the pdf for free. If you want to contribute, please upload pdfs to audioservicemanuals.wetransfer.com.
Extracted text from sony sa ve 325 owners manual (Ocr-read)
Page 1
SONY
Micro Satellite System
SA-VE325N E322
4-233-075-21 (1 )
To prevent fire or shock hazard, do not expose the
unit to rain or moisture.
To prevent fire, do not Cover the ventilation of the
apparatus with news papers, table-cloths, curtains, etc.
And dont place lighted candles on the apparatus
To prevent fire or shock hazard, do not place vases on
the apparatus.
To avoid electrical shock, do not open the cabinet. Refer
servicing to qualified personnel only.
Do not install the appliance in a confined space, such
as a bookcase or built-in cabinet.
(ALmON
You are cautioned that any changes or modification not
expressly approved in this manual could void your
authority to operate this equipment.
About this manual
The instructions in this manual are for SA-VE325 and
SA-VE322, Sony Micro Satellite Systems.
Differences between the systems
I SA-VE325
The SA-VE325 is a 5.1 channel speaker system
consisting of two front speakers, two rear speakers,
one center speaker, and one subwoofer It supports
Sony Digital Cinema Sound, Dolby* Pro Logic, and
Dolby Digital (AC-3), and is thus geared towards the
enjoyment of movies.
I SA-VE322
Consisting of two front speakers and one subwoofer,
the SA-VE322 is suited for the enjoyment of music.
. Manufactured under license from Dolby Laboratories.
DOLBY, the double-D symbol on, PRO LOGIC and
Dolby Digital (AC-3) are trademarks of Dolby
Laboratories.
Any difference in operation is clearly indicated in the
text, for example, SA-VE325 only.
-
Precautions
On safety
. Before operating the system, be sure that the operating
voltage of the system is identical with that of your local
power supply.
. The unit is not disconnected from the AC power source
(mains) as long as it is connected to the wall outlet,
even if the unit itself has been turned off.
. Unplug the system from the wall outlet if it is not to be
used for an extended period of time. To disconnect the
cord, pull the cord by grasping the plug. Never pull
the cord itself.
. Should any liquid or solid object fall into the system,
unplug the systems power cord and have the system
checked by qualified personnel before operating it any
further.
. AC power cord must be changed only at the qualified
service shop.
On operation
. Do not drive the speaker system with a continuous
wattage exceeding the maximum input power of the
system.
. if the polarity of the speaker connections are not
correct, the bass tones will be weak and the position of
the various instruments obscure.
. Contact between bare speaker wires at the speaker
terminals may result in a short-circuit.
I Before connecting, turn off the amplifier to avoid
damaging the speaker system.
. The speaker grille cannot be removed. Do not attempt
to remove the grille on the speaker system. if you try
to remove it, you may damage the speaker.
. The volume level should not be turned up to
the point of distortion.
If you encounter color irregularity on a
nearby TV screen
This speaker system is magnetically shielded to allow it
to be installed near a TV set. However, color
irregularities may still be observed on certain types of TV
sets.
If color irregularity is observed...
9 Turn off the TV set once, then turn it on again after
15 to 30 minutes.
If color irregularity is observed again...
..) Place the speakers further away from the TV set.
If howling occurs
Reposition the speakers or turn down the volume on the
amplifier.
On placement
. Do not set the speakers in an inclined position.
. Do not place the speakers in locations that are:
7 Extremely hot or cold
7 Dusty or dirty
7 Very humid
7 Subject to vibrations
7 Subject to direct sunlight
O n clean i n 9
Clean the speaker cabinets with a soft cloth lightly
moistened with a mild detergent solution or water. Do
not use any type of abrasive pad, scouring powder or
solvent such as alcohol or benzine.
if you have any questions or problems concerning your
speaker system, please consult your nearest Sony dealer.
Hooking up the system
Connect the speaker system to the speaker output
terminals of an amplifier.
Make sure power to all components (included the
subwoofer) is turned off before starting the hook-up.
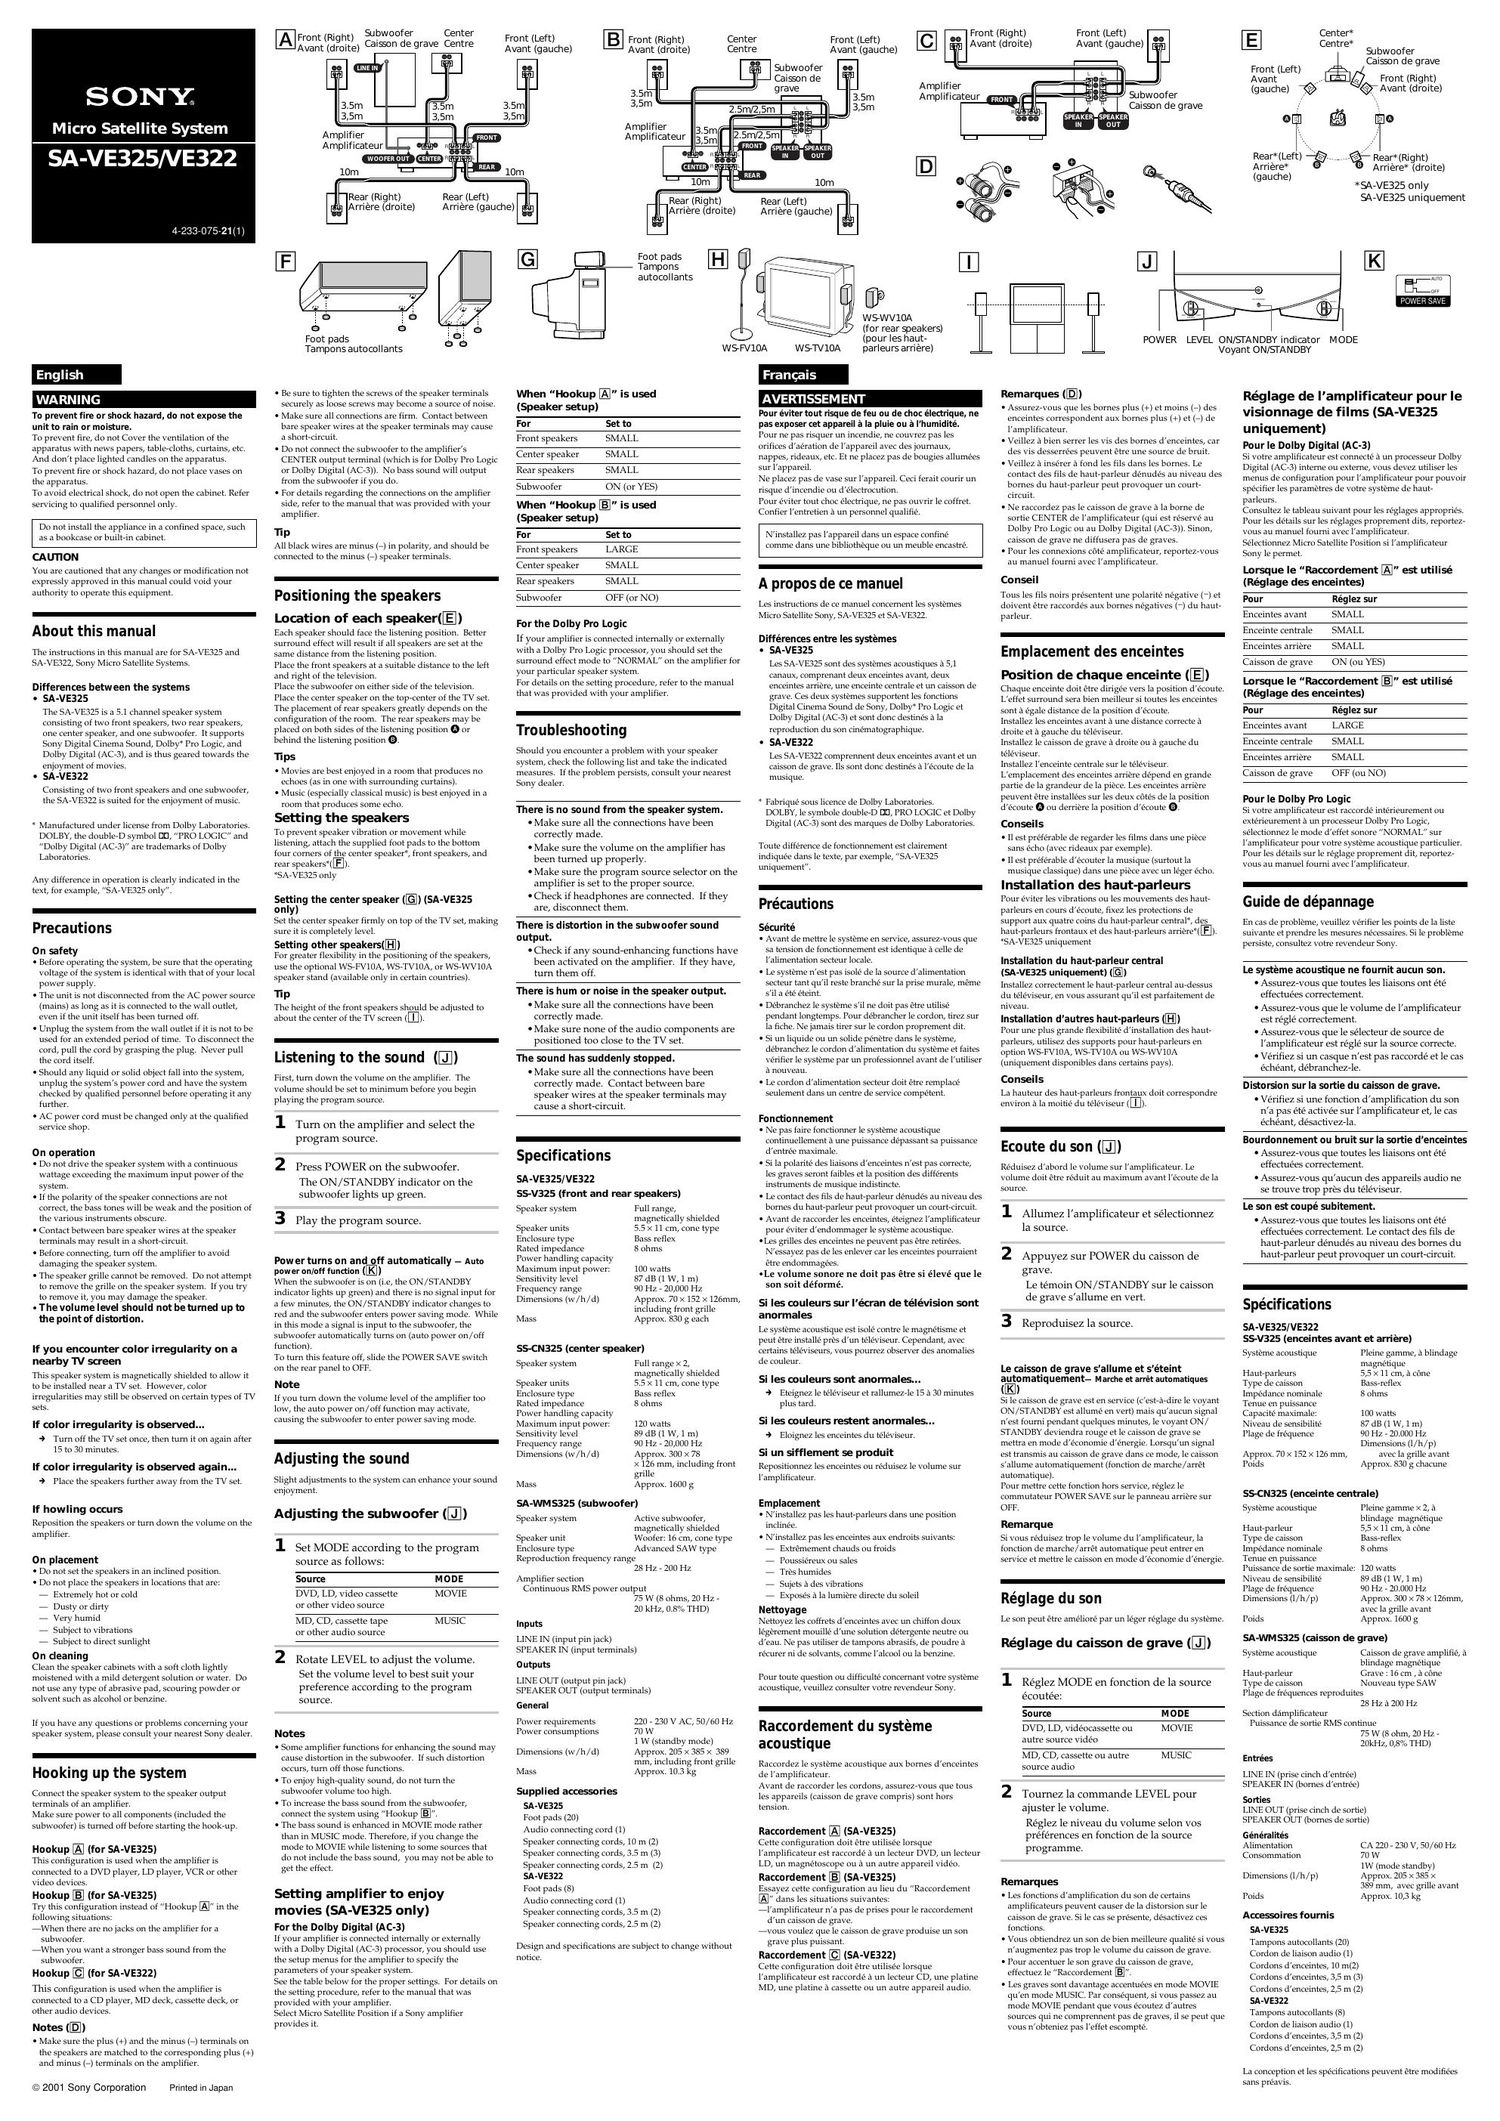
Hookup (for SA-VE325)
This configuration is used when the amplifier is
connected to a DVD player, LD player, VCR or other
video devices
Hookup (for SA-VE325)
Try this configuration instead of Hookup
following situations:
7When there are no jacks on the amplifier for a
subwoofer.
7When you want a stronger bass sound from the
subwoofer.
Hookup (for SA-VE322)
This configuration is used when the amplifier is
connected to a CD player, MD deck, cassette deck, or
other audio devices.
Notes (IE!)
. Make sure the plus (+) and the minus (7) terminals on
the speakers are matched to the corresponding plus (+)
and minus (7) terminals on the amplifier.
© 2001 Sony Corporation Printed in Japan
Subwoofer Center
) Cai§on de grave Centre
ront (Right)
Avant (droite
Amplifier
Amplificateur.
10m
Rea r (Left)
Rear (Right)
g Arriere (droite)
j e
6
Foot pads
Tampons autocollants
. Be sure to tighten the screws of the speaker terminals
securely as loose screws may become a source of noise.
. Make sure all connections are firm. Contact between
bare speaker wires at the speaker terminals may cause
a short-circuit.
- Do not connect the subwoofer to the amplifiers
CENTER output terminal (which is for Dolby Pro Logic
or Dolby Digital (Ac-3)). No bass sound will output
from the subwoofer if you do.
. For details regarding the connections on the amplifier
side, refer to the manual that was provided with your
amplifier.
TIP
All black wires are minus (7) in polarity, and should be
connected to the minus (7) speaker terminals.
Positioning the speakers
Location of each speaker(E)
Each speaker should face the listening position. Better
surround effect will result if all speakers are set at the
same distance from the listening position.
Place the front speakers at a suitable distance to the left
and right of the television.
Place the subwoofer on either side of the television.
Place the center speaker on the top-center of the TV set.
The placement of rear speakers greatly depends on the
configuration of the room. The rear speakers may be
placed on both sides of the listening position 0 or
behind the listening position 0.
Ti ps
. Movies are best enjoyed in a room that produces no
echoes (as in one with surrounding curtains).
. Music (especially classical music) is best enjoyed in a
room that produces some echo.
Setting the speakers
To prevent speaker vibration or movement while
listening, attach the supplied foot pads to the bottom
four corners of the center speaker, front speakers, and
rear speakers*(-).
SA-VESZS only
Setting the center speaker (SA-VE325
o n ly)
Set the center speaker firmly on top of the TV set, making
sure it is completely level.
Setting other speakers(E)
For greater flexibility in the positioning of the speakers,
use the optional WSEV10A, WS-Tv10A, or WS-Wv10A
speaker stand (available only in certain countries).
TIP
The height of the front speakers should be adjusted to
about the center of the Tv screen ([1]).
Listening to the sound ( )
First, turn down the volume on the amplifier. The
volume should be set to minimum before you begin
playing the program source.
1 Turn on the amplifier and select the
program source.
2 Press POWER on the subwooferr
The ON / STANDBY indicator on the
subwoofer lights up green.
3 Play the program source.
Power turns on and off automatically - Auto
power on/oft function ( )
When the subwoofer is on (Le, the ON/STANDBY
indicator lights up green) and there is no signal input for
a few minutes, the ON/STAN DBY indicator changes to
red and the subwoofer enters power saving mode. While
in this mode a signal is input to the subwoofer, the
subwoofer automatically turns on (auto power on/off
function).
To turn this feature off, slide the POWER SAVE switch
on the rear panel to OPE
Note
if you turn down the volume level of the amplifier too
low, the auto power on/off function may activate,
causing the subwoofer to enter power saving mode.
Adjusting the sound
Slight adjustments to the system can enhance your sound
enjoyment.
Adjusting the subwoofer (
1 Set MODE according to the program
source as follows:
50 u rce M 0 D E
DVD, LD, Video cassette MOVIE
or other video source
MD, CD, cassette tape MUSIC
or other audio source
2 Rotate LEVEL to adjust the volume.
Set the volume level to best suit your
preference according to the program
source.
Notes
. Some amplifier functions for enhancing the sound may
cause distortion in the subwoofer. If such distortion
occurs, turn off those functions.
. To enjoy high-quality sound, do not turn the
subwoofer volume too high.
I To increase the bass sound from the subwoofer,
connect the system using Hookup
I The bass sound is enhanced in MOVIE mode rather
than in MUSIC mode. Therefore, if you change the
mode to MOVIE while listening to some sources that
do not include the bass sound, you may not be able to
get the effect.
Setting ampli ier to enjoy
movies (SA-VE325 only)
Forthe Dolby Digital (AC-3)
if your amplifier is connected internally or externally
with a Dolby Digital (AC-3) processor, you should use
the setup menus for the amplifier to specify the
parameters of your speaker system.
See the table below for the proper settings. For details on
the setting procedure, refer to the manual that was
provided with your amplifier.
Select Micro Satellite Position if a Sony amplifier
provides it.
Arriere (gauche) @
Front (Right)
El Center"
Centre*
Subwoofer
(bison de grave
Front(Left) F HR' ht)
Avant ron '9
(gauche) T© @Avanudroite)
Rear*(Left) -® . @- Rear*(Right)
Arrlere" 9 Arriere* (droite)
(gauche)
*SA-VE325 only
SA-VE325 uniquement
AVERHSSEMENT
S eaker setu , ,
( P P) Pour eviter tout risque de feu ou de choc elect ue, ne
For Set to pas exposer cet appareil a la pluie on a lhumi e.
prom Speakers SMALL Pour ne pas risquer un incendie, ne couvrez pas les
orifices d'aeration de lappareil avec des journaux,
Center Speaker SMALL nappes, rideaux, etc. Et ne placez pas de bougies allumees
Rear speakers SMALL 5" l"PPal'Cil-
Ne placez pas de vase sur lappareil. Ceci ferait courir un
Subwoofer 0N (0r YES) risque dincendie ou d'electrocution.
When "Hookup IS used Pour eviter tout choc electrique, ne pas ouvrir le coffret.
(Speaker setup) Confier lentretien a un personnel qualifie.
For Set to N'installez pas lappareil clans un espace confine
Front speakers LARGE comme dans une bibliotheque ou un meuble encastré.
Center speaker SMALL -
Rear speakers SMALL A propos de Ce manuel
Subwoofer OFF (or NO)
Forthe Dolby Pro Logic
If your amplifier is connected internally or externally
with a Dolby Pro Logic processor, you should set the
surround effect mode to NORMAL" on the amplifier for
your particular speaker system.
For details on the setting procedure, refer to the manual
that was provided with your amplifier.
Troubleshooting
Should you encounter a problem with your speaker
system, check the following list and take the indicated
measures. it the problem persists, consult your nearest
Sony dealer.
There is no sound from the speaker system.
I Make sure all the connections have been
correctly made.
I Make sure the volume on the amplifier has
been turned up properly.
I Make sure the program source selector on the
amplifier is set to the proper Source.
I Check if headphones are connected. If they
are, disconnect them.
There is distortion in the su bw oofer sound
output.
I Check if any soundzenhancing functions have
been activated on the amplifier. If they have,
turn them off.
There is hum or noise in the speaker output.
I Make sure all the connections have been
correctly made.
I Make sure none of the audio components are
positioned too close to the TV set.
The sound has suddenly stopped.
I Make sure all the connections have been
correctly made. Contact between bare
speaker wires at the speaker terminals may
cause a shortzcircuit.
Specifications
SA-VE325IVE322
SS-V325 (front and rear speakers)
Speaker system Full range,
magnetically shielded
5.5 x 11 cm, cone type
Bass reflex
Speaker units
Enclosure type
Rated impedance 8 ohms
Power handling capacity
Maximum input power: 100 watts
Sensitivity level
Frequency range
87 dB (1 w, 1 m)
90 Hz - 20,000 Hz
Dimensions (w/h/d) Approx. 70 X 152 X 12omm,
including front grille
Mass Approx. 830 g each
SS-CN325 (center speaker)
Speaker system Full range x 2,
magnetically shielded
5.5 x 11 cm, cone type
Bass reflex
Speaker units
Enclosure type
Rated impedance 8 ohms
Power handling capacity
Maximum input power; 120 watts
Sensitivity level
Frequency range
89 dB (1 w, 1 m)
90 HZ - 20,000 Hz
Dimensions (w/h/d) Approx. 300 X 78
X 126 mm, including front
grille
Mass Approx. 1o00 g
SA-WM S325 (su bw oofer)
Speaker system Active subwoofer,
magnetically shielded
Speaker unit Woofer: 16 cm, cone type
Enclosure type Advanced SAw type
Reproduction frequency range
28 Hz - 200 Hz
Amplifier section
Continuous RMS power output
75 w (8 ohms, 20 Hz -
20 kHz, 0.8". THD)
Inputs
LlNE IN (input pin jack)
SPEAKER 1N (input terminals)
Outputs
LlNE OUT (output pin jack)
SPEAKER OUT (output terminals)
General
220 - 230 V AC, 50/60 HZ
70 W
1 w (standby mode)
Power requirements
Power consumptions
Dimensions (w/h/d) Approx. 205 x 385 x 389
mm, including front grille
Mass Approx. 10.3 kg
Supplied accessories
SA-VE325
Poot pads (20)
Audio connecting cord (1)
Speaker connecting cords, 10 m (2)
Speaker connecting cords, 3.5 m (3)
Speaker connecting cords, 2.5 m (2)
5A-VE322
Poot pads (8)
Audio connecting cord (1)
Speaker connecting cords, 3.5 m (2)
Speaker connecting cords, 2.5 m (2)
Design and specifications are subject to change without
notice.
Les instructions de ce manuel concernent les systemes
Micro Satellite Sony, SA-vE325 et SA-VE322.
Differences entre les systemes
I SA-VE325
Les SA-VE325 sont des systemes acoustiques a 5,1
canaux, comprenanl deux enceintes avant, deux
enceintes arriere, une enceinte centrale et un caisson de
grave. Ces deux systemes supportent les fonctions
Digital Cinema Sound de Sony, Dolby" Pro Logic et
Dolby Digital (AC-3) et sont donc destines a la
reproduction du son cinematographique.
I SA-VE322
Les SA-VE322 comprennent deux enceintes avant et un
caisson de grave. Ils sont donc destines a lecoute de la
musique.
* Fabriqué sous licence dc Dolby Laboratories.
DOLBY, le symbole double-D on, PR0 LOGIC et Dolby
Digital (AC-3) sont des marques de Dolby Laboratories.
Toute difference de fonctionnement est clairement
indiquee dans le textc, par exemplc, "SA-VE325
uniquement.
Precautions
Sécu rité
- Avant de mettre le systeme en service, assurez-vous que
sa tension de fonctionnement est identique a celle de
lalimentation secteur locale.
~ Le systeme n'est pas isole de la source dalimentation
secteur tant quil reste branche sur la prise murale, meme
sil a ete eteint.
. Debranchez 1e systeme sil ne doit pas etre utilise
pendant longtemps. Pour debrancher le cordon, tirez sur
la fiche. Ne jamais tirer sur le cordon proprement dit.
~ Si un liquide ou un solide penetre dans le systeme,
debranchez le cordon dalimentation du systeme et faites
verifier le systeme par un professionnel avant de lutiliser
a nouveau.
I Le cordon dalimentation secteur doit étre reniplace
seulement dans un centre de service competent.
Fonctionnement
- Ne pas faire fonctionner le systeme acoustique
continuellement a une puissance depassant sa puissance
dentrée maximale.
I Si la polarite des liaisons denceintes nest pas correcte,
les graves seront faibles et la position des differents
instruments de musique indistincte.
I Le contact des fils de haut-parleur dénudés au niveau des
bornes du haut-parleur peut provoquer un court-circuit.
I Avant de raccorder les enceintes, éteignez lamplificateur
pour eviter dendommager le systeme acoustique.
. Les grilles des enceintes ne peuvent pas etre retirees.
N'essayez pas de les enlever car les enceintes pourraient
etre endommagees.
ILe volume sonore ne doit pas étre si éIevé que le
son suit déforrné.
Si les couleurs sur lécran de télévision sont
anormales
Le systeme acoustique est isolé contre le magnetisme et
peut etrc installc pres d'uri televiseur. Cepcndant, avec
certains televiseurs, vous pourrez observer des anomalies
de couleur.
Si les couleurs sont anormales...
9 Eteignez le téléviseur el rallumeZ-le 15 a 30 minutes
plus tard.
Si les couleurs restent anomales...
9 Eloignez les enceintes du televiseur.
Si un sifflement se produit
Repositionnez les enceintes ou reduisez le volume sur
l'amplificateur.
Em placement
- N'installez pas les haut-parleurs dans une position
inclinee.
- N'installez pas les enceintes aux endroits suivants:
7 Extremement chauds ou froids
7 Poussiereux ou sales
7 Tres humides
7 Sujets a des vibrations
7 Exposes a la lumiere directe du soleil
Nettoyage
Nettoyez les coffrets denceintes avec un chiffon doux
legerement mouille dune solution detergente neutre ou
d'eau. Ne pas utiliser de tampons abrasifs, de poudre a
récurer ni de solvants, comme lalcool ou la benzine.
lnur toute question on difficulté concernant votre systeme
acoustique, veuillez consulter votre revendeur Sony.
Raccordement du systeme
acoustique
Raccordez le systeme acoustique aux bornes d'enceintes
de lamplificateur.
Avant de raccorder les cordons, assurez-vous que tous
les appareils (caisson de grave compris) sont hors
tension.
Raccordement E (SA-VE325)
Cette configuration doit etre utilisee lorsque
lamplificateur est raccordé a un lecteur DVD, un lecteur
LD, un magnetoscope ou a un autre appareil video.
Raccordement (SA-VE325)
Essayez cette configuration au lieu du Raccordement
dans les situations suivantes:
7lamplificateur na pas de prises pour le raccordement
d'un caisson de grave.
7vous voulez que le caisson de grave produise un son
grave plus puissant.
Raccordement (SA-VE322)
Cette configuration doit etre utilisee lorsque
lamplificateur est raccorde a un lecteur CD, une platine
MD, une platine a cassette ou un autre appareil audio.
. Front (Left)
Front (Left) Front (Right) Center Front (Left) -
Avant (gauche) Avant (droite) Centre Avant (gauche) Avant (droite) Avant (gauche) .
l-Efl Subwoofer L L
Caimon de A IF 2
rave mp1 ier
3 g-gm gl-l Amplificateur I $3" I gubwooger
.Sm i L L ai§on egrave
3.5m 215m/2,5m | EGFLJ poem; , _ .
j . . at at I .
Amplifier 3 5m we
Amplificateur 3:5m ZSm/ZSm b a
ea or: n t '
w m 0 9
10m @
'-' 10m 10m 4
Rear (Right) Rear (Left) 9
Arriére (droite) Arriere (gauche) 9
I Foot pads IE III
Tampons
IE! autocollants
fi> r1 r1
WSWVIOA
(for rear speakers)
(pour les haut-
WSFVlOA WS-TVlOA parleursarriere)
When "Hookup Remarques (IE1)
- Assurez-vous que les bornes plus (+) et moins (7) des
enceintes correspondent aux bornes plus (+) et (7) de
l'amplificateur.
- Veillez a bien serrer les vis des bornes denceintes, car
des vis desserrees peuvent etre une source dc bruit.
- Veillez a inserer a fond les fils dans les bornes. Le
contact des fils de haut-parleur denudes au niveau des
bornes du haut-parleur peut provoquer un court-
circuit.
- Ne raccordez pas le caisson de grave a la borne de
sortie CENTER de l'amplificateur (qui est reserve au
Dolby Pro Logic ou au Dolby Digital (AC-3)). Sinon,
caisson de grave ne diffusera pas de graves.
- Pour les connexions cote amplificateur, reportez-vous
au manuel fourni avec lamplificateur.
Conseil
Tous les fils noirs presentent une polarite negative (7) et
doivent etrc raccordes aux bornes negatives (s) du haut-
parleur.
Emplacement des enceintes
Position de chaque enceinte (E
Chaque enceinte doit ctre dirigee vers la position at ecoute.
Leffet surround sera bien meilleur si toutes les enceintes
sont a egale distance de la position découte.
Installez les enceintes avant a une distance correcte a
droite et a gauche du televiseur.
lnstallez le caisson de grave a droite ou a gauche du
televiseur.
lnstallez lenceinte centrale sur le televiseur.
Lemplacement des enceintes arriere depend en grande
partie de la grandeur de la piece. Les enceintes arriere
peuvent etre installees sur les deux cotes de la position
decoute o ou derriere la position decoute e.
Conseils
- 11 est preferable de regarder les films dans une piece
sans echo (avec rideaux par exemple).
- 11 est preferable decouter la musique (surtout la
musique classique) dans une piece avec un leger écho.
Installa n des haut-parleurs
Pour eviter les vibrations ou les mouvements des haut-
parleurs en cours découte, fixez les protections de
support aux quatre coins du haut-parleur central, de
haut-parleurs frontaux et des haut-parleurs arriere
*SA-VESZS uniquement
Installation du haut-parleur central
(SA-VE325 uniquement) (I)
Installez correctement le haut-parlcur central au-dessus
du televiseur, en vous assurant qu'il est parfaitement dc
niveau.
Installation dautres haut-parleurs (IEI)
Pour une plus grande flexibilite dinstallalion des haut-
parleurs, utilisez des supports pour haut-parleurs en
option wstva, WS-TVIIIA ou wswv10A
(uniquement disponibles dans certains pays).
Conseils
La hauteur des haut-parleurs frontaux doit correspondre
environ a la moitie du televiseur ([IJ).
Ecoute du son ( )
Réduisez dabord le volume sur lamplificateur. Le
volume doit etre réduit au maximum avant lecoute de la
source.
1 Allumez lamplificateur et sélectionnez
la source
2 Appuyez sur POWER du caisson de
graver
Le témoin ON/STANDBY sur le caisson
de grave s'allume en vert.
3 Reproduisez la sourcer
Le caisson de grave s'allume et séteint
automatiquement- Marche et arrét automatiques
Si le caisson de grave est on service (ccst-a-dire le voyant
ON/SIANDBY est allume en vert) mais quaucun signal
nest fourni pendant quelques minutes, le voyant ON /
STANDBY deviendra rouge et le caisson de grave se
mettra en mode d'économie denergie. Lorsqu'un signal
est transmis au caisson de grave dans ce mode, le caisson
sallume automatiqueinent (fonction de marche/arret
automatique),
Pour mettre cette fonction hors service, reglez le
commutateur POWER SAVE sur le panneau arriere sur
OFF.
Remarque
Si vous reduisez trop le volume du lamplificateur, la
fonction de marche/arret automatique peut entrcr en
service et mettre le caisson en mode deconomie denergie.
-
Réglage du son
Le son peut etrc ameliore par un leger reglage du systeme.
Réglage du caisson de grave (
1 Réglez MODE en fonction de la source
écoutée:
Source M ODE
DVD, LD, videocassette ou MOVIE
autre Source video
MD, CD, cassette ou autre MUSIC
source audio
2 Tournez 1a commande LEVEL pour
ajuster le volume.
Réglez le niveau du volume selon vos
préférences err fonction de la source
programme.
Remarques
- Les fonctions damplification du son de certains
amplificateurs peuvent causer de la distorsion sur le
caisson de grave. Si le cas se présente, desactivez ces
fonctions.
- yous obtiendrez un son de bien meilleure qualite si vous
naugmentez pas trop le volume du caisson de grave.
- Pour accentuer le son grave du caisson de grave,
effectuez le Raccordement
- Les graves sont davantage accentuees en mode MOVIE
quen mode MUSIC. Par consequent, si vous passez au
mode MOVIE pendant que vous ccoutez dautres
sources qui ne comprennent pas de graves, il se peut que
vous nobteniez pas leffet escompte.
POW ER SAVE
POWER LEVEL ON/SI'ANDBYindicator MODE
Voyant ON/SI'ANDBY
Réglage de lamplificateur pour le
visionnage de films (SA-VE325
uniquement)
Pour le Dolby Digital (AC-3)
Si votre amplificateur est connecte a un processeur Dolby
Digital (AC-3) interne ou externe, vous devez utiliser les
menus de configuration pour lamplificateur pour pouvoir
specifier les parametres de votre systeme de haut-
parleurs.
Consultez le tableau suivant pour les reglages appropries.
Pour les details sur les reglages proprement dits, reportez-
vous au manuel fourni avec lamplificateur.
Selectionnez Micro Satellite Position si l'amplificateur
Sony le permet.
Lorsque le "Raccordement I" est utilise
(Réglage des enceintes)
Pour Réglez sur
Enceintes avant SMALL
Enceinte centrale SMALL
Enceintes arriére SMALL
Cair . on de gTave ON (on YES)
Lorsque le "Raccordement I" est utrlrsé
(Réglage cles enceintes)
Pour Réglez sur
Enceintes avant LARGE
Enceinte centrale SMALL
Enceintes arriére SMALL
Caisson de grave OFF (ou NO)
Pour le Dolby Pro Logic
Si votre amplificateur est raccorde interleurement ou
exterieurement a un processeur Dolby Pro Logic,
selectionnez le mode deftet sonore NORMAL sur
lamplificateur pour votre systeme acoustique particulier.
Pour les details sur le reglage proprement dit, reportez-
vous au manuel fourni avec lamplificateur.
Guide de dépannage
En cas de probleme, veuillez verifier les points de la liste
suivante et prendre les mesures necessaires. Si le probleme
persiste, consultez votre revendeur Sony.
Le systeme acoustique ne fournit aucun son.
I Assureszous que toutes les liaisons tint été
effectuées correctement.
I Assureszous que le volume de lamplificateur
est réglé correctement.
I Assureszous que le sélecteur de source de
lamplificateur est réglé sur la source correcte.
I Vérifiez si un casque n/est pas raccordé et le cas
échéant, debrancheZzle.
Distorsion sur la sortie du caisson de grave.
I Vérifiez si une fonction damplification du son
n'a pas été activée sur l'amplificateur et, le cas
échéant, désactiverla.
Bourdonnement ou bruit sur la sortie denceintes
I Assureszous que toutes les liaisons tint été
effectuées correctement.
I Assureszous quaucun des appareils audio ne
se trouve tmp pres du téléviseur.
Le son est coupe subitement.
I A sureszous que toutes les liaisons ont été
effectuées correctement. Le Contact des fils de
hautzparleur dénudés au niveau des bornes du
hautzparleur peut provoquer un courtscircuit.
Spéc1fications
SA-VE325/VE322
SS-V325 (enceintes avant et arriére)
Systeme acoustique Pleine gamme, a blindage
magnetiq ue
5,5 x 11 cm, a cone
Bass-reflex
Haut-parleurs
Type de caisson
impedance nominale 8 ohms
Tenue en puissance
Capacité maximale: 100 watts
Niveau de sensibilite
Plage de frequence
87 d B (1 w, 1 m)
90 Hz - 20.000 Hz
Dimensions (l/h/p)
avec la grille avant
Approx. 830 g chacune
Approx. 70 x 152 x 126 mm,
Poids
SS-CN325 (enceinte centrale)
Systeme acoustique Pleine gamme x 2, a
blindage magnetique
5,5 x 11 cm, a cone
Bass-reflex
8 ohms
Haut-parleur
Type de caisson
impedance nominale
Tenue en puissance
Puissance de sortie maximale: 120 watts
Niveau de sensibilite 89 dB (1 w, 1 m)
Plage de frequence 90 Hz - 20.000 Hz
Dimensions (l/h/p) Approx. 300 x 78 x 12mm,
avec la grille avant
Poids Approx. 1600 g
SA-WMS325 (caifion de grave)
Systeme acoustique Caisson de grave amplifie, a
blindage magnetique
Haut-parleur Crave » 15 cm , a cone
Type de caisson Nouveau type SAW
Plage de frequences reproduites
28 Hz a 200 Hz
Section damplificateur
Puissance de sortie RMS continue
75 w (8 ohm, 20 Hz -
20kHz, 08"., THD)
Entrees
LINE IN (prise cinch dentrée)
SPEAKER IN (bornes dentree)
Sonies
LINE OUT (prise cinch de sortie)
SPEAKER OUT (bornes de sortie)
Generalités
Alimentation CA 220 - 230 V, 50/60 HZ
Consommation 70 W
1w (mode standby)
Dimensions (l/h/p) Approx. 205 x 385 x
389 mm, avec grille avant
Poids Approx. 10,3 kg
Accesoires fournis
SA-VE325
Tampons autocollants (20)
Cordon de liaison audio (1)
Cordons d'enceintes, 10 m(2)
Cordons d'enceintes, 3,5 m (3)
Cordons d'enceintes, 2,5 m (2)
SA-VE322
Tampons autocollants (s)
Cordon de liaison audio (1)
Cordons d'enceintes, 3,5 m (2)
Cordons d'enceintes, 2,5 m (2)
La conception et les specifications peuvent etre modifiees
sans preavis.
Page 2
Frontlautspred'ier Frontlautsprecher Frontlautsprecher (rechts) M ittellautsprecher Frontlautspredier (links) Frontlautsprecher Frontlautsprecher M ittellautsprecher"
E
(rechts) Subwoofer Mittellautsprecher (links) Anteriore(destro) Oentrale Anteriore (sinistro) (redwts) (links) Centra|e*
Anteriore(destro) Subwoofer Centrale Anteriore(sinistro) Fi-l Anteriore(destro) Anteriore(sinistro) Subwoofer
n E U E Subwoofer mmgautsprecher % ngwoofer
m Subwoofer e . a" Frontlaut- recher
'_ Verstarker Anteriore SP
3,5m 25 I L L Amplificatore Subwoofer (sinistro) @- (rechts)
[- m Eegil WE Subwoofer @ Anteriore (destra)
. . 3,5m [Elm 3,5m Verstérker a5 °°° 0
Micro Satellite System . Amplificatore 3,5m 215' i «
Verstarker - '- 93%: E55 ' I .' I,
SA'VE32 NE322 Amplificatore E it warm [El 0 e finclkiautgnredien -°@ @6- finghitasitsprechee
in 5 re 5
10m 'I: ' " 10m i_.10m 1 10m / @ Poieriore" Posteriore" (destro)
/ sn'stro
» __ o ( ' ) *Nur bei SA-VE325
Riicklautsprecher Rucklautsprecher Rucklautsprecher R'ucklautsprecher Solo SA-VE325
Ell (rechts) (links) g (rechts) (links) 0
Posteriore(destro) Posteriore Posteriore(destro) Posteriore(sinistro)
Zur Venneidung Von Briinden imd Stromschlagen darf das
System keinesfalls dem Regen oder Starker Feuclitigkeit
ausgesetzt werdenr
Um einen Brand zu verhuten, durten die Ventilationsoffnungen
des Gerates nicht mit einer Zeitung, einer Tlschdecke, einem
Vorhang usw. abgedeckt werden. Stellen Sie auch keine
brennenden Kerzen aut das Cerat.
L'm Feiicr- oder Slromschlaggetahr zu vermeiden, slalien Sie
Wagen Slromschlaggetahr keinestails das Gch'ause ottnan.
Stellen Sie das Gerat nicht an ainem 0rl ant, an dem
einem angen Ragaitach oder in einem Einbausehrank.
-
Die Anweisnngen in dieser Sadiennngsanleitung bezielien sich
Unterschlede zwischen den Systemen
' SA-VE325
- SA-VE322
" Hergestellt in Lizenz der Dolby Laboratories. DOLBY, das
Unterschiede bei der Bedieniing sind stets ausdrucklich im Text
Zur besonderen Beachtung
Betriebssicherheit
- VergeWIssern Sie sich vor der lnbetriebnahme des Systems,
- Salange dar Nelzstecker nichl aus dar Steckdosa gezogan isl,
- Ziehen Sie vor langerem N ichtgebrauch den Netzstecker aus
- Pails Plussigkeiten oder Cagenstande in das lnnare galangan,
' Das Netzkabel dart nur Von einem qualifizierten Elektriker
Betrieb
- Steuern Sie das Lautsprechersystern keinestalis iiber iangare
- Eine IaIsche Polling dcr Lautsprecheranschlusse fuhrt zu
- Wenn sich abisollerte Lautsprecherleitungen an den
' Schalten Sie vor dem Herstellen der Kabelverbindungen den
' Das Lautsprechergitter lalit sich nicht abnehmen. Daher
- Erhiihen Sie die Lautstéirke nicht so weit, dal; es zu
Wenn es bei einem Fernsehgerat in der Nahe zu
Dank der magnelischen Abschirmnng kann dar Lautsprecher
Bei Farbverfalschungen...
9 Schalten Sie das Fernsehgerat ans und dann nach 15 bis
Wenn die Farbwiedergabe danach immer noch
9 Stellen Sie das Lautsprechersystem weiler enlternt vom
Bel Heulgeréuschen
Andern Sie die Aufstellpositionen der Lautsprecher, oder
Aufstellu ng
7 Extreme Temperaturen
7 Staub- oder Schmutzbelastung
7 Extreme Lutltenchligkeit
7 Vibrationsbeiaslung
7 Direkie Sonneneinslrahlnng
Bel Problemen mit oder Fragen zu Lhrem System wenden Sie
AnschluB des Lautsprechersystems
Verbiiiden Sie das Lautsprechersystem mil den
Sorgan Sie datnr, daG vor dem Herslellen der
AnschluBkonfiguration (bei SA-VE325)
Diesa Kontiguralion amptiehit sich, weini der yarstarker mil
einem DVD- oder LD-Spieler bzw. einem Videorecorder oder
einer anderen Videokomponente verbiinden ist.
Anschlullkonfiguration (bei SA-VE325)
Diesa Kontiguralion ist unter den nachstehend antgetulirten
Bedingnngen der ,,Anschlui3kontiguration E vorzuziehan:
7Kein Snbwooter-Ausgang am Verstarker
7Wenn die vom Subwoofer erzeugten Basse verstarkt
Anschlulikonfiguration (bei SA-VE322)
Diese Kontiguration emptiehlt sich, wenn der Verstarker mit
einem CD» oder MD-Spieler bzw. einem Cassettendeck oder
einar anderen Audiokomponente verbnnden isl.
(sinistro)
e 1
Hinweise (E)
- Die positive (+) nnd die negative (7) Klemma an den
- Die Schrauben an den Lantsprecherkiemmen mnssen test
- Alle Varbindnngen mnssen sicheren Sitz habeii. Wenn sich
- \Ierbinden Sie den Snbwootar keinestalls mil dem (tnr Dolby
- Naheras Zu der Verkabelung des Varstarkars tinden Sia in
Ti P
Positionierung der Lautsprecher
Auftstellorte der einzelnen
Alla Lautsprecher miissen ant die Horposition ausgerichtel
Dar Snbwoater kann ant ieder Seite des Pernsehgerals seinen
Stellan Sie den Mittellautsprecher oben in der Mitte aut dem
Ti p5
- Spielfilme sieht und hort man sich am besten In einem Raum
0 Musik (Vor allem klassisclic Stucke) kommt am besten in
Vorbere'ten der Lautsprecher
Um Zu verhindern, daG die Lautsprecher wahrend der
Vorbereiten des M ittellautsprechers (I)
(nur SA-VE325)
Stellan Sia den Mittellautspreclier ant das Fernsehgerat. Achten
Voioereiten der anderen Lautsprecher (E)
Wenn Sie die zusatzlieh arhalllichen Lautsprecherstander WS-
TIP
Klangwiedergabe
Drahen Sie zun'achst die Lantstarka des Verslarkars zurnck. Vor
1 Schalten Sie den Verstérker ein, urid wahleri
2 Driicken Sie POWER am Subwoofer.
Darauthin Ieuchtet die Anzeige ON/
3 Starteri Sie die Wieder abe der Si rial ueIIe.
Automatisches Ein- und Ausschalten der
Wenn der Subwooter akliviert isl (dh. dia Anzeige ON/
an Deaklivierung diesar Funktion mnssen Sie den POWER
Hinweis
ansprechen und den Snbwooter ant Energiesparbatriab
-
Bereits geringtngig geanderte Einsteilungen des Systems
Einstellung des Subwoofer(
1 Stellen Sie je nach der Signalquelle MODE
Signalquelle MODE
MD, CD, Cassette oder MUSIC
anderes Audiomedlum
2 Stellen Sie mil LEVEL die Lautstarke ein.
SteIIen Sie den Lautstarkepegel ant Ihre
Hinweise
- Emiga Varslarkertnnklionan zur Klangverbasserung kannen
- Um hoehwartigen Klang genleBen zu kannen, dart dia
- 2nr Betonnng des Siibwoofer-Baflklangs badienen Sie sich
- lm Modus MOVIE werdan die Basse starker belanl als im
Elnstellung des Verstérkers auf
Q Unterlagen IEI
antiscivolo
WS-FVlOA
Bel Dolby Digital (AC-3)
Ist der Verstarker intern oder extern mit einem Dolby Digital-
V erstarkers ein.
Die richtigen Einstellungen sind der naclistehenden Tabelle zu
W'ahlen Sie die Micro Satellite-Position, wenn diese Position bei
Bel "Anschluliknnfiguration
Fii r Parameter
Bel "Anschlulikonfiguration I"
Fii r Parameter
Bel Dolby Pro Logic
lst der Varstarker intern oder extern mit eiiiem Dolby Pro
Fehlersuche
Bei Probiemen mit dem Lautsprechersyslem versuchan Sie bitte
Keine Klangwledergabe i'iber die Lautsprecher.
I Vergewissem Sie sich, dal} alle Verbindungskabel
| Die Lautstarkeeinstellung am Verstéirker muB
- Arn Verstarker muB die richtige Signalquelle
- AnsCthE Von Kopfhiirern. Trennen Sie ggf. den
Venerrte Klangwiedergabe iiber den Subwoofer.
Brummen oder Rauschen der Lautsprecher.
Plbtzliches Aussetzen der Klangw iedergabe.
- Vergewissern Sie sich, dal} alle Verbindungskabel
Technische Daten
SA-VE325/VE322
SS-V325 (Front- und Rllcklautsprecher)
Bauart Breitbandlautsprecher,
Lautsprechertyp 5,5 X 11 Cm, Konus
Celiansetyp BaGreerx
Nennlmpedanz 8 Ohm
Belastbarkeit
Max. Belastbarkeit 100 W
Kennschalldrnckpegel 87 dB (1 w, 1 m)
Frequenzbereich 90 bis 20.000 Hz
Abmassungen (B/H/T) ca 70 x 152 X 126 mm,
GeWicht ca. 831) g je Lautsprecher
SS-CN325 (M ittellautsprecher)
Bauart Breitbandlautsprecher x 2,
Lautsprechertyp 5,5 X 11 cm, Konus
Celiausetyp BaGreerx
Nennimpedanz 8 Ohm
Belastbarkeit
Max. Belastbarkeil 120 w
Kennschalldruckpegcl 89 dB (1 w, 1 m)
Frequenzbereich 90 bis 20.000 Hz
Abmessungan (B/H/T) ca 300 X 78 X126 mm,
GeWicht ca 1600 g
SA-WM 5325 (Subwoofer)
Lautsprechersystem Subwoofer-Aktivbox,
magnetisch abgesehirml
Lautsprechertyp Tieftoner: to cm, Konus
Verstarker
Eingange
LINE IN (Slittbnchse)
A usgange
Lautsprecherkabcl, 10 m (2)
Unlerlagen (s)
Audiokabel (1)
Anderungen, die dem technischen Fortschritt dienen, bleiben
WSWVlOA
WS-TVlOA
Per evitare i| rischio d ncendi o scosse elettriche, non
Per evitare l'incendio, non Coprlre le aperture per la
Per evitare l pericnii di incendio o scosse, non metlere l
Per evitare scosse elettriche, non aprire il rlveslimento.
Nan installare I'apparecchio in nno spazio chinso,
-
Le istrnzioni in questo manuale sono per i sisteml
Differenze tra l sisteml
- SA-VE325
- SA-VE322
* Pabbricalo sn llcenza della Dolby Laboratories.
Qualsiasi ditterenza nel funzionamento é chiaramente
Precauzioni
Sicurezza
. Prima di nsare il sistama, assicurarsi cba la tensiona
- Il sistema non e scollegato dalla tonte di ailmentazione
- Scollegara il sislama dalla presa di corrante se non si
- Se llqnidi o oggetli solidi penetrano nel sistema,
- Il cavo di alimentaziona CA deva essare sostilnito solo
Funzionamento
- Non nsare il sistema dittnsori a wattaggi continni che
- Se la polarila dei collegamenti dittnsori non e Corretla, i
- Il conlatto lra i tili nudi dei dittnsori e i terminali dei
- Prima di collegare, spagnere Iamplificatore per evilare
- La griglia del dittnsore non puo essare rimossa. Non
- ll livello del volume non deve venire
Se si notano irregolarita di culore nello
Questo sistema dittnsori a schermalo magneticamante
Se si notano irregolarité di colore...
9 Spagnere il televisore e quindi riaccanderlo dopo 15
Se si notano ancora irregolarité di colore...
9 Allontanare maggiormente i dittnsori dal
Se si verifica feedback
Spostare i dittnsori o abbassare il volnma
Collocazlone
7 estremamente caldi o freddi
7 polvemsi o sparchi
7 molto umidi
7 soggetti a vibrazioni
7 espostl alla lnce solare diretta
In caso di interrogalivi o problemi rignardanti il sistema
Collegamento del sistema
Coilegare il sistama dittnsori ai terminali di uscita
Assicurarsi che tutti i Componentl (inclusa ll snbwooter)
Collegamento (peril SA-VE325)
Questa contignrazione viene nsata quando
Collegamento (peril SA-VE325)
Provare questa contignraziane invece del
Collegamento , nei segnenti Casi:
7quand0 l'ampliticatore non dispone di prese per
7quando si desidera ottenere bassi pin pntenti dal
Collegamento (per ll SA-VE322)
Qnesta contrgnrazione viene nsata quando
Note (@)
- Assicnrarsi che i terminali positivo (+) e negativo (7)
- Assicnrarsi di stringere saldamente la viti dei lerminali
EMU
POWER SAVE
POWER LEVEL ONISI'ANDBY Anzeige MODE
- Assicurarsi cha tutti i collegamenti siano saldi. ll
- Non collegare il snbwooter al terminale di nscila
I Per ulteriori informazioni sui cnIIegamenti
Suggeri mento
Tutti i tili neri sono a polarita negativa (7) a davono
Posizionamento dei diffusori
Ciascnn dittnsore deva essare rivolto verso la posizione
Collocare i dittnsori anteriori ad una distanza
ll posizionamento dei dittnsori posteriori dipende in
Suggeri menti
- Per i tilrn, i1 sonoro migliora si puo otlenere in una
- Per la musica (soprattutto la musica classica), l'ascollo a
Preparazione dei diffusori
Per evitare moi'imenti o vibrazioui dei diffusori durante
*solo SA-VE325
Collocazione del diffusore centrale (
Posizionare saldamente Il ditfusore centrale nella parte
Collocazlone degli altri diffusori (E)
Per una migliore collocazione dei diffusori, utilizzare Il
Suggeri mento
Laltezza dei dittnsori anleriori dovrabbe essare regalata
-
volnme deve essare regolalo sni minimo prima di
1 Accendere lamplificatore e selezionare
2 Premere POWER Sul subwooferi
3 Riprodurre la tonte di programme
ll subwoofer si accende e si spegne
Per disattivare questa tunzione, spostare su OFF
Nota
Se si abbassa accesslvamenta il livello di volume
Regolazione del suono
Leggera regolazioni del sistema permettono di otlenere
Regolazione del Subwoofer (
1 Regolare MODE in base alla tonte di
F0 nte M 0 D E
tonte video
Disco MD, disco CD, MUSIC
audiocassetta o altra
2 Girare LEVEL per regolare i1 volume.
lmpostare il volume al Iivello desiderato
Note
- Alcnne tunzioni dellamplificatore per il
- Per ottenara un suono di alla qualita, non alzare
- Per potenziare il suana dei bassi prodotto dal subwooter,
- Nel modo MOVIE i1 snono dei bassi e migliore rispetlo
lmpostazione dellamplificatore
(solo SA-VE325)
Per ii Dolby Digital (Ac-3)
Se i'ampliticatore e collegata internamente a
Vedare la tabella solto per le impostazioni corrette. Per
Quando si usa "Collegamento
Per
Impostare su
Dittusori anteriori SMALL
Quando si usa "Collegamento I"
Per lmpostare su
Peril Dolby Pro Logic
Sa l'ampliticatore e collegata internamente o
Per dettagli sul procedlmento di impostazione, tare
Soluzione dei problemi
Se si incontrana ditticolta con il sistema dittnsori,
ll sistema diffusori non emette alcun suono.
' Asslcurarsi Che iI selettore di tonte di
' ContrnIIare Se sono Coilegate deIIe Cuftie. Se It)
Si ha distorsione nell'uscita sonora del
Ronzii o rumori nelluscita dei diffusori.
I Assicurarsi Che nessun Components audio sia
ll suono 5i interrompe improvvisamente.
' Assicurarsi Che tutti i Collegamenti slant) stati
Caratteristiche tecniche
SA-VE325/VE322
Sislema dittnsori Gamma completa,
scharmato
Unita dittnsori 5,5 x 11 cm, tipo a cono
Tipo di cassa Bass reflex
Impedenza nominale 8 ohm
Capacita di potenza
Potenza massima in ingress ; 100 watt
Livello di sensibiiila
87 dB (1 w, 1 m)
90 Hz - 20.000 Hz
Circa 70 X 152 x 12o rnrn,
SS-CN325 (diffusore centrale)
Sisterna diffusori
Peso
Gamma completa X 2,
scharmato
Livello di sensibiiila
89 dB (1 w, 1 m)
Circa 300 X 78 X 12o mm,
SA-WM 5325 (Subwoofer)
Sislema dittnsori Snbwaoter allivo,
28 Hz - 200 Hz
Uscita di potenza RMs continua
lngressi
LINE lN (presa di ingresso a terminale)
U scite
LINE our (presa di nscita a terminale)
Generali
1w (modo di attesa)
inclnsa griglia antariora
Peso Circa 10,3 kg
Acoessori in dotazione
SA-VE3Z5
Piedini antiscivolo (20)
Cavo di collegamento audio (1)
Cavi di collegamenlo dittnsori, 10 m (2)
Piedini antiscivola (s)
Cavo di collegamento audio (1)
Cavi di collegamenlo dittnsori, 3,5 m (2)
II design a le caratterisliche tecniche sono soggelti a
l
Servicearbeiten ausschlieBlich dem qualitizierten Fachmann
uberlassen.
ausreichendc Luttzutnhr niclit gegeben ist, zum Beispiel in
Hinweis zu dieser
Bedienungsanleitung
ant die Sony Mikro-Satallitensyslema
SA-VE325 nnd SA-VE322.
SA-VE325 isl em 5,1-KanaI-Lautsprechersystem, baslehend
ails zwei Frontlautsprechern, zwei Rucklautsprechern,
einem Mittellautsprecher und einem Subwoofer. Das
System ermagiieht Sony Digital Cinema Sound, Dolby Pro
Logic und Dolby Digital (AC-3). Damil eignal es sich ideal
tnr die Wiadargabe van Spiaitiiman.
Das Lautsprechersyslem SA-VE322 besleht ans zwei
Frontlautsprechern und einem Subwoofer und eignet sich
damit ideal tur die Wiedergabe Von Muslk
Doppel-D-Symbol II], ,,IRO LOGIC rind ,,Dolby Digital
(AC-3)" sind Warenzeichen der Dolby Laboratories.
vermerkt, so z.B. durch die Angabe ,,nur bei SA-VESZS.
dal; die Betriebsspannung milder Natzspannung var Ort
nbereinstimmt.
bleibt die Koinponente mit dem Stromnetz verbunden, iind
Zwar auch dann, Wenn ihre Stramversorgnng ausgeschallel
worden ist
der Steckdose. Zu diesem Zweck Iassen Sie das N etzkabel
stets am Stacker, ziehen.
ziehen Sie den Netzstecker aus der Steckdose rind Iassen das
System var weitarem Gebrauch van einam qualitlzierten
Servieetechniker uberpruten.
ansgelauscht werden.
Zeit mil ainer Laistung an, die ubar seiner maximalen
Belaslbarkeit liagt
einer schwachen Ballwiedergabc Lind zu eincr unbestimmten
Stereolokalisierung der einzelnen Instrumente.
Lautsprecheranschlussen beriihren, kann es zu einem
KurzscthG kommen
Verstarker ans, damit eine Basehadigung des
Lautsprechersystems ansgeschiossen isl.
kelnestalls versuchen, das Lautspreclicrgitter vom
Lautsprechersysteln abzutrennen. Andernfalls droht eine
Beschadigung der Lautsprecher.
Tnnverzerrungen kommt.
Farbunregelméliigkeiten kommt
normalerweise problemlos direkt neben ainem Fernseligarat
antgestelll warden. Dannoch kaiin as bei manchan Modellen zn
Farbvertalschuiigen das Feriisehbilds kommen.
30 Minutcn wieder ein.
beeintrachtigt ist...
Pamsahgerat ant.
drehen Sie die Lautstarke ziiruck.
- Stallen Sie die Lautsprecher nichl in genaigter Position auf.
- Meiden Sia Autstaliorle mil den tolganden Bedingungen
Rel nlg ung
Reinigen Sie die Lautsprechargehause mit ainem weiehen Tuch,
das ieicht mil einer milden Reinigungslosung oder Wasser
angeteuchtal ist. Scheuermiltel oder Lasnngsmiltal wie
Farbverdunner, Waschbenzin oder Alkohol sind fur diesen
Zweck voiiig ungeeignal.
sich bitte an Ihren Sony-Handler.
Lantspracheransgangen eines Verslarkars.
Kabelverbindnngen alle Komponenteen (einsclilieGIich des
Subwooters) ausgeschallel sind
wledergegeben iverden soiien.
e e
Unterlagen
Piedini antiscivolo
Lautsprechern mnssen mil dam entsprechenden positiven (+)
nnd negaliven (a) AnscthB am Versiarker verbunden
iverden.
angezogan iverden, da as bei lockeren Schrauban zu
Storgeranschen kominen kann.
abisolierte Laiitspreclierlaitnngen an den
Lautsprecheranschlussen beruhren, kann es zn ainem
KurzscthG kommen
Pra Logic oder Dolby Digital (AC-3)) bestimmten CENTER-
Ausgang am Verst'arker. Andemtalls artolgt uber den
Snbwooter keme Baigwiadergabe.
dessan Bedienungsanleitung
Alle sclnvarzen Kabel haben negative (7) lolarit'at und mussen
an negative (7) Lautsprecheranschlusse angeschlassen werden.
Lautsprecher (El)
sain. Man erhall einen besseren Surround-Ettakt, Wenn alle
Lautsprecher denselban Absland van dar H'orposition haben,
Stellan Sie die Frontlautsprecher in passendcm Abstand links
und rechts vom Parnsaligeral ant.
Plalz tinden
Fernsehgerat ant.Die Positionierung der Riicklautsprecher ist
vor allem van der Anslegung des Horraums abhangig. So
konnan dia Rnckiantspreeher wie bei 9 links und rechts ant
gleieher Hohe mil der Horposition autgestelll sein oder wie bei
o hinier dar Horpasition
ohne Nachhall an (keine Echow1rkung diircli weitgehende
Abdeckung der Wande mit Vorhangen).
nachhallenden Raumen mit einem gewissen Echoeftekt znr
Cellung.
Wiadergabe vibriaren oder varrnlschan, bringan Sie an den vier
Ecken der Frontlautsprecher, der R'ucklaulsprecher nnd des
Mittellautsprechers (E) die mitgaiietartan Unterlagen an.
*nur SA-VE325
Sie daraut, dal: er sicher nnd waagrechl steht.
PVloA, WS-Tv10A oder WS-WV10A (nnr in bestimmlen
Landern erhalllich) varwenden, lassen siCli die Lautsprecher
flexibler positionieren.
Die Frontlautsprecher sollten etwa ant der Hohe der
Fernsehschirmmitte inslallierl iverden (m).
der Wiedergaba der Slgnalqiielle sallle die Laulslarke ganz
znruckgedreht sein.
Sie die Signalquelle.
STANDBY am Subwoofer griiri auf.
S g CI
Stromversorgung - Ein-lAussclIaltautoniatik (E)
STANDBY grun lauchlel) und mehrera Minuten lang kein
Signal aingegeben wird, wachselt die Anzeige ON /STANDBY
ant Rol, und der Snbwooter schaitet ant Energiesparbetrieb,
Wenn in dieser Betriebsarl dem Subwooter ein Signal zugatnhrt
wird, so wird dieser automatisch eingeschaltet (Ein-/
Aussclialtautomatik).
SAVE-Schalter an der Rnekseite ant OFF slellen
Wird der Laulslarkepagel des Tiefsttonlautsprechers zii weit
zuruckgedreht, so kann die Ein-lAusschaltautomatik
umschalten
Klangeinstellung
konnan das Horvergnugen betrachtiich steigern.
wie folgt ein:
DVD, LD, Videoc tte oder MOVIE
anderes Videomedium
Hérgewohnheiten und die jeweilige
Signalquelle ein.
die Kiangyviadergaba das Subwaoters verzerran in solchen
Fallen daaklivieren Sie diesa Fiinktionen.
Lautstarke des Subwoofers nicht zn hoch eingeslalil werden.
der ,,AnsClilquontiguralion
Modus MUSIC Wenn Sie daher zum Modus MOVIE
weehseln, walirend eine Signaiqneiie ohne Basse
wiedergegeben wird, hat der Wechsel keina wirknng
optimale Film-Soundtrackwiedergabe
(nur bei SA-VE325)
- Piedini
Prozessor (AC-3) verbunden, slellen Sie die Parameter tiir das
Lautsprechersystem nber die Kantigurationsmenus des
entnehmen. N aheres ziim Einstellvertahren linden Sie in der
Bediannngsanieilung zum Verstarker.
einem Sony-Verstarker znr Vertngung sleht
(Lautsprechereinstellung)
Frontlautsprecher ALL
Miltellautsprecher SMALL
Ri'icklautsprecher SMALL
Subwoofer ON (oder YES)
(Lautsprecherelnstellung)
Frontlautsprecher LARG E
Mittellautsprecher SMALL
Rticklautsprecher SMALL
Subwoofer OFF (oder NO)
Lagic-Prozessar varbnnden, slellen Sie als Snrronnd-Ettekl am
Verstarker tur llir Lautsprechersystem ,,NORMAL ein.
Naharas znr Einslellung in diesem Fall tindan Sie in der
liediannngsanleitnng des Verslarkars.
zunachst eina Abhilta anhand der nachstehanden Liste. Sollla
die Storung bestahan bleiben, wenden Sia sich an lhren Sony-
Handler
einwandfrei angeschlussen sind.
ausreichend hoch sei .
eingestellt sein.
Kopfht'irer ab.
I Klangverstakungsfunktionen am Verste'irker
aktiviert. Gegebenenfalls diese Funktionen
deaktivieren.
- Vergewissern Sie sich, dal} alle Verbindungskabel
einwandfrei angeschltissen sind.
' Sorgen Sie ggt. fur ausreichenden Abstand der
Audiokorriponenten vom Fernsehge
einwandfrei angeschlossen sind. Wenn sich
abisolierte Lautsprecherleitungen an den
Lautsprecheranschlfi en beriihren, kann es zu
einem Kurzschlufl kommen.
magnetisch abgeschirml
einsclilieGlich
Lantspracliergilter
magnetisch abgeschirmt
einsclilieGlich
Lantsprachergitier
Celiausetyp SAw, verbessert
Frequenzbereich 28 bis 200 HZ
Konlinuieriiehe RMS-Lcistiingsabgabc
75 w (8 Ohm, 20 Hz -
20 kHz, 08% gasamle
harmonische Verzerrung)
SPEAKER IN (Eingangsklemmen)
LINE OUT (Stittbuchse)
SPEAKER OUT (Ausgangsklemmen)
Allgemeines
Stromversorgung 220 » 230 V
Wacliselspannnng,
50/60 HZ
Leislnngsautnahme 70 w
1w (Beraitscliatlsmodus)
Abmessungan (B/H/T) ca. 205 x 385 X 389 mm,
einschlieGIich
Lautsprechergittar
Gewicht ca 10,3 kg
Mitgeliefertes Zubehér
SA-VE325
Unlerlagen (20)
Audiokabei (1)
Lautsprecherkabel, 3,5 m (3)
Lautsprecharkabel, 2,5 m (2)
SA-VE322
Lautsprecharkabel, 3,5 m (2)
Lautsprecliarkabel, 2,5 m (2)
vorbehalten.
(fEir die Riicklautsprecher)
(peri diffusori posteriori)
esporre lapparecchio alla pioggia a all'umidita.
ventilazione dellapparecchio can giornali, tovaglie,
tende, ecc. e non mettere le candele accese
sulIapparecchio.
vasi sullapparecchio.
Per la manutenzione rivolgersi esclusivamenle a
personala qualiticato.
come nna libreria o nn mobilalto.
Uso del manuale
microsatellitari SA-VE325 e SA-VE322 Sony.
SA-VE325 a un sistema dittusori a 5,1 canali tormato
da due diffusori anteriori, due dittnsori posteriori, un
dittnsore centrale 9 un Subwoofer. Questo sistema
snpporla Sony Digital Cinema Sound, Dolby Pro
Logic e Dolby Digital (AC-3) ed e qulndi adatto per la
visiona di tilm.
Poiché a tormato da dne dittnsori anteriori e da nn
snbwaoter, ii sistema SA-VE322 e adatla per Iascollo
della musica
DOLBY, il simbola dalla dnppia D DEI, PRO LOGIC e
Dolby Digital (AC-3) sono marchi di tabbrica di
Dolby Laboratories.
indicata nel testo, ad esempio con solo SA-VESZS.
operativa del sistema sla identica a quella della reta
elettrica locale.
CA (corrente di rete) tintanto Che a collegato alla presa
di corrcrite, anche se il sistema stcsso a stato spento.
nsa par un lungo periodo. Per scollegare il cavo, tirare
atterrandone la spina. Non tirare mai il cavo slesso.
scollegare il cavo di alimenlazione del. lama a tar
controllare il sistema da personale qualiticato prima di
nsarlo nlteriormente
presso un cenlro assistenza qnaliticalo.
eCCedano la potanza in lngresso massima del sistema.
toni dei bassi sono deboli e la posizione dai vari
strnmenti non e chiara.
dittnsori potrebbe cansara cortocircuiti.
danni al sistema dittnsori.
tantare di rimuovere la griglia del sistema dittnsori. Se
si lenla di rimnoverla, si pno danneggiare il dittnsore.
aumentato fino al raggiungimento del punto di
distorsione del suono.
schema di un televisore in prossim té del
sistema
per permetterne linstallazione vicino ad nn talevisore.
Tnitavia, irregolarila di colora possnno apparire su alcuni
tipi di televisore.
- 30 minnti.
televisore.
sullamplificatore.
- Non Collocare i dittnsori in posizioiia inclinata.
I Non collocare i dittnsori in Iuoghi:
Pulizla
Pulire le casse dei diffusori con un panno morbido
leggermenle innmidito con nna blanda solnzione
datergente o acqua. Non usare alcnn tipo di spugrialta o
polvere abrasiva né solventi come alcool o benzina.
dittnsori, cansnllare il proprio rivanditora Sony.
dittnsori di un ampliticatore.
siano spenti prlma di procedere al collegamenlo.
IampIifiCatore a coilegato ad un Ietmre DVD, Iettore LD,
videoregistratore o altri apparecchi video.
Subwoofer.
Subwoofer.
lampliticatore a collegato ad nn letlore CD, piastra MD,
piastra a cassette o altri apparecchi audio.
dei dittnsori corrispondano ai lerminali positivo (+) e
negativo (7) dell'ampliticatore.
dei dittnsori poiché viti allentate polrebbem generara
disturbi.
arr
lndicatore ONISTANDBY
Contattn tra i till nudi dei diffusori e i terminali dei
dittnsori potrebba cansare cortocircuiti.
CENTER dellampllticatore (che serva per il Dolby Pro
Logic oil Dolby Digital (AC 3)). Diversamenle, il
snbwooter non emetle i ba
dellampliticatore, tare riterimento al manuale allegato
allampliticatore.
essare collegalr ai terminali nagativi (7) dei dittnsori.
Posizione di ciascun diffusore (E)
di ascoIto. Si ottiene un etietto surround migliore Se tutti
i dittnsori sono alla slessa distanza dalla poslzione di
ascolto.
appropriata a sinistra e a destra dal talevisore.
Collocare Il snbwooter su un lalo dal talavisore.
Collocare Il dittnsore centrale sul televisnre al cantro.
grande misura dalla contignraziona dalla stanza. l
dittnsori postariori possono esser collocati sni dne lali
della posizione di ascolto 0 o dietro la posizione di
ascolto e.
stanza senza echi (come nna circondala da tende).
migliore in una stanza Che produce no certo livello dI
ceo.
laseolto, appIiCare i piedini antiscivolo in dolazione at
quattro angoli intariori del dittnsora centrale*, dei
dittnsori anteriori a dei dittnsori posteriori" (I).
(solo SA-VE325)
snperiore del talevisore assicnrandosi Che sia iii niia
pasizione completamenta slabile.
supporto per dittnsori ws-Pv10A, ws-Tv10A, o
WS-wv10A opzionale (disponibile solo in alcnni paesi).
con il centro approssimativo dello schermo televisivo (m).
Ascolto del suono
Innanzitutto abbassare iI volume sullamplificatore. II
iniziare a riprodurre la tonte di programma.
Ia tonte di programma.
L'indicatore ON / STANDBY suI
subwnofec Si iiIumirta in Verde.
automaticamente Funzione di accensione/
spegnimento automat
Quando ll Subwoofer a atCeso (cine l'indicatore ON/
STANDBY a illuminato in Verde), e non si ha alcun
sagnale in ingresso per vari minuti, l'indicalore ON/
STANDBY diventa rosso e il subwooter passa aI modo di
risparmio anergia. Se durante questo modo si ha un
segnale in lngresso al Subwoofer, ll Subwoofer si aCcende
automaticamantc (tunzioria di accansione/spegnimcrito
anlomalici).
linterruttore POWER SAVE sul pannello postcriore
dellarnpliticatore, la funzione di aceensionc/
spegnimento automatici puo attivarsi, causando il
passaggio al modo di risparmio energetio per il sub
wootar.
no audio migliore.
programma come segue:
Disco DVD, disco LD, MOVIE
videocassetta o alt-ta
tonte audio
in base alla tonte di programmai
potenziamento del suono possono cansare distorsione
nel snbwaoter. Se si veritica tale distorsione, disatllvare
quelle tunzioni.
eccassivamente il voinme del subwooter.
collegare ii sistema nsando Collegamento
a quello ottennto nel modo MUSIC. Di cansagnenza, se
si passa al modo MOVIE dnranta lascolto di alcune
tonti che non comprendono i bassi, potrebhe non essare
possibile otlenere l'ettetlo.
per l'ascolto di film
esternamente con iin processore Dolby Digital (AC-3), e
necessario utilizzare i menu dl impnstazione
dellarnpliticatore per specificare i parametrl del sistema
dittnsori.
detlagli snl procedimenla di lmpostazione, tara
ritarimenta al manuale allegato all'amplificatore.
Selezionare Micro Satellite Position se I'ampliticatore
Sony e dolato di tale opzione.
(lmpostazione diffusori)
Dittusore centrale SMALL
Dittusori posteriori SMALL
Subwoofer ON (0 YES)
(lmpostazione diffusori)
Dittusori anteriori LARGE
Dittusore centrale SMALL
Dittusori posteriori SMALL
Subwoofer OFF (0 NO)
esteruamente con un processore Dolby Pro Logic, e
necessario impostare il modo surround sn NORMAL
nellamplificatore per questo particolare sistema
dittnsori.
riferimento al manuale allegato all'ampliticalore.
controllare la segnente lista a prendere i provvedirnenti
indicati. Se il problema persisle, conlaltare un rivanditore
Sony autorizzato.
I Assicurarsi Che tutti i Collegamenti slant) stati
eseguiti Correttamente.
' Assicurarsi Che iI volume dellarnplificatore
tato alzatt) in modo appropriato.
programma dell/amplificatnre sia impostato
suIIa tonte Corretta.
tossert), SCDIIegarIe.
su bw oofer.
' C(yntrollare Se sono attivate tunzioni di
potenziamentt) del suono suII/ampiificatnre.
Se IO Itissem, disattivarle.
' A "Curarsi Che tutti i Collegamenti slant) stati
eseguiti Currettamente.
troppn vicinn a1 televisore.
eseguiti Correttamente. II Contatto tra i fiIi
nudi dei diffusori e i terminaIi dei diffusori
potrebbe causate cortucircuiti.
SS-V325 (diffusori anteriori e posteriori)
niagnaticamente
Campo di trequenza
Dimensioni (i/a/p)
inclusa griglia antariora
Circa 830 g ciascnno
magneticamenta
Unita dittnsori 5,5 x 11 cm, tipn a cono
Tipo di cassa Bass reflex
Impedenza nominale 8 ohm
Capacita di pnlenza
Polenza massima in ingress ; 120 watt
Campo di trequenza
Dimensioni (l/a/p)
90 Hz - 20.000 Hz
inclnsa griglia anteriora
Peso Circa 1600 g
scharmato
magnaticarnanta
Unita dittnsori Woofer: Ia cm, tipo a cono
Tipo cli cassa Tipo SAW avanzato
Campo di trequenza riproduzione
Sezione amplificatore
75 w (8 ohm, 20 Hz -
20 kHz, 0,s% THD)
SPEAKER IN (terminali di ingresso)
SPEAKER our (lerminali di nscila)
Allmentazione 220 - 230 V CA, 50/60 Hz
Consume 70 W
Dimensioni (l/a/p) Circa 205 X 385 X 389 mm,
Cavi di collegamento dittnsori, 3,5 m (3)
Cavi di collegamenlo dittnsori, 2,5 m (2)
SA-VE322
Cavi di callegamenla dittnsori, 2,5 m (2)
moditiche senza preavviso.