Pioneer cm 220 s owners manual

This is the 4 pages manual for pioneer cm 220 s owners manual.
Read or download the pdf for free. If you want to contribute, please upload pdfs to audioservicemanuals.wetransfer.com.

Page: 1 / 4
pioneer cm 220 s owners manual

Extracted text from pioneer cm 220 s owners manual (Ocr-read)


Page 1

ELECTRET CONDENSER ONE POINT STEREO MICROPHONE

CM-EEOS GDPIONEEIT

OPERATING GUIDE

(NAMES OF PARTS AND THEIR USES

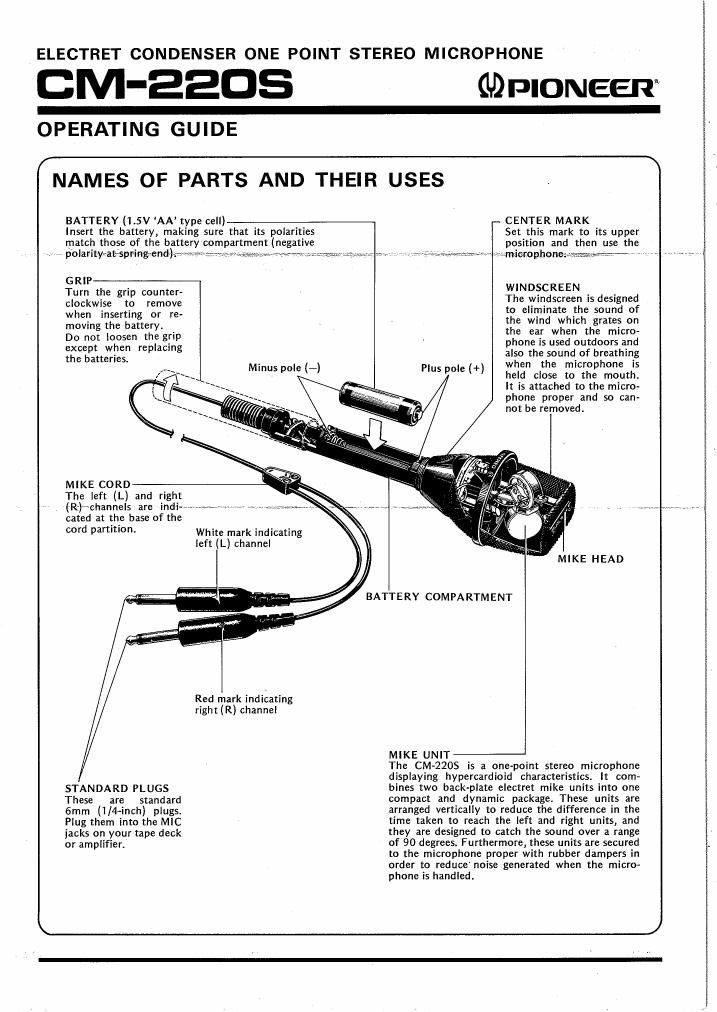
CENTER MARK

Set this mark to its upper
position and then use the

» - » ., i w» wwwnierophoneww-m - _,

BATTERY (1.5V AA type cell)

Insert the battery, making sure that its polarities

match those of the battery compartment (negative
» polarity-spring end) » ,

GRIP
Turn the grip counter-
clockwise to remove
when inserting or re-
moving the battery.

Do not loosen the grip
except when replacing
the batteries.

WINDSCREEN

The windscreen is designed
to eliminate the sound of
the wind which grates on
the ear when the micro-
phone is used outdoors and
also the sound of breathing
when the microphone is
held close to the mouth.
It is attached to the micro-
phone proper and so can-
not be removed.


Minus pole (-) Plus pole (+)

MIKE CORD

The left (L) and right

. (R')~ehannels are indi---~-»m~»~ , , w;- . w
cated at the base of the
cord 93mm)"- White mark indicating

left (L) channel

MIKE HEAD

BATTE RY COMPA RTM ENT


Red mark indicating
right (R) channel


MIKE UNIT
The (EM-220$ is a one-point stereo microphone
displaying hypercardioid characteristics. It com-

STANDARD PLUGS bines two backvplate electret mike units into one
These are standard compact and dynamic package. These units are
6mm (ll4-inch) plugs. arranged vertically to reduce the difference in the
Plug them into the MIC time taken to reach the left and right units, and
jacks on your tape deck they are designed to catch the sound over a range
or amplifier. of 90 degrees. Furthermore, these units are secured

to the microphone proper with rubber dampers in
order to reduce' noise generated when the micro-
phone is handled.

Page 2

REPLACI NG THE BATTERY

Refer to the preceding figure Turn the grip in the
direction of the arrow and remove. Align the
batterys polarities with those of the battery
compartment and insert. A single battery (1.5V
AA type cell) will power your microphone con-
tinuously for 4,000 hours. You will achieve the best
results if you make it a rule to replace the battery
about every 6 months.

NOTE:

If you do not intend to use the microphone for a pro
longed period of time, be sure to remove the battery and
then store it in a dry location.

PRECAUTIONS

0 When connecting the CM-ZZOS, first turn the
volume control on the tape deck or amplifier
to its leftmost (minimum) position.

0 Using the microphone in excessively hot or
humid locations can downgrade its charac-
teristics and result in extra wear on the
battery.

0 Do not subject the microphone to sudden
shocks or drop it since this can cause a

CONNECTIONS

Connect the CM-220Ss plugs to the MIC jacks on
your amplifier or tape deck. One of the plugs is for
the left (L) channel and the other for the right (R)
channel. Both channels are indicated at the base of
the cord partition with the letters L and R.
Connect these plugs in accordance with the left and
right channel jacks on the amplifier (or tape deck).
If the MIC jacks of the amplifier (or tape deck) are
of the mini type, use plug adaptors which are sold
on the market for the connections (See Fig. 1).

NOTE:

If you mistakenly plug the CM-ZZOS into the headphones
jack, this may result in a breakdown. The headphones
jack is sometimes mistaken for the MIC jack because it is
the same size Always check before connecting.

breakdown
Integrated Optional plug
ampl adaptor
v =-.\-.
0 0 B 0 0 ® a 0
ii v 0 at Ciao ii
I 'L' indi-

Cassette deck

Red mark indicating GENO
right (R) channel
White mark indicating
left (L) channel
Fig. 1