Jvc XLR 5010 BK Service Manual

This is the 81 pages manual for Jvc XLR 5010 BK Service Manual.
Read or download the pdf for free. If you want to contribute, please upload pdfs to audioservicemanuals.wetransfer.com.

Page: 1 / 81
Jvc XLR 5010 BK Service Manual

Extracted text from Jvc XLR 5010 BK Service Manual (Ocr-read)


Page 1

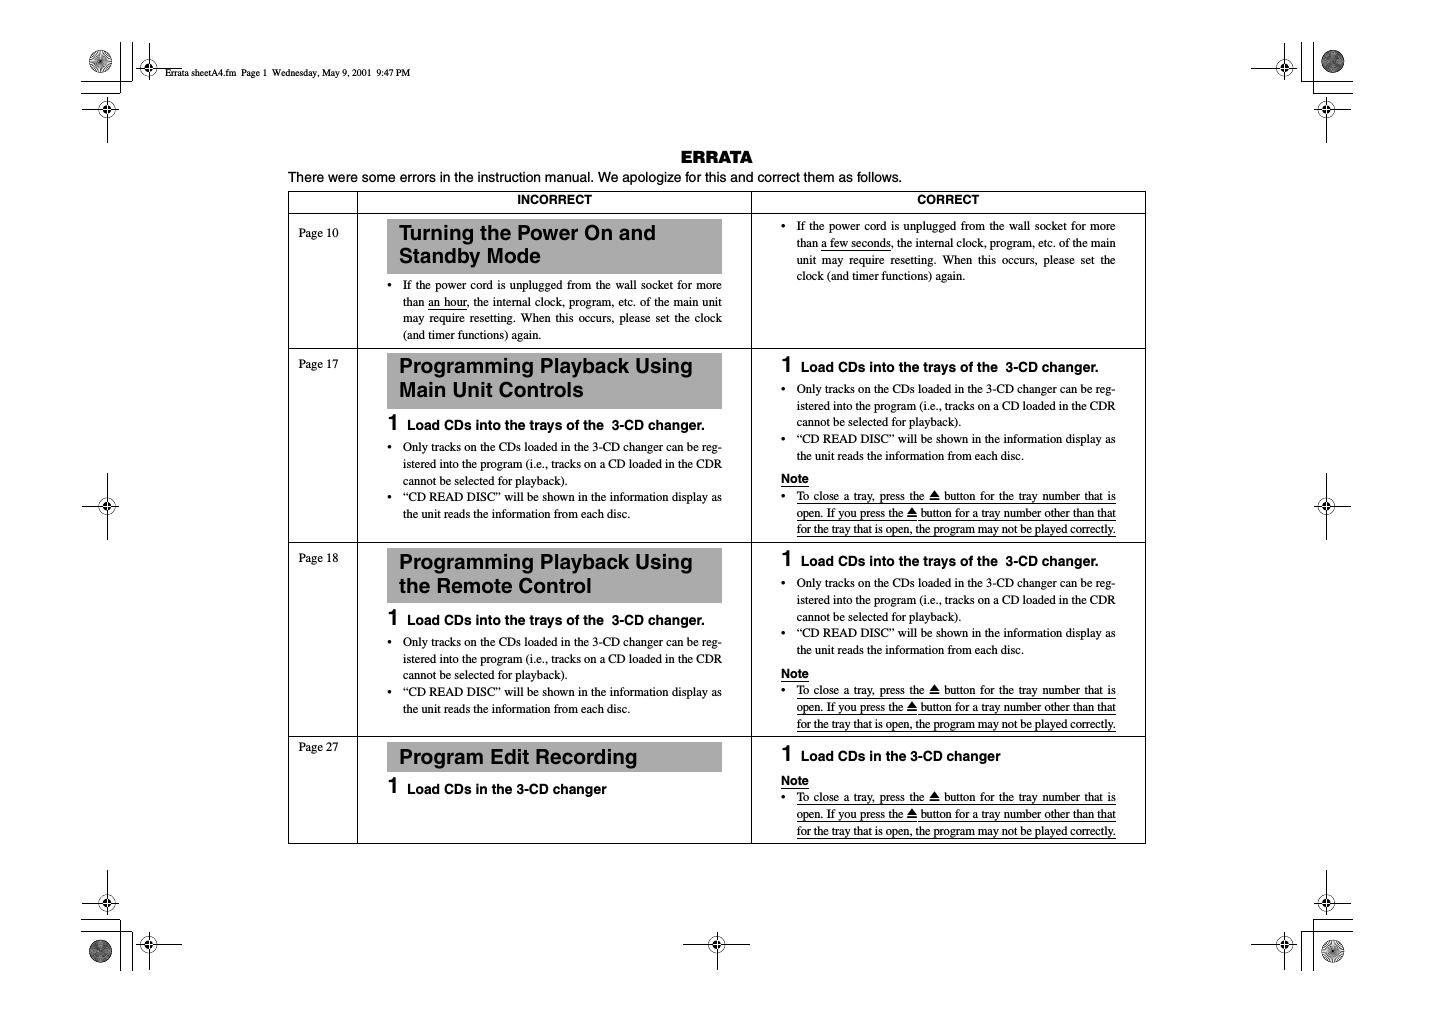
ERRATA INCORRECT CORRECT 4 Turn the MULTI JOG control or press the 2/3 (menu) button on the remote control to select HIGH or 1x.  If HIGH is selected, HIGH flashes in the display window.  Press the CANCEL button (main unit/remote control) to cancel the procedure and return to the normal display. 4 Turn the MULTI JOG control or press the 2/3 (menu) button on the remote control to select HIGH or 1x.  If HIGH is selected, HIGH flashes in the display window.  Press the CANCEL button (main unit/remote control) to cancel the procedure and return to the normal display. 5 Press the SET button. 4 Turn the MULTI JOG control or press the 2¥3 (menu) button on the remote control and choose the setting TR SPACE ON or TR SPACE OFF.  Press the CANCEL button (main unit/remote control) to cancel the procedure and return to the normal display. 4 Turn the MULTI JOG control or press the 2¥3 (menu) button on the remote control and choose the setting TR SPACE ON or TR SPACE OFF.  Press the CANCEL button (main unit/remote control) to cancel the procedure and return to the normal display. 5 Press the SET button. Set the timer immediately after turning on the power to the main unit for the first time. Additionally, should there be a power black- out that lasts for longer than one hour , or if the AC power cord of the unit is unplugged from the wall socket for longer than one hour , please check to see if the clock needs to be reset again before using any other operation.Set the timer immediately after turning on the power to the main unit for the first time. Additionally, should there be a power black- out that lasts for longer than a few seconds , or if the AC power cord of the unit is unplugged from the wall socket for longer than a few seconds , please check to see if the clock needs to be reset again before using any other operation. 5 Press the SET button.  "DAILY TIMER" is shown in the information window. To set DAILY TIMER Proceed to step 5 . To set ONCE TIMER Press the MENU button and display "ONCE TIMER", and then proceed to step 5 . 5 Press the SET button.  "DAILY TIMER" is shown in the information window. To set DAILY TIMER Proceed to step 6 . To set ONCE TIMER Press the MENU button and display "ONCE TIMER", and then proceed to step 6 . Setting the Unit for High-speed Recording Setting the Auto Track Spacing Function Setting the Present Time Timer Play (wake-up play) LE40829-001A Page 29 Page 30 Page 40 There were some errors in the instruction manual. We apologize for this and correct them as follows. Page 38 Errata sheetA4.fm Page 2 Wednesday, May 9, 2001 9:47 PM

Page 2

For Customer Use: Model No. Serial No. Enter below the Model No. and Serial No. which are located on the rear, bottom or side of the cabinet. Retain this information for future reference. STANDBY/ON CD1 CD2 CD3 CD REC PLAY MODE -REC REC MUTING REC SOURCE M E N U P IT C H 0 CHANCEL REPEAT CD PITCH + SET PITCH– RM– SXLR5010A REMOTE CONTROL CDR CD EDIT FINALIZE DISPLAY 1 2 4 5 7 8 369 10+ 10 FA D E SYNCHRO CONTROL STANDBY STANDBY/ON PLAY & EXCHANGE3-CD MAX MIN PHONESPLAY MODE PHONES LEVEL EJECT REC SOURCE SELECTOR XL-R5010 CD/CDR MULTIPLE COMPACT DISC RECORDER MIX BLANCECD LINE LINE MIC MULTI JOG REC LEVEL + – MIC CANCEL SET MENU PAUSEREC/ REC MUTING PLAY STOP SYNCHRO CD EDIT CD REC STOP PLAY PAUSE FINALIZE MIC LINE CD DIGITAL CD/CDR MULTIPLE COMPACT DISC RECORDER COMBINE ENREGISTREUR CHANGEUR DE CD/CDR XL-R5010BK LET0181-002A [ C ] INSTRUCTIONS MANUEL DINSTRUCTIONS XL-R5010BK.book Page 1 Monday, June 4, 2001 11:40 AM

Page 30

25 English English 1 Select a disc and start playback. Example: When planning to record a track on CD1 2 Insert a recordable CD-R or CD-RW disc in the CDR disc tray. The disc is read. 3 While the disc is playing back the track you want to record or if that track is being paused, press CD REC (main unit/remote control). 1TR DUBBING is shown in the information display. When a blank disk is in the CDR tray, UPDATE OPC is shown following 1TR DUBBING. When ADD FINALIZE? is shown in the information window: No response (no input) assumes that finalization is to be per- formed, or you can press the SET button (main unit/remote con- trol) to confirm that finalization is to be done. Press the CANCEL button (main unit/remote control) to keep the disc unfinalized. Note This message will not be shown if the menu FINALIZE func- tion setting is OFF. The default setting is ON. The CD restarts playback from the beginning of the track and the CDR starts recording simultaneously. When a track is recorded, its digital signals are recorded in their original form. A new track mark is automatically placed at the beginning of the track being recorded. When recording completes STOP DUBBING flashes and recording automatically stops. When recorded without canceling ADD FINALIZE? FINALIZE is shown in the information window after recording is stopped and finalization is automatically performed. To stop recording at any time Press the CD or CDR STOP 7 button on the main unit or the 7 (stop) button on the remote control to end recording. The recording mode is released after STOP DUBBING is shown in the infor- mation display. Notes There is no need to adjust the recording level when recording a digital signal. If the source CD being recorded from the 3-CD changer is itself a first-generation digital copy, digital recording cannot be per- formed. When this occurs, the recording type will switch from digital to analog automatically.Upon completion of recording, STOP DUBBING is shown in the information display. Always wait for the STOP DUBBING message to be cleared before proceeding with the next operation. You can make a complete copy of a CD that you want to record onto a CD-R/CD-RW disc. When recording a CD with song numbers but no silence between songs such as a live CD, for example, you can use the 1 DISC DUBBING feature to make a recording without any silence. 1 Select and stop the CD to be recorded. Example: To record the CD loaded in tray CD1. Only the selected CD is recorded. 2 Load a recordable CD-R or CD-RW disc into the CDR and close the tray. The disc is read. 3 Press the MENU button (main unit/remote control), and then turn the MULTI JOG control on the main unit or press the 2 or 3 button on the remote control until 1 DISC DUBBING is shown in the information display. 4 Press the SET button. DUBING READY? is shown in the information display. Only the selected CD is recorded. 5 Press the SET button. CD REC CD REC Remote Control Main Unit 1 Disc Dubbing STANDBY STANDBY/ON PLAY & EXCHANGE3-CD MAX MIN PHONESPLAY MODE PHONES LEVEL EJECT REC SOURCE SELECTOR MIX BLANCECD LINE LINE MIC MULTI JOG REC LEVEL+ – MIC CANCEL SET MENU PAUSEREC/ REC MUTING PLAY STOP SYNCHRO CD EDIT CD REC STOP PLAY PAUSE FINALIZE MIC LINE CD DIGITAL 12 3 3 4,5 1 STANDBY/ON CD1 CD2 CD3 CD REC PLAY MODE REC REC MUTING REC SOURCE MENU PITCH 0 C H A N C E L REPEAT CD PITCH + SET PITCH– RM– SXLR5010A REMOTE CONTROL CDR CD EDIT FINALIZE DISPLAY 1 2 4 5 7 8 369 10+ 10 FA D E SYNCHRO CONTROL 3 3 1 1 4,5 STOP (To be continued on the next page) XL-R5010BK.book Page 25 Monday, June 4, 2001 11:40 AM

Page 59

2-6 I H A BCDE FG 1 2 34 5 6XL-R5010BK XL-R5010BK 3CD Digital signal R802 R809 R808C821 C822 R805 R803 C608 C643 C624IC251 R631 C631D631 Q631R666 R632R635 R634C632 C815 C816 CN601C633 CN001C603 C604 CN608 IC291 Q602R602 R601 C602 C601 R636 C292 CN610 CN699R608 R607 IC651 C291 R667R288 C661 C651X651 C652R264 CN620IC201 R201 C653 C676 R682 R683CN606 R701R657 C642 C641 R691 Q601 R692R656R265 C693 C694C250 TP7 C691CN651 X251 TP6 R661 C692R659 TP5 SW680 D667R670 D653 K651 SW690 R286 R255 R260 R258 SW690 SW691SW691 SW692 R269 TP4 C859 C860B853 SW692 R813R812 SW693SW693SW690 SW691 SW692 SW693 B854 R614R261CN671 TP3 R617C260 D801 TP8IC851 R695 TP9 R696IC652 CN652 IC852 R285 TP2R284 R283 TP1R251 R252 R253 R254 R257 M851 TP10L853 M852L854 TP11 C003 C002VR001 C001SW1 SW2 SW3 SW6 SW5SW4 C658 IC801 C855 C812 C814 R801 C801 C811 C813 Q673 D251 C802IC601 C621 C677R605 C614 C615C611 C612 C623 C610C606 R276 C605 R603 D852 R293 R291R277 R804 R651 C657 C655R652 R653 R665 C656R662 R663 R664 C663 C664 C665C680 C679 C673R294 C695 R658 C255R273 R275 R668R270 C622 R671 R811 R672 C659 R673R295 C669 R292 C666R685 C259C257C256 C258 C253 K655 K656 K657 K658 C625 R669C626 C617 C667R613 R611 C654R851 R854 R271 R272C853 C852 R274C851 C254R256R259 R278 R279 R280 R281 R654 C616 1.5k 1.5k 18k1/10 220/10 5.6k 4.7k NI 6p 100/10UPD780076GK502 2.2 10/161SS355-X 2SA1037AK/RS/-X100 3.910 3.91/10 1/10 1.5/6.3 QGF1016C1-210.0220.022 0.022 QGF1016F3-04 XC62HR3502P-X DTC114EUA-X82k 220k 0.001 0.001 150 1/16 QGB1214J1-08S EMV7169-006R47k 47k MN662790RSC 1/16 4.710k 470p 1pQAX0599-001Z 1pNI QGB1214K1-08S10k 0.33/10 0.1/161k 1MQGF1016F3-08 1k100 22p 15p 680 DTC114EUA-X 6801kNI 0.0027 0.00270.1/16 0.001QGF1016F3-19 QAX0684-001Z 20k 0.00147k QSW0865-001 MA152WA-X100NI NI QSW0886-002 1k 1k 1k 1k QSW0886-002 QSW0886-002 NI 1/10 1/100 1.8k1.5k QSW0886-002 0 00NI 3.3kNI 1SR154-400-X LB1641 560 560NI NI LB1641 1k 1k 1k 1k 1k 1k 1k 1k RF-500TB-12560NI RF-500TB-12560NI QAR0123-001 0.1 11k 0.1 PPN-13KA10C VSH1173-0010.1/16 LA6541-X 0.1/16 390p390p 2.7k 0.022 390p 390p DTA114EUA-X MA112-X 1000pAN22000A-W 0.1/16 0.1/16220k 0.039/16 0.00270.1/16 0.1/501/10 0.056/1682p NI 270p39k UDZS5.6B-X 10k 110k 10k 1k 220/10 0.1/161k 1k 100 0.1/2568k 68k 330 0.022 0.022 0.15/100.1/16 100/10 BR24C01AFV-W-X 220/1010k 0.1/16 1k NI22k 22k 1.5M22k 100/10 680k 47k NI 0.047/1668k10k 220/10 1 NI68k NININI NI 0.1/16 NQR0007-002X NQR0251-004X NQR0251-004X NQR0251-004X 0.1/16 5.6kNI 330pHDU-110 0.47/105.6k5.6k NINI NI 22k 22k0.01 0.01 22k10/16 47/6.31k1k 1k 1k 1k 1k 1k 680p TRY2OPEN OFT RFENVBDOTRY2CLOSE TRDTE B+DFE F EFBAL TBAL GCTRL A+C F B+DA+C F- F+ T+ T-TRY2CLOSE TRY3OPEN TVDOUTL ECM ECS FODTRY3OPEN TRY3CLOSE TRY1OPEN TECDINDEX TVD ECM ECS TRD FOD RFENV FE TBAL FBAL OFT BDO ARFOUTR KCLK CAMP2 CAMP3 OUTL P.POSI1CAMP4 TRY1CLOSEP.POSI2 P.POSI3 SUB_OP/CL SUBQ OUT_L OUT_R CAMP4 CAMP3 EQSW CAMP1 CDTNO TRY2OPEN EQSWDQSY SBCK SUBC MCS KCLK KCMND MRDY DQSY CDINDEXCDCOPY CAMP2 FM+ FM- SM-TRY3CLOSESQCK MCLK TRY1OPEN SM+TXD0 RXD0 MSTAT OUTR AM- CM- SRDATA LRCK BCLK CDTNO CDCOPY OUT_L OUT_RMDATA MLD DMUTE STAT /RESET E ARF AM+ CM+ T+ SM-T- SM+ BLKCK FM- FM+F+ F- CAM_CW CAMP1MSTAT KCMND MCS MRDY /RESET STAT SUBQ DMUTE SQCK MLD MDATA MCLK SRDATAP.POSI3 P.POSI2 P.POSI1 SUB_OP/CL ACTU_CW SUBCRXD0 GCTRLSBCKTXD0 TRY1CLOSE LRCK BCLKAM- AM+ ACTU_CCW CAM_CCW CAM_CW CM- CM+ CAM_CCW ACTU_CCW ACTU_CW BLKCK 3CD Changer mechanism section TO CN615 SHEET 1/4 TO CN616 SHEET 2/4 TO CN617 SHEET 2/4 SHEET 4/4