Cambridgeaudio incognito lr 10 owners manual

This is the 2 pages manual for cambridgeaudio incognito lr 10 owners manual.
Read or download the pdf for free. If you want to contribute, please upload pdfs to audioservicemanuals.wetransfer.com.

Page: 1 / 2
cambridgeaudio incognito lr 10 owners manual

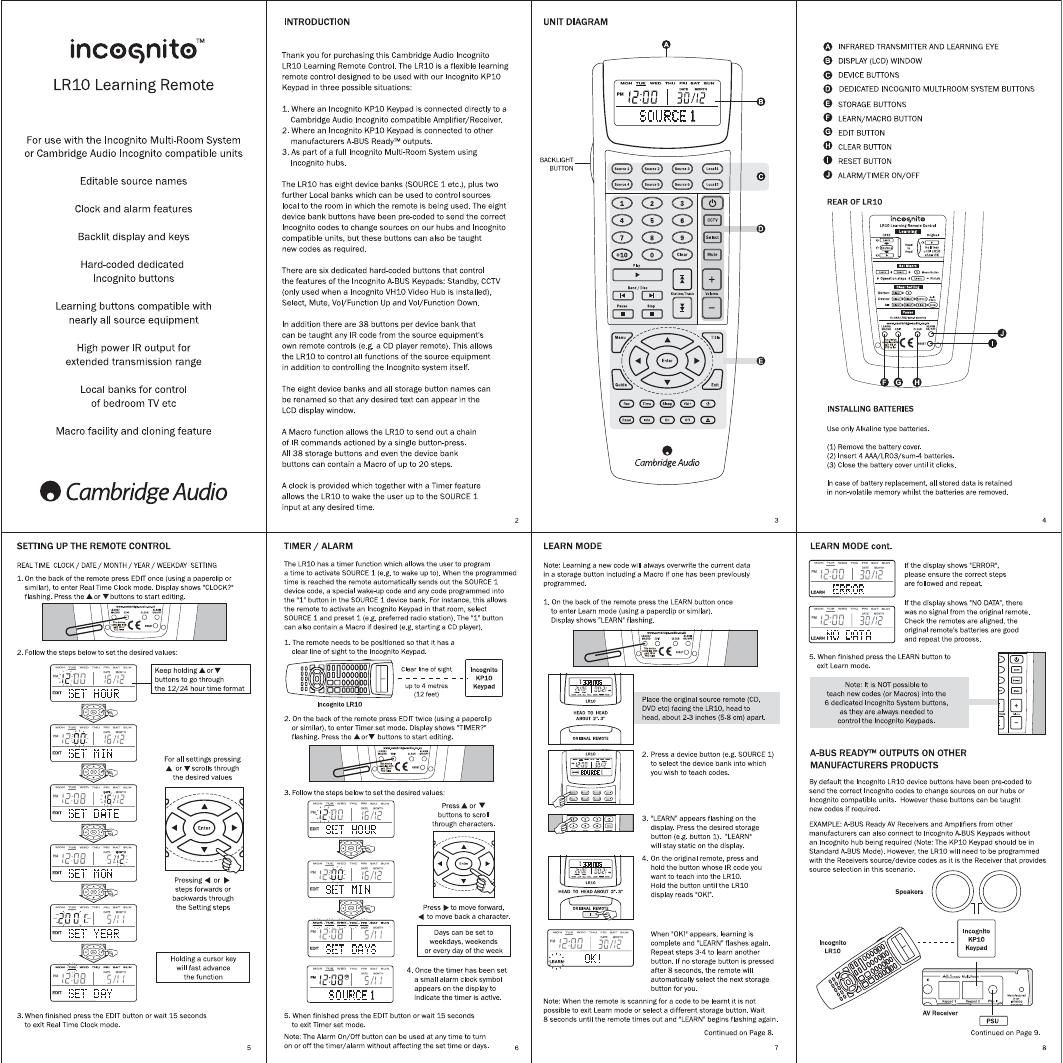
Extracted text from cambridgeaudio incognito lr 10 owners manual (Ocr-read)


Page 1

INTRODUCTION

UNIT DIAGRAM


. . ru
Incosn'te ? Q INFRARED TRANSMITTER AND LEARNING EVE
Thankyou for piirchasihgthis Cambridge Audio Incognito i \
U110 Leamlng Remote ConnoI The LRlO Is a flexlble Ieamlng e DISPLAY (LCD) WINDOW
. remote control designed to be used with our Incognito KP10 6 DEVICE BUTTONS
LR 10 Lea rn I ng Remote Keypad In three possible situations- :fi: W :32 'Z'amiw 9 DEDICATED INcoeNlTo MULTIRooM SysTEM BUTTONS
au . ,1 ,
ic -Ll LI u/iE
1 Where an Incognito KP10 Keypad Is connected directly to a I 9 STORAGE BUTTONS
Cambridge Audio Incognito compatible Amplifier/Receiver. I .IRCE I. G LEARN/MACRO BUTTON
2. Where an Incognito KP1o Keypad is connected to other e EDIT Burro
For use WIth the Incognlto MUItIaRoom System manufacturers AabUS Readyw outputs 0 CLEAR BUWON
0y Cambridge Audio Incognito com patible units 3. As part of a fuII Incognito MultIaRooIn System usIng BACKUGHT / 0 RESU BUTTON
Incognito hubs. 3mm 6 o
. ALARM/TIMER ON/OFF
EdltabIe source names The LRm has eight device banks (SOURCE lam). plus two I id 5
further Local banks which can be used to control sources
CIOCk and alarm features local to the room in which the lemme Is Doing used. The eight G) CD CD REAR 0F LR)
device bank buttons have been preceded to send the correct I l W I l I
Incogmm codes (a Change souvces on our hubs and lnodgmto ® ® ® 0 I I I I mm-m" I
Backllt dlspIay and Keys compatible units, but these buttons can also be taught (D ® ® I i W
irew codes as required. ® I
I
a I m I
Hard coded ded'cmed There are six dedicated hardacoded buttons that control [:1
INCOENIIO buttons the features of the Incognito AVBUS Keypads: Standby, CCTV @
(onIy used when a Incognito VH10 Video Hub Is Installed), (3.."er imam...
Learning buttons compatible with Select. Mute. VoI/Fuflctiorl Up and Vol/Function Down. ,m. m, [E]
nearly all source equipment In addition there are as buttons per device bankthat I iwia -;
can be taught any lR code from the source eoiiipment's
HIgh power IR output for own remote controls (e.g. a CD player remote). This allows
. the LR10 to control all functIons of the source equipment
extended transmlsslon range In addition to controlling the Incognito system rtself G
LoCaI banks for COHIIOI The eight devlce banks and all storage button names Can _ e
be renamed so that any desired text can appear In the - ®
Of bedroom TV etc LCD dISDIay wmdow. ® m INSTALLING BATTERIES
@ E) Q
Macro facillty and clonlrlg feature A Macro function allows the LR1o to send out a chain U WWW We mm
of IR commands actiohed by a single buttonepfess. O [1) Remove me bafiemoven
All as storage buttons and even the device bank _ _ (2, rm 4 WARM/SW4 gage,
buttons can contain a Macro of up to 20 steps. CambridgeAudm (3) dose the battery cover untii it ciicks.
C b Id A d- A clock Is provided which together with a Timerieature " case 0 MIMI 'ePacememfstled dam 5 laws
C I I H ge U IO allows the UM!) to wake the user up to the SOURCE 1 " "WV" 9 E WW 5 e 9" a mm"?
Input at any desired time.
2 3 4
SETTING UP THE REMOTE CONTROL TIMER / ALARM LEARN MODE LEARN MODE cont.

REAL TIME CLOCK/ DATE/ MONTR / yEAR / WEEKDAY SEWING

1 0n the back ofthe remote press EDIT once (using a paperclip or
siniilarl, to enter Real Time Clock mode. DIsplay shows CLOCK?
flashing Press the Am v buttons to start editing.


Keep haIdlnngrV
buttons to go through
the 12/2A hourtime iormat


Fofall sclllngs pressing
A UstcfulIs through
the desired values

PICSSIng 4 or >
steps lorwards or
backwards through
the Setting steps

Holding a cursor key
WIII fastadvance
the function

3 When finished press the EDIT button or wait 15 seconds
to exIt Real Time clock mode

The LR10 has atimerfunction which allows the userto program

atinie to activate SOURCE 1 ie.g to wake upto). When the programmed
time Is reached the remote automatically sends out the SOURCE 1
device code. a special wakerup code and any code programmed Into
the 1 button In the SOURCE 1 device bank. Fol Instance. this allows
the remote to activate an Incognito Keypad In that room. select
SOURCE 1 and preset 1 can also contain a Macro It desired leg starting a CD playerl.

1. The remote needsto be positioned so that It has a
clear line ofsighttothe Incognito Keypad.

Clear line of sight Incognito
______ KPlD
up to 4 metres Keypad

I12 feetl

Incognito LRJK)

2 on the back ofihe remote press EDITtwice (usinga paperclip
or simIIarI. to enter Timerset inode Display shows TIMER?
flashing Press the AolV buttons to start editmg

Ivote- Learning a new code will always overwrite the current data
In a storage button Includinga Macro If one has been previously
programmed

1 on the back or the remote pressthe LEARN button once
to enter Learn mode iusinga paperclip or sImIIarI.
Display shows LEARN flashing

I Tamra...

Place the original source remote (CD,
DVD etcl racing the Lhto, head to

"EMS?" head. about 23 Inches (sad crnl apart.

Press A or V
buttons to scroll
through characters

Press No move torward.
4 to move back a character.

Days can be set to
weekdays. weekends
or every day of tho wcok

4 Once the timer has been set
a small alarm clock synibol
appears on the display to
Indicate the timer Is active

5 When linished press the EDIT button orwaii 15 seconds
to exit TIrnerset Inode

Note The Alarm on/off button can be used atanytime to turn

on or off the timer/alarm without affectingthe set time or days 5


was? 1;
SEIUREEI

2 Press a device button [e.g SOURCE 1)
to select the device bank Irito which
you wish to teach codes

to

LEARN appears flashIng on the
display Press the desired storage
button (e.g. button 1) LEARN
will stay static on the display

a

0n the DVIgmaI remote. press and
hold the button whose IR code you
want to mach Into the LR1o

hold the button until the LR1o
display reads OKI.

Atria ro uuomvr 273'

When OW appears. learning Is
complete anti LEARN iloshes again.
Repeat steps 34: to learn another
button If no storage button Is pressed
after 8 secondsthe remote will
automatically select the next storage
button for you.

Note When the remote Is scanning for a code to be learnt It Is not
possible to exit Learn mode or select a drfferent storage button Wait
8 seconds until the remote times out and "LEARN begins flashing again

Continued on Page 8

lfthe display shows ERROR.
please ensure the correct steps
are followed and repeat

If the display shows NO DATA. there
was no sIgnal trom the original rernote.
Check the remotes are aligned. the
original remotes batteries are good
and repeat the process

5 When finished pressthe LEARN button to
exit Learn mode

Note. It is NOT possible to
teach new codes (or Macros) Into the
6 dedicated Incognito System bunonsr

as they are always needed to
control the Incognito Keypads

LII-JUUUU

A-BUS READYW OUTPUTS ON OTHER
MANUFACTURERS PRODUCTS

By delault the Incognito LRlo devIce buttons have been preceded to
send the correct Incognito codes to change sources on our hubs or
Incognito compatible units. Howeverthese buttons can be taught
new codes If required.

EXAMPLE AVBLIS Ready Av Receivers and Amplifiers from other
manufacturers can also connect to Incognito ARBUS Keypads Without

an Incognito hub being required (Note The KPlo Keypad should be In
standard AaBUs Mode) However. the LRIO Will need to be programmed
With the Receivers source/device codes as It Is the Receiver that provides
source selection In this scenario.

Speakers

'II'

IncognIto
KPiO
keypad


Av Receiver

Continued on Page 9

Page 2

AVBUS READYM OUTPUTS ON OTHER
MANUFACTURERS PRODUCTS
1 0n the back ofthe remote press the LEARN button once

to enter Learn mode Iuslng a papercllp orsllnllar)
Display shows LEARN tlashlng.

l MJHWqu


2. Press and hold for 5 secorlds
the devtce button Ie.g SOURCE 1)
Into whlch you want to teach
the new code (and replace the
pvecode) LEARN wlll stay
statlc on the dlsplay

.w

Pressthe approprlate
Soutce/devlce button on
the AV Recelver remote.
and hold untll the
dlsplay reads OW

.6

When DKI appears Ieamlngts
complete and LEARN llasnes

agaln. Repeat steps 23 to learn
the othersaurce/devtce buttons

to I7 rm
rt Du

earnlng new codes lnto the Source/devlce huttons replaces
the Incognlto codes that have been preeoded tnto thern.

To recover the orlglnal codes. perform a Clear key or Clear
DeVlce on each deylce button ln turn Thls wIII reset lts codeto
the dedlcated lncognlto source codes Alternatively a Clear All
operatlon wlll reset the whole renlote to lts default factory
settlngs lncludlrlg all mercodes See the CLEARING

STORED DATA sectlon for nlore tnlormatlon

BUTTON LABEL EDITING

wnen devtce orstorage buttons are pressed. the dlsplay shows a
default label The LRIO however also allows users to change
these labels (up to 8 characters). Please see AVAILABLE
CHARACTER TADLE tor the avallable character set

""'".Z.-.c.-a I
0 t2. .l
@on

2


1. On the back ofthe remote press
the EDIT button a tlnles (ustnga
papercllporslnlllar) to enter
Label edttrng mode "LABEL2
wlll appearon the dlsplay

2. Press the button whosc dlsplay name you want to change

3 The dlsplay shows the name wlth thellrst cllaracterrlashlng
PvessAof V
buttonsto scroll
through characuers

Next Press p to move forward.
character 4 to move back a characlcr.

weal wraunl um

4 Press the CLEAR button on the front of the remote to clear
a character or rnsert a space The name wlll be automatlcally
centered when edltlng ls complete.

5. When flntshed press the EDIT button orwalt 15 seconds
to cklt Edlt mode.
10

SETTING A MACRO

A Macro ls a chaln or commands actloncd by a stngle button press.
Any storage button on the LR1o can contatn a Macro or up to

20 steps Delays of 199 seconds can be programmed between
steps lf deslred

EXAMPL .

Creatlng a Macro called from the 0 button ln the SOURCE 2
deVlce page that turns on a CD player. watts 10 seconds.
selects Track One and then Play

Q Q 1. Select the devtce banktnat contains
I l a E; Q a) the button to hold the Macro
(SOURCE 2 for thls example).

:0

On the back of the remote
press LEARN/MACRO tuslng
a papcrcllp or slrnllart twlce
to enter Macro mode

w I7 I77 I"
tcuu I fr.

[I The dlsplay shows "MACRO?.

3 Press the button to contalrt the
Macro (t) forthls examplel.

The dlsplay wtll show
M.POWER ocorttlrmthat
the Macro WIII be entered
lntothe L') button

The dlsplay wtll then show
STEP 1 to confirm that the
first Macro step ls reoulred

rl Ltlr

Note: It a button ts not pressed wttnln appmxlmaler
15 seconds the LR1o wtll eklt Macro mode

a) a) at a: E) A. For tnts example. by ptesslng
and tongue an arm to.
10 seconds a 10 second delay
ls selected beforethe next step ls
perfornled It counter In the top
rlght ofthe dlsplay counts up
frorn 199 seconds. Lettlng go of
the ON button when the counter
reaches 10 selects the 10 second
delay. II no delay ls reoulrcd.
press and release the CN button
lrnmedlately

Press and hold any Macro
step to select a delay of
199 seconds betore the
ncxlswo ts performed.

Contlnued on Page 12.
11

SETTING A MACRO Cant.

sutnrln lrrro
lE/rlE

5 The dlsplay wlll

show STEP 2"
N. -u u

Press the 1" button

co

The dlspIay wlll
show STEP 3

.V lttnrl lr
tC-LILI lCl t

Press tlle Plat/(Pl button.

7. The dtsplay wlll show STEP 4.
on the back or the remote
press the LEARN/MACRo
button to rlnlsh. as no fourth
step ts reoulred for thts
partlcular Macro

«v t-.t~rn
rr' lE/IE The dlsplay WIII show MARDKI
- to contlrm the Macro has

been successrplly learnt

OPERATING A MACRO

To call a Macro slmply press the button tllat youtaught the
Macro lnto. The dlsplay will then show the steps and count
down any delays programmed as the Macro ls played back.

NoTEs ON MACROS

Macros can be programmed lntc the source buttons ln the sanle
way as the storage buttons. In thls case the flrst code sent out by
the source button Macro wlll always be the source buttons own
code, followed bythe steps that you program ln

Thts flrstcode wtll be the pretpded Incognlto source code ora new
code lf the source codes have been replaced wlth a learnt code as
perthe LEARNING CODES INTO DEVICE BUTTONS sectlon.

A Macro cannot conmln as a step a button thatalso conmlns a
Macro. Iryou do program a Macro button asa step ln another
macro the LR1o wtll not do anythtng for thls step, but all other
steps wlll work as expected

Delays of 199 seconds can be programmed between Macro steps.
the default delay Ilf no delay ls speclfiedt ts 0.5 seconds

The dedlcated Incogntto Multeroom System buttons CANNOT
conLall't Macros.
12

CLONING

For ease of setup where a user may have more than one LR1o.

the complete contens of a remote IIR codes. Macros. button names
and clock settlngs) can be transferred to another LR 10 Remote by

a Clonlng process one remote must he set to transmlt nlode whllst
the otherset to recelve mode, whllelolned by a CIorItrlg cable

0n the back ofthe remote press the EDIT button 4 tlmes (uslng a
Papercllp ot slmllarl on BOTH remotes to enter Clone mode
REC/TRX' wlll appear on both the dlsplays.

M:

I LR10

LR1O
SET As 551 As
TRANS RECEIVER
MIrTER

CLorth? cAoLE

For the transnllttlng LR1o.
Pressthe 4 button unttl
TRx lsflashlrlg.

For the recetvmg LR1o.
Press the 4 button unttl
REC lsflashlng

.t I- on tam

Ltll lulu

_ Pless ENTER on 015
762 U recelvng remote
DlsDIay shows WAITING

I-I
IB'U'J I

Press ENTER on the
transrnlttlng remote
Dlsplay shows "SENDING.

The recenrlng remote display
wIII now show REOINC to
lndlcate lt ls recelylng data

After approkllnately 7 mlllutestne dlsplays sllould show OR!

and return to normal operatlon. All data has been transferred

Itthe clone tells the recelver remote wlll show ERROR then
CLREPT (Clone Repeatl Put the transmlttlng remote back lnto
Clone mode and repeat the process. Asucocssrul clone must be done
to the recelvlng remote once the clone process has been started.

as clonlng overwrltes the complete software ln the recelvlltg remote 13

CLEARING STORED DATA

1. To clearthe IR code data ln a slngle button. flrst selectthe deVlce
bank (SOURCE 1 ethtllat contatnsthat button then press the CLEAR
button on the back ofthe remote once (ustnga babercllp or stmtlar).

ICC I l .


W" A w" T" I: 2 when the dlsplay shows
M II: nil] I rE/lr' "CLR REW press the button

to be cleared.

Note: Cleartng a button does not affect the buttons name lf
It has been edlted. Cleartng a devtce button resets the code to
the Incognlto plerCode.

2 To cleattlle IR code data In a whole deVlce bank press the
CLEAR button twlce

., WhentheolsolayshowsCLRDEW
PMIEI-I-II-I I lr l'r

press the deVlce button for the devlce
bank (SOURCE 1 etc>to be cleared.
I 5 All buttons ln that devtce bank wlll be
' cleared

ULI ll: lE

Note: Cleartng a devtce button does not affect the deVlce nante or any
button names If they have been edlted. butttoes clear all codes and
Macros. and TCCOVCrS the Incognlto precede tor the demon bank button.

3 To cleatALL the IR code data and Macros tn the remote lncludlng
all devlcc. button and precede names and all button names.
press the CLEAR button a tlmes

H W When [he dlsplay shows
me I' IIII F F
to at, I long

CLR ALL? press and
hold the ENTER button
chaRPVDx4SeCollds.

The dlsplay wlll show
"CLEARING. and may
take a mrnute or so
to complete

4 After each clearlrlg operatlon (Clear hey. Clear DeVlce or
Clear All) the LR10 wlll automatlcally exlt Cleartng nlode.

Note: When clearlng. all sotthe/devlce button codes wlll be
returned to then ractory default Incognrm codes.

14

OPERATING THE REMOTE CONTROL
NORMAL OPERATION

1. Press a deVlce button.

2. Press the deslred storage button. If no IR code data ls stored.
the dlsplay shows EMPTV. Ifan IR cede ls present ln the button
the lit, symbol thI appear whllstthe code ls sent

BUTTON AND DISPLAY BACKLIGHTING

Press the light button to turn on the remotes backllght functlon.
All the buttons and the LCD dlsplay wlll Ilght up for nlgllt tlme vlewtng

LOW BATTERY IN DICATO R

When the battery ls low. a battery symbol appears on the dlsplay

When the battery symbol starts
rlashlng, all remote funottons are
locked unttl fresh betterles are
lltstalled

RESET

Press the RESET button to restart the LR1o Alter reset. all data
remalns. but the real tlme clock and date have to be set agaln
Reset ls used lrt the unllkely eyentthatthe LR10 locks up due
to statlc dlscharge or other UnIofeseen events

AVAILABLE CHARACTER TABLE


'JIJHHEI31234 STE: 7"-
??ddxfihla'u.-{? FI'IH
911712.1'STIJ'I'HILFEEJlttT?I'l'~'I
it.x'EI".13':'UIlll-U"}LI "

O'. Eééééiiiififilfifirfiflfifilfl
fil" I; +I:I>SPACE \

i
5

El
I


15

COMPLIANCE WITH FCC RULES:
THIS DEVICE COMPLIES WITH PART 15 OF THE FCC RULES.
OPERATION IS SUBJECT TO THE FOLLOWING TWO
CONDITIONS. [1) THIS DEVICE MAV NOT CAUSE HARMFUL
INTERFERENCE. AND I2) THIS DEVICE MUST ACCEPT ANy
INTERFERENCE RECEIVED. INCLUDING INTERFERENCE
THAT MAY CAUSE UNDESIRED OPERATION.

Note The manufacturer ls not responslble forany radlo chy
lnterference caused by unauthonsed motltflcatlons to thls
eouloment. such modrtlcattons could Votd the users
authorlty to operate the eoulpment

CE

BUSmady ArBUS and AVBUS Ready are

reglstercd trademarks of
Lolsurcchh Electronlcs Pty Ltd Australla

The Cambrldge Audto Incognlto LR1o Learnlng
Remote Control complles wlth the Electromagnetlc
Compatlplllty (BB/SSS/EEC) Dltectwe when used
accotdtng to thls user gulde.

Cambrldge Audto ls a member or the
Custom Electronlo Destgn &
Installatlon Assoclatlon

AP1orsz/1

0 Cambridge Audio

lncognlto ls a trademark of Cambrldge Attdlo Ltd. All rtgnts reserved

www.cambridge-aud o.com