Anatek pocket sequencer operating instructions

This is the 1 pages manual for anatek pocket sequencer operating instructions.
Read or download the pdf for free. If you want to contribute, please upload pdfs to audioservicemanuals.wetransfer.com.

Page: 1 / 1
anatek pocket sequencer operating instructions

Extracted text from anatek pocket sequencer operating instructions (Ocr-read)


Page 1

OPE RATING INSTRUCTIONS
HOW POCKET SEQUENCERT

Pocket Sequencer records all MIDI data including nonqmntd systemmfive a linear, tape recorder style format with a resolution of 96 parts per quarter note.
Each of its 16 tracks corresponds to one MJBIthannel. New pamcan be punchedhor uouslydv'erdubbed on to individual tracks and then quantized. A temporary edit
buffer assures that the Month does not overwrite the Ian until it is Accgpted". '

BASIC HOOKUP
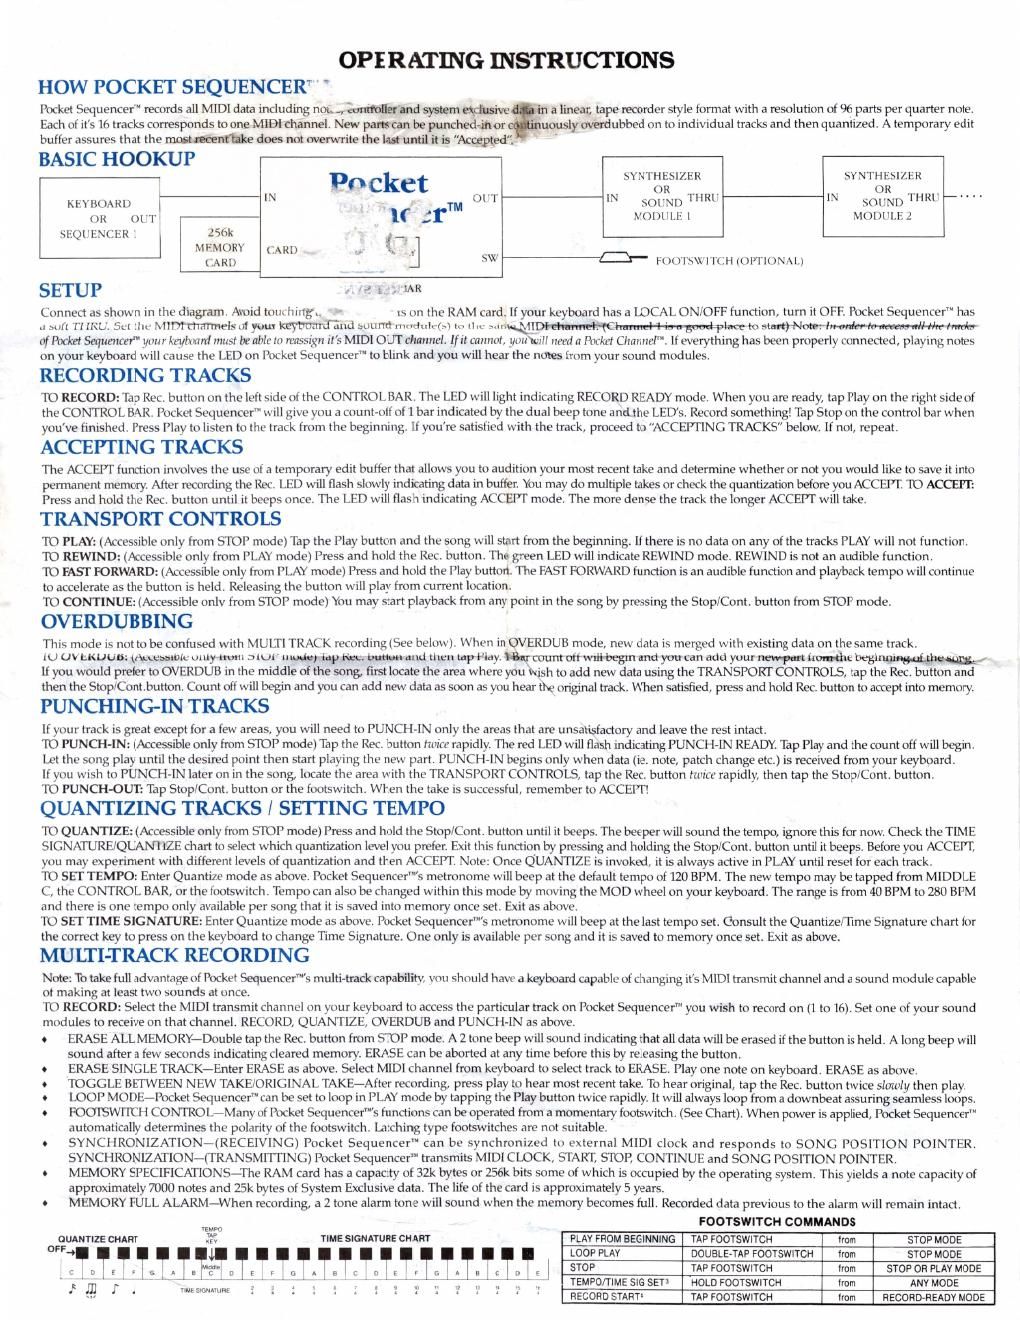
SYNTHESIZER SYNTHESIZER
!( .
PanCt 0R . . R ,L. . ..
KEYBOARD t-'-'- IN _. . TM OUT IN 50mg THRI IN SOUND THRL
()R 011 If :r M0u1'1.r:1 momma 2
SEQIIENCER I 156k QT
MEMORY CARD . v." . _
CARI) j SW E- H >o'rsw1'1cI-I (OPTIONAL)
SETUP . 1-! lg, iAR
Connect as Show n in the diagram. Avoid tout hllig.. " rs on the RAM card. If your keyboard has a LOCAL ON/OFF function, turn it OFF. Pocket Sequencer has

a sufl Tum; Sui [IIL Mimrtmmrelsot your keybmnTind sound "wank-(q to 4m A .r MIDWWW to srmwokmmmm
of Pocket Sequencer" wurlwylmrd mils! benblt to reassign it s MIDI OUT channel. If It cannot _I/i>u\vill need a POCALI Channel. If everything has been properly connected, playing notes
on your keyboard will Cause the LED on Pocket Sequencer to blink and you will hear the notes from your sound modules

RECORDING TRACKS

10 RECORD: Tap Rec. button on the left side of the CONTROL BAR. The LED will light indicating RECORD READY mode. When you are ready, tap Play on the right side of
the CONTROL BAR. Pocket Sequencer will give you a count-off of 1 bar indicated by the dual beep tone andthe LEDs. Record something! Tap Stop on the control bar when
youve finished. Press Play to listen to the track from the beginning. If you're satisfied with the track, proceed to ACCEPTING TRACKS" below. If not, repeat.

ACCEPTING TRACKS

The ACCEPT function involves the use of a temporary edit buffer that allows you to audition your most recent take and determine whether or not you would like to save it into
permanent memory. After recording the Rec. LED will flash slowly indicating data in buffer. You may do multiple takes or check the quantization before you ACCEPT. TO ACCEPT:
Press and hold the Rec. button until it beeps once. The LED will flash indicating ACCEPT mode. The more dense the track the longer ACCEPT will take.

TRANSPORT CONTROLS

TO PLAY: (Accessible only from S'IOP mode) Tap the Play button and the song will start from the beginning. If there is no data on any of the tracks PLAY will not function.
TO REWIND: (Accessible only from PLAY mode) Press and hold the Rec. button. The green LED will Indicate REWIND model REWIND is not an audible function.

TD FAST FORWARD: (Accessible only from PLAY mode) Press and hold the Play IMHO. The FAST FORWARD function is an audible function and playback tempo will continue
to accelerate as the button is held Releasrng the button will play from current location

TO CONTINUE: (Accessible onlv from STOP mode) You may start playback from any point in the song by pressing the Stop/Cont. button from STOP mode.

OVERDUBBING

This mode is not to be confused with MULTI TRACK recording (See below) When in OVERDUB made, new data 1s merged with existing data on the same track.

to uv EKUUIS: (Assessmls only-horn an» W M button and their rapt-day urconmoft wrlinbegrn and you can add your rim trouthe beginnw/
If you would prefer to OVERDUB' In the middle of the song, first locate the area where you wish to add new data using the TRANSPORT CONTROLS tap the Rec button and
then the Stop/Cont. button. Count off will begin and you can add new data as soon as you hear the original track. When satisfied, press and hold Rec. button to accept into memory.

PUNCHING-IN TRACKS

If your track is great except for a few areas, you will need to PUNCH-IN only the areas that are unsatisfactory and leave the rest intact.

TO PUNCH-IN: (Accessible only from STOP mode) Tap the Rec. button twice rapidly. The red LED will flash indicating PUNCH-IN READY. Tap Play and the count off will begin.
Let the song play until the desired point then start playing the new part. PUNCH-IN begins only when data (ie. note, patch change etc.) is received from your keyboard.

It you wish to PUNCH-IN later on in the song, locate the area with the TRANSPORT CONTROLS, tap the Rec. button twice rapidly, then tap the Stop/Cont. button.

TO PUNCH-OUT: Tap Stop/Cont. button or the footswitch. When the take is successful, remember to ACCEPT!

QUANTIZING TRACKS / SETTING TEMPO

TO QUANTIZE: (Accessible only from STOP mode) Press and hold the Stop/Cont. button until it beeps, The beeper will sound the tempo, ignore this for now. Check the TIME
SIGNATURE/QUANI 12E chart to select which quantization level you prefer. Exit this function by pressing and holding the Stop/Cont. button until it beeps. Before you ACCEPT,
you may experiment with different levels of quantization and then ACCEPT. Note: Once QUANTIZE is invoked, it is always active in PLAY until reset for each track.

TO SET TEMPO: Enter Quantize mode as above. Pocket Sequencerm's metronome will beep at the default tempo of 120 BPM. The new tempo may be tapped from MIDDLE
C, the CONTROL BAR, or the footswitch. Tempo can also be changed within this mode by moving the MOD wheel on your keyboard. The range is from 40 BPM to 280 BPM
and there is one tempo only available per song that it is saved into memory once set. Exit as above.

TO SET TIME SIGNATURE: Enter Quantize mode as above. Pocket SequencerWs metronome will beep at the last tempo set. Consult the QuantizelTIme Signature chart for
the correct key to press on the keyboard to change Time Signature. One only is available per song and it is saved to memory once set. Exit as above.

MULTI-T RACK RECORDING

Note: To take full advantage of Pocket Sequencerw's multi-track capability, V011 should have a keyboard capable of changing its MIDI transmit channel and a sound module capable

ot making at least two sounds at once.

TO RECORD: Select the MIDI transmit channel on your keyboard to access the particular track on Pocket Sequencer you wish to record on (I to 16). Set one of your sound

modules to receive on that channel. RECORD, QUANTIZE, OVERDUE and PUNCH-IN as above.

r ERASE ALL MEMORY-Double mp the Rec. button from STOP mode. A 2 tone beep will sound indicating that all data Will be erased if the button is held. A long beep will

sound after a few seconds indicating cleared memory. ERASE can be aborted at any time before this by releasing the button.

ERASE SINGLE TRACK-Enter ERASE as above. Select MIDI channel from keyboard to select track to ERASE. Play one note on keyboard. ERASE as above

TOGGLE BETWEEN NEW TAKE/ORIGINAL TAKEwAfter recording, press play to hear most recent take. To hear original, tap the Rec. button twice slowly then play

LOOP MODE Pocket Sequencer" can be set to loop' 1n PLAY mode by tapping the Play button twice rapidly. It will always loop from a downbeat assuring seamless loops

FOOISWTICH CONTRO L~Many of Pocket Sequencers functions can be operated from a momentary footswitch (See Chart) When power is applied, Pocket Sequencer

automatically determines the polarity of the footswitch. latching typc footswitchcs are not suitable.

6 SYNCHRONIZATION-(RECEIVING) Pocket Sequencer can be synchronized to external MIDI clock and responds to SONG POSITION POINTER.
SYNCHRONlZATIONfltTRANSMITTlNG) Pocket Sequencer transmits MIDI CLOCK, START. STOP, CONTINUE and SONG POSITION POINTER.

s MEMORY SPECIFICATIONS-The RAM card has a capacity of 32k bytes or 56k bits some of which is occupied by the operating system. This yields a note capacity of
approximately 7000 notes and 25k bytes of System Exclusive data. The life of the card is approximately 5 years.

t MEMORY FULL ALARM7When recording, a 2 tone alarm tone will sound when the memory becomes full. Recorded data previous to the alarm will remain intact.

~90.

FOOTSWITCH COMMANDS
ouAuan mum TIME SIGNATURE CRAFT PLAY FROM BEGINNING TAP roorswncn from STOP MODE
I I I I m; LOOP PLAY DOUBLE-TAP FOOTSWlTCH from STOP MODE
3 c n E K G 1 B c D E STOP TAP FDOTSWITCH from STOP on PLAY MODE
I , , . as , .. .. q u ,. TEMPO/TIME SIG sen HOLD Foorswnca (mm ANY MODE
. : . 4 1 ' ' RECORD START TAP FDOTSWITCH "om RECORD-READY MODE